Berechtigungen: Benutzer mit Rollen, die die Berechtigung Reality-Daten anzeigen einschließen, können 360-Videos im Explorer verwalten; mit Reality-Daten hochladen können sie 360-Videos in ein Projekt importieren und in einem Projekt löschen.
Wählen 360 Edition Explorer auf der vertikalen Explorer Toolbar on the left-hand side of the screen.

INHALTSVERZEICHNIS
- 360-Inhaltsstatus verstehen
- 360-Aufnahmen navigieren
- Daten anzeigen, erkunden und kontextualisieren
- Gaussian Splatting
- In 360 Edition Explorer verfügbare Aktionen
- Suchen und Filtern im 360 Edition Explorer
- 360-Videos importieren
- Integration mit Data Tab und Resource Explorer
- Berechtigungen für 360-Inhalte verwalten
- Fehlerbehebung bei häufigen Problemen
- Best Practices für die Nutzung von 360 Edition Explorer
- Brauchen Sie Hilfe?
360-Video importieren
Zwei Optionen zum Importieren von 360-Videodaten.
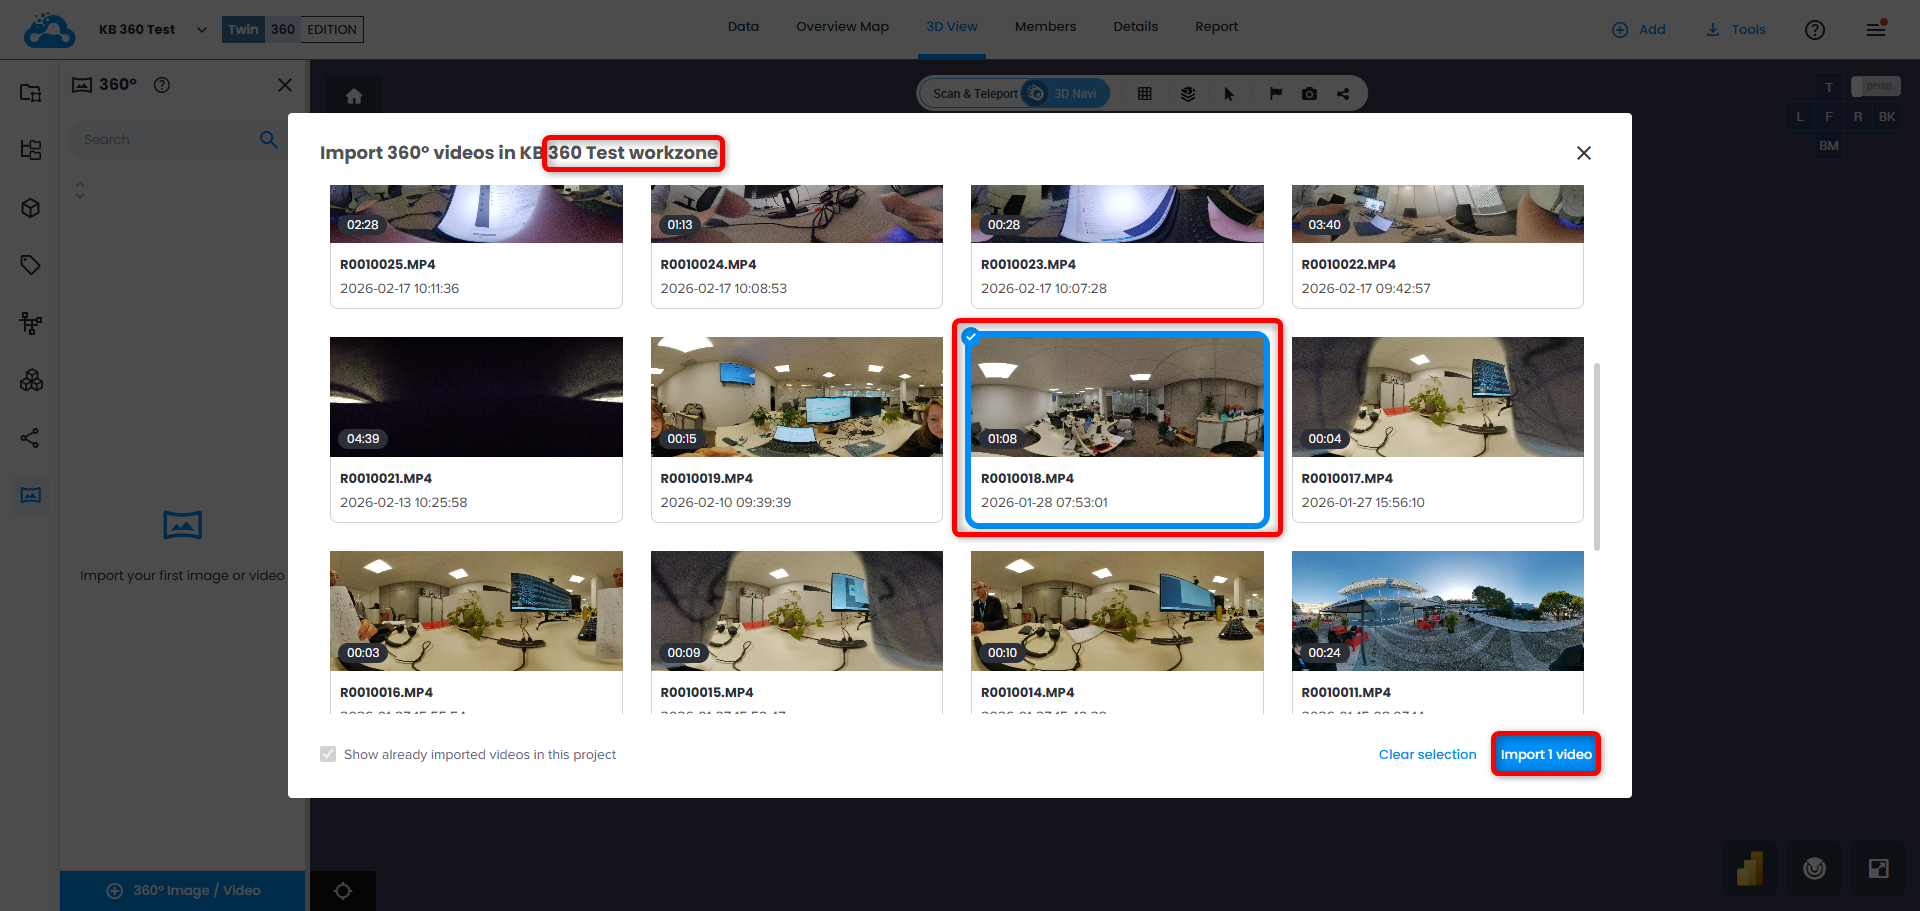
Oben im Fenster wird der Arbeitsbereich angezeigt, in dem der Import stattfindet.
Wählen Sie ein oder mehrere Videos zum Importieren aus und klicken Sie Import X video(s).
Hinweis: hier werden alle Videos, die von allen Kameras mit einem Abonnement verknüpft sind visualisiert, sobald sie verarbeitet wurden.
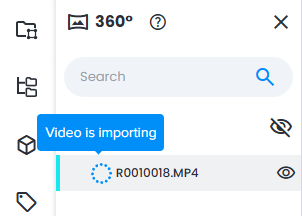
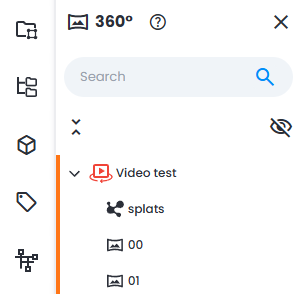
Video(s) werden im 360 Edition Explorer mit dem entsprechenden Status Video wird importiert und einem Symbol angezeigt.
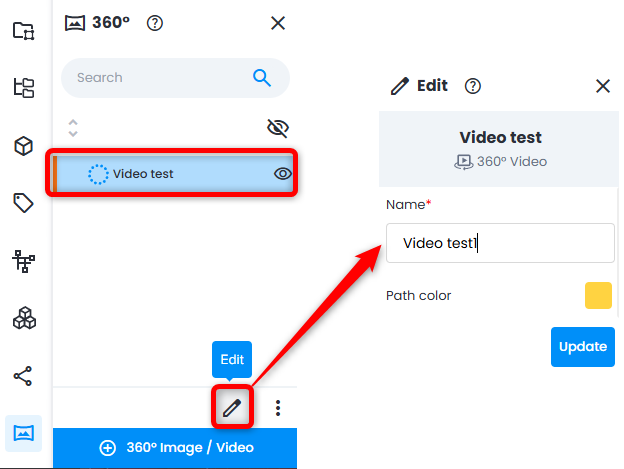
Bereits zu diesem Zeitpunkt ist es möglich, Name und Pfadfarbe zu ändern, indem Sie auf das ladende Video und im unteren Bedienfeld auf Bearbeiten klicken. Klicken Sie auf Aktualisieren , um Änderungen zu speichern.
Sobald das Video in das Projekt geladen wurde, wird eine E-Mail-Benachrichtigung gesendet.
An diesem Punkt wird die gesamte Struktur eines 360-Videos in das Projekt heruntergeladen.
Ein 360°-Video besteht aus der Videodatei selbst, die nicht vollständig abgespielt werden kann. In einem erweiterbaren Baum unter jedem Video befinden sich ein entsprechender, von Cintoo erzeugter Gaussian Splat sowie Videoframes (360 Bilder). Jedes Element hat sein entsprechendes Symbol.
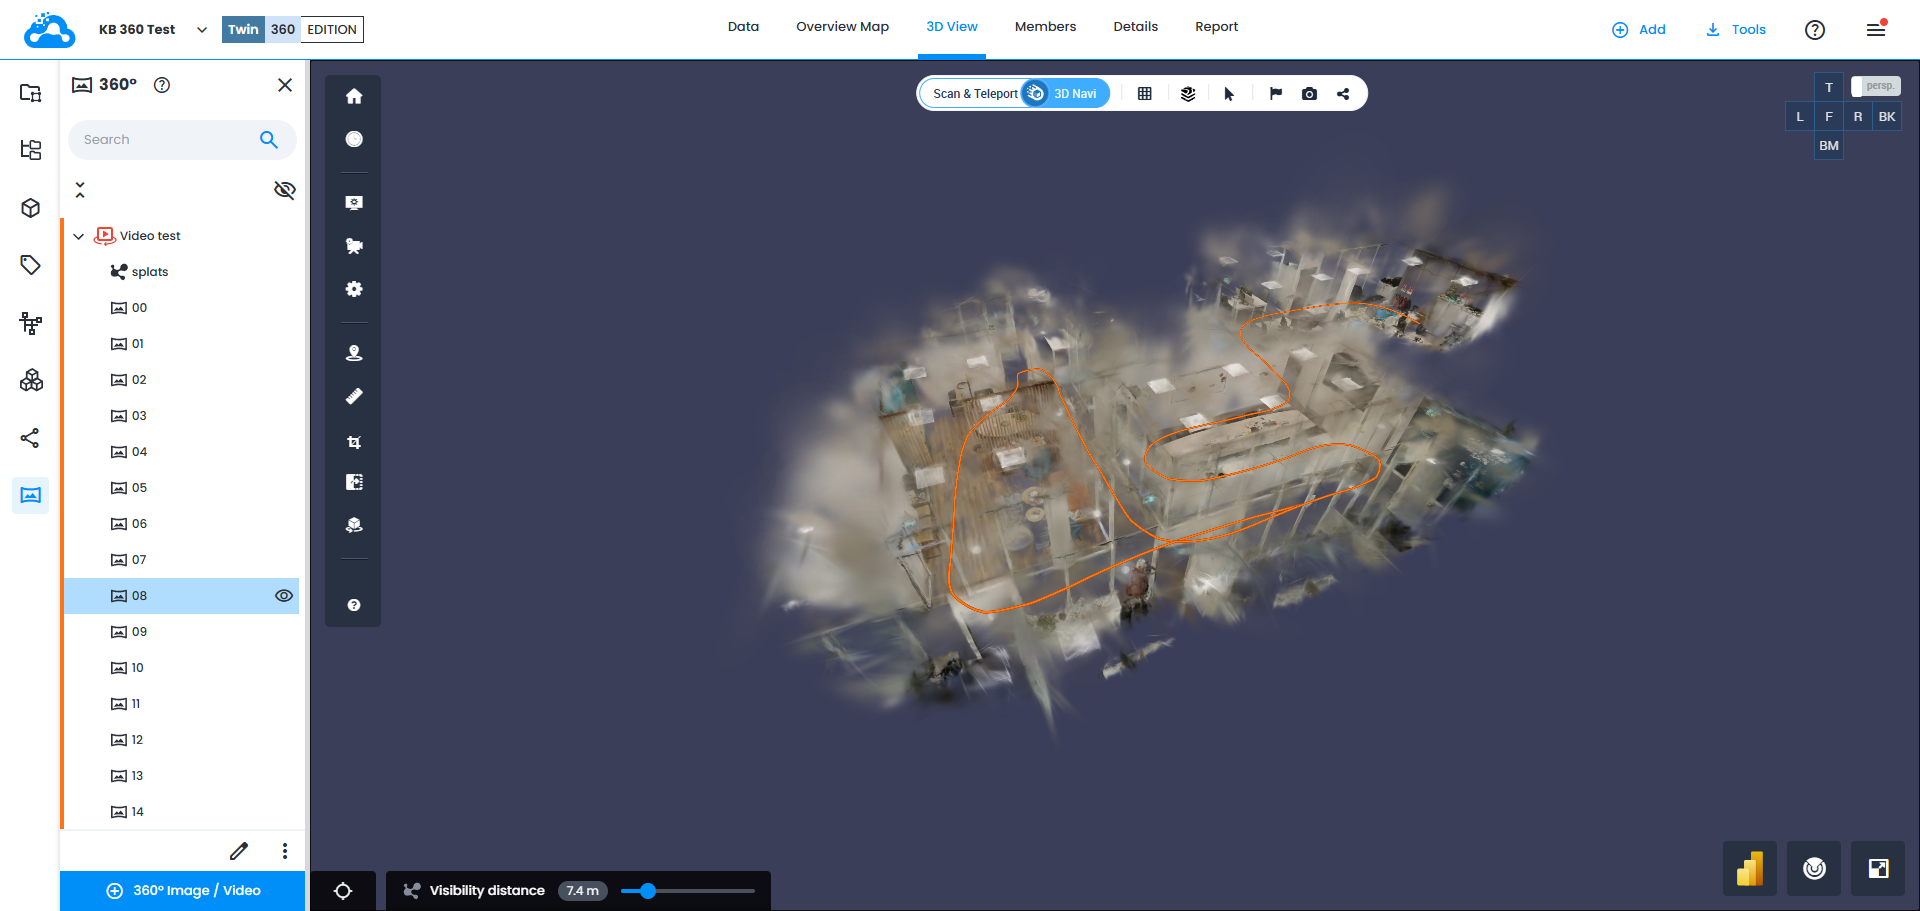
Das importierte Ergebnis in der 3D-Ansicht sieht wie folgt aus – farbiger Pfad, Gaußscher Splat darum herum und die Möglichkeit, durch Klicken auf verschiedene Teile des Pfads zu einzelnen Videobildern (360-Bilder) zu navigieren.
Statusbenachrichtigungen
- Sie erhalten eine E-Mail-Benachrichtigung, wenn die Verarbeitung abgeschlossen ist
- Eine fehlgeschlagene Verarbeitung löst eine Fehlerbenachrichtigung aus
- Die Verarbeitungszeiten variieren je nach Videolänge
360-Aufnahmen navigieren
360-Inhalte im 3D-Viewer anzeigen
Methode 1: Doppelklick
- Suchen Sie im 360 Edition Explorer das 360-Video oder -Bild, das Sie anzeigen möchten
- Doppelklicken Sie auf das Element
- Der 3D-Viewer wechselt automatisch in den Scan-Modus
- Die Kamera bewegt sich zur Aufnahmeposition
- Die 360°-Panoramaansicht öffnet sich
Methode 2: Kontextmenü per Rechtsklick
- Klicken Sie im 360 Edition Explorer mit der rechten Maustaste auf ein 360-Element
- Wählen Sie im Kontextmenü „Fokus im Scan-Modus“ aus
- Der Viewer navigiert zu den 360-Inhalten
[ BILDER PLATZHALTER: Screenshot zeigt Doppelklick-Aktion und resultierende Panoramaansicht]
Quellenhinweis: Navigationsinteraktionen sind auf der Confluence-Seite dokumentiert, die SCAN-221 (Viewer-Interaktionen für 360-Bilder) referenziert: „Ein Doppelklick auf ein Frame im 360 Explorer schaltet den Viewer in den Scan-Modus, bewegt die Kamera zur Frame-Position und aktiviert die 2D-Panoramaansicht.“ Fokus im Scan-Modus ist als Standardaktion im Kontextmenü aufgeführt.
Entlang von Videopfaden navigieren
360-Videos werden im Viewer als 3D-Pfade visualisiert und stellen die Trajektorie der Aufnahme dar.
Pfadvisualisierung:
- Jedes Video erscheint als farbige Linie, die die Aufnahmeroute zeigt
- Die Pfadfarbe wird automatisch zugewiesen (und kann angepasst werden)
- Pfade sind standardmäßig sichtbar, wenn das übergeordnete Element
Navigation entlang des Pfads:
- Über den Pfad bewegen – Eine Vorschau des nächstgelegenen Frames wird angezeigt
- An eine beliebige Stelle auf den Pfad klicken – Der Viewer springt zur nächstgelegenen Aufnahmeposition und öffnet die 360-Ansicht
- Entlang des Pfads bewegen – Klicken Sie nacheinander auf Punkte, um chronologisch durch die Aufnahme zu navigieren
[ BILDER PLATZHALTER: 3D-Viewer zeigt einen Videopfad mit Hover-Vorschau]
Quellenhinweis: Pfadvisualisierung und Navigation sind auf der Confluence-Seite dokumentiert, die SCAN-129 (360-Videos und Viewer-Interaktionen) referenziert: „Jedes verarbeitete 360-Video wird als 3D-Pfad dargestellt. Beim Überfahren des Pfads wird eine Vorschau des nächstgelegenen Frames angezeigt. Ein Klick an eine beliebige Stelle auf den Pfad navigiert zur nächstgelegenen Aufnahmeposition.“ Die Sichtbarkeit des Pfads ist an den Status „Ready“ gekoppelt.
Pfadfarbindikatoren
Pfadfarben helfen, zwischen verschiedenen 360-Videos zu unterscheiden:
- Jedem Video wird automatisch eine eindeutige Farbe zugewiesen
- Farben können über die Eigenschaften des Videos angepasst werden
- Ausgeblendete Videos zeigen ihre Pfade nicht an
Warum Pfadfarben wichtig sind:
- Schnell erkennen, welches Video zu welchem Bereich gehört
- Überlappende Aufnahmen unterscheiden
- Visuelle Informationen in dichten Umgebungen organisieren
[ BILDER PLATZHALTER: Beispiel mehrerer farbiger Pfade in einer einzelnen Work Zone]
Source Note: Path color functionality mentioned in CSU-479 ticket under "UI & Interaction Details - Change of path color." Konkrete Verfahren zur Farbzuweisung und -anpassung sind in den abgerufenen Quellen nicht dokumentiert.
Frame-Navigation
Auf einzelne Frames kann zugegriffen werden über:
- Den 360 Edition Explorer (Video erweitern, um Frames zu sehen)
- Den 3D-Pfad (entlang des Pfads klicken)
- Sequentielle Navigation (Pfeiltasten oder Steuerelemente auf dem Bildschirm verwenden)
Frame-Interaktionen:
- Fokus – Den 3D-Viewer auf einen bestimmten Frame zentrieren
- Isolieren – Alle anderen Inhalte ausblenden und auf einen einzelnen Frame fokussieren
- Ansehen – Die Kamera drehen, um den Frame anzusehen, ohne die Position zu ändern
- Gehen zu – Die Kamera zur Aufnahmeposition des Frames bewegen
[ BILDER PLATZHALTER: Screenshot zeigt die erweiterte Frame-Liste unter einem Video im 360 Edition Explorer]
Quellenhinweis: Aktionen auf Frame-Ebene sind auf der Confluence-Seite dokumentiert, die SCAN-221 referenziert: „Kontextmenü-Aktionen für 360-Bilder/Frames umfassen Fokus im Scan-Modus (Standard), Isolieren, Ansehen, Gehen zu, Anzeigen/Ausblenden.“ Eine erweiterbare Videostruktur mit einzelnen Frames wird in CSU-479 erwähnt.
Daten anzeigen, erkunden und kontextualisieren
Anzeigemodi
Panoramaansicht (Standard):
- Vollständige 360°-Kugelansicht
- Klicken und ziehen, um sich umzusehen
- Scrollen, um hinein- und herauszuzoomen
Integrierte 3D-Ansicht:
- 360-Inhalte werden im räumlichen Kontext neben Scans und Modellen angezeigt
- Navigieren Sie in der 3D-Umgebung bei sichtbaren 360-Pfaden
- Nahtlos zwischen 360 und standardmäßiger 3D-Navigation wechseln
[ BILDER PLATZHALTER: Nebeneinander Vergleich zeigt korrekte vs. inkorrekte Aufnahmeszenarien]
Quellenhinweis: Anzeigemodi basieren auf den Anforderungen in CSU-479 für „Display modes“ und „Viewer interactions.“ Konkretes Verhalten von Panorama- und 3D-Ansicht folgt den Standardmustern des Cintoo-3D-Viewers, ähnlich denen im Referenzartikel zu Resource Explorer.
Viewer-Interaktionen
Beim Anzeigen von 360-Inhalten können Sie:
- Schwenken – Klicken und ziehen, um sich umzusehen
- Zoomen – Mausrad verwenden, um hinein-/herauszuzoomen
- Messen – Messtools auf 360-Bildmaterial verwenden
- Anmerkungen – Kommentare, Pins oder Markierungen zu bestimmten Ansichten hinzufügen
- Frames wechseln – Zu benachbarten Aufnahmepunkten navigieren
Tastenkürzel:
- Pfeiltasten: Zwischen Frames navigieren
- Esc: 360-Ansicht verlassen und zur standardmäßigen 3D-Navigation zurückkehren
- Leertaste: Automatische Frame-Abfolge abspielen/anhalten (falls verfügbar)
[ BILDER PLATZHALTER: Annotierter Screenshot zeigt Viewer-Steuerungen und Interaktionspunkte]
Quellenhinweis: Viewer-Interaktionen werden in CSU-479 unter „Mandatory Topics - Viewer interactions.“ erwähnt." Konkrete Tastenkürzel sowie Mess-/Annotierungsfunktionen sind in den abgerufenen Quellen nicht dokumentiert – basierend auf der Standardfunktionalität des Cintoo-3D-Viewers.
Erweiterbare Videos
Videos können im 360 Edition Explorer erweitert oder reduziert werden:
Reduzierte Ansicht (Standard):
- Zeigt den Videonamen, den Status und das Vorschaubild
- Schneller Zugriff auf primäre Aktionen
Erweiterte Ansicht:
- Zeigt alle einzelnen Frames innerhalb des Videos
- Zeigt Frame-Zeitstempel
- Ermöglicht die Navigation Frame für Frame
- Bietet Zugriff auf frame-spezifische Aktionen
Zum Erweitern/Reduzieren:
- Klicken Sie auf das Pfeilsymbol neben dem Videonamen
- Oder Rechtsklick und „Erweitern/Reduzieren“ auswählen
[ BILDER PLATZHALTER: Vorher/Nachher-Screenshot zeigt reduzierte vs. erweiterte Videoansicht]
Quellenhinweis: Erweiterbare Videos werden in CSU-479 unter „UI & Interaction Details - Expandable videos.“ erwähnt." Konkrete Mechanismen zum Erweitern/Reduzieren sind in den abgerufenen Quellen nicht dokumentiert – basierend auf Standardmustern für Baumstrukturen ähnlich wie bei Resource Explorer.
360-Daten mit anderen Projekt-Assets kontextualisieren
Die Stärke von 360 Edition Explorer liegt in der Kombination von 360-Bildmaterial mit anderen Daten:
Überlagerung mit Punktwolken:
- 360-Videos ausgerichtet mit Laserscandaten anzeigen
- Ausrichtungsgenauigkeit überprüfen
- Bereiche identifizieren, die nicht durch Scans abgedeckt sind
Integration mit 3D-Modellen:
- As-built-360-Bildmaterial mit Entwurfsmodellen vergleichen
- Abweichungen oder Installationsfortschritt identifizieren
- 360-Ansichten verwenden, um den Modellkontext zu verstehen
Kombinieren mit Tags:
- Ausrüstungs-Tags innerhalb von 360-Bildmaterial anzeigen
- Visuelle Referenzen für getaggte Assets erstellen
- Asset-Zustände mit 360-Fotos dokumentieren
[ BILDER PLATZHALTER: Screenshot zeigt einen 360°-Pfad, überlagert mit Punktwolke und Modell]
Quellenhinweis: Funktionen zur Kontextualisierung werden in CSU-479 als „Viewing, exploring, and contextualizing data.“ erwähnt." Die Integration mit Scans und Modellen entspricht dem allgemeinen Nutzenversprechen der 360 Edition aus dem Confluence-FAQ zu 360. Konkrete Integrationsverhalten sind nicht im Detail dokumentiert.
Gaussian Splatting
Was ist Gaussian Splatting?
Gaussian Splatting ist eine fortschrittliche 3D-Visualisierungstechnologie, die aus 360-Videodaten immersive, fotorealistische 3D-Darstellungen erzeugt. Sie erzeugt einen 3D-„Splat“ der erfassten Umgebung, sodass Sie sich mit realistischer Tiefe und Perspektive durch den Raum bewegen können.
Hauptmerkmale:
- Erstellt volumetrische 3D-Darstellungen (nicht nur flache Panoramen)
- Vermittelt ein Gefühl von Tiefe und räumlichem Verständnis
- Ermöglicht fließende Übergänge zwischen Aufnahmepunkten
- Verbessert den visuellen Kontext für Inspektionen und Reviews
Hinweis: Gaussian Splatting ist eine neue Technologie und kann Einschränkungen bei Performance, Datenvolumen und Hardwarekompatibilität haben.
[ BILDER PLATZHALTER: Vergleichsbild zeigt traditionelles 360°-Panorama vs. Gaussian-Splatting-Ansicht]
Quellenhinweis: Gaussian Splatting wird in CSU-479 ausdrücklich als obligatorisches Thema aufgeführt: „Must reference and align with the official explanation from the internal/external FAQ.“ Gaussian Splatting wird im Confluence-FAQ zu 360 beschrieben als „emerging 3D display technology used to visualize photogrammetry-based data, included in 360 Edition MVP, positioned as early-stage/experimental technology with known limitations on data volume, performance, and hardware constraints.“
Wie Gaussian Splatting in der 360 Edition funktioniert
Wenn ein 360-Video importiert und verarbeitet wird:
- Das Video wird automatisch analysiert
- Eine Gaussian-Splatting-Darstellung wird generiert (falls zutreffend)
- Der „Splat“ wird räumlich am Videopfad ausgerichtet
- Der Splat wird sichtbar, wenn das Video im 3D-Viewer angezeigt wird
Quellenhinweis: Der Workflow zur Generierung von Gaussian Splatting wurde aus der Beschreibung der MVP-Funktionen und der Verarbeitungspipeline im Confluence-FAQ zu 360 abgeleitet. Die konkrete technische Implementierung ist in den abgerufenen Quellen nicht dokumentiert.
Gaussian-Splatting-Inhalte anzeigen
- Gaussian Splatting ist automatisch integriert in den 3D-Viewer
- Es erscheint als volumetrische Ebene um den Videopfad herum
- Die Sichtbarkeit wird durch den Anzeigen-/Ausblenden-Status des übergeordneten Videos gesteuert
Performance-Aspekte:
- Große Gaussian Splats können die Performance auf Hardware mit geringer Leistung beeinträchtigen
- Die Renderqualität passt sich automatisch an die Systemfähigkeiten an
Quellenhinweis: Die Vererbung der Sichtbarkeit ist auf der Confluence-Seite dokumentiert, die SCAN-129 referenziert: „Das Ausblenden eines 360-Videos blendet dessen Pfad, alle Frames und Gaussian splatting aus.“ Performance-Einschränkungen werden im Confluence-FAQ zu 360 in Bezug auf den experimentellen Charakter von Gaussian Splatting erwähnt.
In 360 Edition Explorer verfügbare Aktionen
Aktionen auf Videoebene
Klicken Sie mit der rechten Maustaste auf ein Video oder verwenden Sie das Aktionsmenü (drei Punkte), um auf Folgendes zuzugreifen:
Information
- Videometadaten anzeigen (Upload-Datum, Dauer, Dateigröße, Verarbeitungsstatus)
- Übergeordnete Work Zone und Projekt anzeigen
- Ausrichtungsstatus anzeigen
Bearbeiten
- Videonamen ändern
- Beschreibung aktualisieren
- Pfadfarbe ändern
Herunterladen
- Die originale 360-Videodatei herunterladen
- Für externe Nutzung oder Archivierung exportieren
Teilen
- Einen teilbaren Link zu den 360-Inhalten generieren
Navigation und Anzeige
- Isolieren
- Ansehen
- Gehen zu
- Fokus in 3D
- ausblenden
Bewegen
- Das Video in eine andere Work Zone verschieben
- 360-Inhalte über Work Zones hinweg organisieren
Löschen
- Das Video dauerhaft aus dem Projekt entfernen
- Erfordert eine Bestätigung
- Kann nach einer 30-tägigen Wiederherstellungsfrist nicht rückgängig gemacht werden
[ BILDER PLATZHALTER: Screenshot zeigt das Kontextmenü per Rechtsklick mit allen Aktionen]
Quellenhinweis: Aktionen sind in CSU-479 unter „UI & Interaction Details - Actions available in 360 Explorer.“ aufgeführt." Konkrete Verhaltensweisen der Aktionen werden auf der Confluence-Seite zu Viewer-Interaktionen und im Referenzartikel zum P&ID Viewer referenziert, der ähnliche Aktionsmenü-Muster zeigt (Information, Bearbeiten, Löschen, Herunterladen, Teilen, Bewegen).
Aktionen auf Frame-Ebene
Einzelne Frames haben ähnliche Aktionen:
Navigation und Anzeige
- Fokus im Scan-Modus - direkt zur Position des Frames in der Panoramaansicht springen
- Isolieren - alle anderen Inhalte ausblenden und nur auf diesen Frame fokussieren
- Ansehen - den 3D-Viewer drehen, um den Frame anzusehen
- Gehen zu - die Kamera des 3D-Viewers zur Position des Frames bewegen
- Anzeigen / Ausblenden - Sichtbarkeit des Frames umschalten - Was ist das Ergebnis?
[ BILDER PLATZHALTER: Screenshot zeigt frame-spezifische Aktionen]
Verwaltung des Interaktionsstatus
Vererbung der Sichtbarkeit:
- Das Ausblenden eines 360-Videos blendet Folgendes aus:
- Seinen Pfad
- Alle Frames
- Gaussian splatting
Pending- oder Failed-Videos:
- Viewer-Interaktionen sind deaktiviert
- Es sind nur Nicht-Viewer-Aktionen (Info, Bearbeiten) verfügbar
Ausgeblendete Frames:
- Werden bei der Pfadnavigation übersprungen
- Erscheinen nicht beim Überfahren oder Klicken entlang des Pfads
Quellenhinweis: Regeln zur Statusverwaltung sind auf der Confluence-Seite dokumentiert, die SCAN-123 (Pending- und Failed-Videos) und SCAN-129 (Vererbung der Sichtbarkeit) referenziert: „Visibility inheritance - Hiding a 360 video hides its path, all frames, and Gaussian splatting. Pending or Failed videos have viewer interactions disabled."
Sammelaktionen
Wählen Sie mehrere Videos mit Strg+Klick oder Umschalt+Klick aus:
- In Work Zone verschieben
- Mehrere Videos löschen
- Mehrere Videos ausblenden/anzeigen
Hinweis: Verknüpfungs- oder Ausrichtungsaktionen müssen für einzelne Videos durchgeführt werden.
Quellenhinweis: Die Funktion zur Sammelauswahl ist in den abgerufenen Quellen nicht ausdrücklich dokumentiert – basierend auf Standard-Mehrfachauswahlmustern von Cintoo ähnlich wie bei Resource Explorer.
Suchen und Filtern im 360 Edition Explorer
Suchfunktion
Verwenden Sie die Suchleiste oben im 360 Edition Explorer, um bestimmte Inhalte zu finden:
Einfache Suche:
- Geben Sie einen beliebigen Teil des Videonamens ein
- Die Suche ist teilweise und nicht groß-/kleinschreibungssensitiv
- Die Ergebnisse werden während der Eingabe aktualisiert
Erweiterte Suche mit Präfixen:
Suche nach ID:
- Präfix:
id: - Beispiel:
id:abc123-def456-ghi789 - Führt eine exakte Suche anhand der eindeutigen Kennung des Videos aus
Suche nach exaktem Label:
- Präfix:
label:" - Beispiel:
label:"Building A - First Floor" - Exakter Treffer mit Groß-/Kleinschreibung
- Verwenden Sie Anführungszeichen für Namen mit Leerzeichen
Suche nach Typ:
- Präfix:
type: - Unterstützte Keywords:
video,image,geoimage - Beispiel:
type:videozeigt nur 360-Videos (schließt 360-Bilder aus)
Sonderzeichen escapen:
- Wenn ein Videoname ein Anführungszeichen (") enthält, fügen Sie davor einen Backslash ein
- Beispiel:
Building\"Asucht nach einem Video mit dem NamenBuilding"A
[ BILDER PLATZHALTER: Screenshot zeigt die Suchleiste mit Beispielsuchen]
Quellenhinweis: Search functionality explicitly documented in CSU-479 under related tickets: "CSU-542 – Update: search in 360 Explorer." Suchsyntax und Präfixmuster entsprechen dem Referenzartikel zu Resource Explorer, der identische Suchmöglichkeiten dokumentiert (Teilsuche, Präfix id:, Präfix label:", Präfix type:, Escape-Zeichen).
360-Videos importieren
Importmethoden
Methode 1: Über 360 Edition Explorer
- Öffnen Sie den 360 Edition Explorer
- Klicken Sie unten im Panel auf die Schaltfläche Import
- Wählen Sie Videos aus Ihrem verknüpften Ricoh360-Konto aus
- Wählen Sie die Ziel-Work Zone aus
- Klicken Sie auf Import
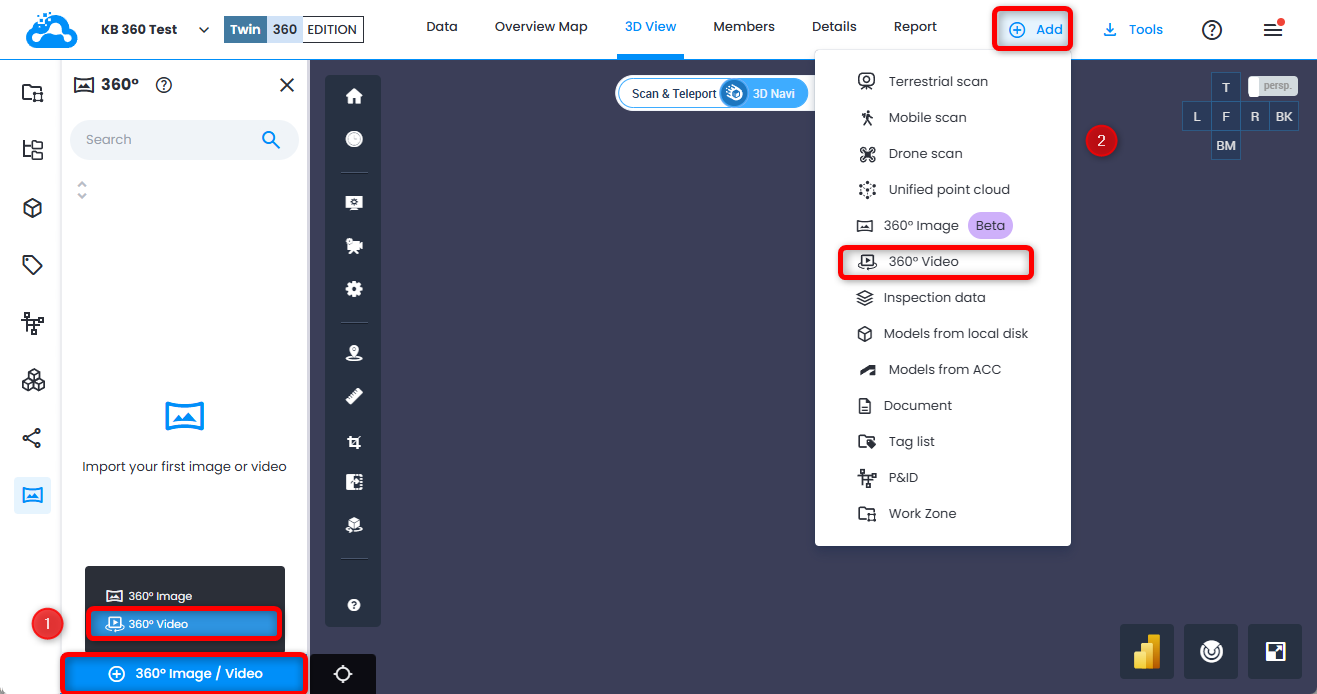
Methode 2: Über das Add-Menü
- Klicken Sie in der oberen Symbolleiste auf die Schaltfläche Add
- Wählen Sie „Import 360 Videos“ aus
- Der 360 Edition Explorer öffnet sich automatisch mit dem Importdialog
[ BILDER PLATZHALTER: Screenshot zeigt beide Importmethoden]
Quellenhinweis: Importmethoden werden in der Einleitung von CSU-479 und im Jira-Ticket CSU-487 „Create: Import 360 videos“ referenziert, das den Import-Workflow dokumentiert. Die Add-Menü-Option wird in CSU-479 und in Präsentation [1] erwähnt, die sagt: „Start using 360 Edition: Import videos into your projects via the 360 Explorer.“
Importvorgang
- Videos auswählen – Wählen Sie ein oder mehrere Videos aus der Liste der verfügbaren Uploads aus
- Work Zone zuweisen – Wählen Sie die Work Zone aus, in die Videos importiert werden
- Import bestätigen – Klicken Sie auf „Import“, um die Verarbeitung zu starten
- Verarbeitung beginnt – Videos erscheinen im 360 Edition Explorer mit dem Status „Pending“
- Benachrichtigung – Sie erhalten eine E-Mail, wenn die Verarbeitung abgeschlossen ist
Importbeschränkungen:
- Maximale Dateigröße: 5 GB pro Video
- Verarbeitungszeit: 15 Minuten bis 2 Stunden, abhängig von der Videolänge
- Videos werden automatisch mit der Kamera verknüpft, die sie aufgenommen hat
Quellenhinweis: Import-Workflow aus CSU-487 und dem Confluence-FAQ zu 360. Dateigrößenlimit (5 GB) ist im Confluence-FAQ und in CSU-533 dokumentiert. Video-Upload zu Ricoh360 Cloud ist in Präsentation [1] dokumentiert: „The ThetaX will upload automatically all the new captures once connected to the internet.“
Integration mit Data Tab und Resource Explorer
360-Inhalte in Data Tab anzeigen
360-Videos sind auch über den Data Tab zugänglich:
- Navigieren Sie zu Data → Work Zones → [Ihre Work Zone]
- 360-Videos erscheinen neben anderen Ressourcen (Scans, Modelle usw.)
- Bietet eine alternative Ansicht für projektweite Datenverwaltung
Weitere Informationen zu Data Tab finden Sie hier:
Data Tab-Hilfeartikel
Quellenhinweis: Die Integration von Data Tab wird in CSU-479 ausdrücklich erwähnt: „Videos and content visible in the Data Tab. Verweisen Sie auf den bestehenden Help-Center-Artikel. Etwaige sich überschneidende Erklärungen sollten in den jeweiligen Artikeln stehen und nicht hier erneut geschrieben werden."
360-Inhalte in Resource Explorer anzeigen
Der Resource Explorer bietet eine einheitliche Ansicht aller Projektressourcen:
- Öffnen Sie Resource Explorer über die vertikale Symbolleiste
- 360-Videos erscheinen im Ressourcenbaum
- Verwenden Sie Such- und Filteroptionen, um bestimmte Videos zu finden
Weitere Informationen zu Resource Explorer finden Sie hier:
Resource Explorer-Hilfeartikel
Quellenhinweis: Die Integration von Resource Explorer wird in CSU-479 ausdrücklich erwähnt: „Videos and content visible in Resource Explorer." Verweisen Sie auf den bestehenden Help-Center-Artikel. Etwaige sich überschneidende Erklärungen sollten in den jeweiligen Artikeln stehen und nicht hier erneut geschrieben werden."
[ BILDER PLATZHALTER: Geteilter Screenshot zeigt 360°-Inhalte sowohl in Data Tab als auch in Resource Explorer]
Berechtigungen für 360-Inhalte verwalten
Wer kann 360-Videos anzeigen?
- Alle Projektmitglieder können 360-Inhalte in Work Zones anzeigen, auf die sie Zugriff haben
- Berechtigungen werden von den Projekt- und Work-Zone-Einstellungen geerbt
Wer kann 360-Videos verwalten?
Aktionen, die erhöhte Berechtigungen erfordern:
- Import – Erfordert die Rolle Contributor oder Administrator
- Bearbeiten – Erfordert die Rolle Contributor oder Administrator
- Löschen – Erfordert die Rolle Administrator
- Bewegen – Erfordert die Rolle Administrator
So prüfen Sie Ihre Berechtigungen:
- Navigieren Sie zu Project Settings → Users
- Suchen Sie Ihren Namen in der Benutzerliste
- Sehen Sie sich Ihre zugewiesene Rolle an
[ BILDER PLATZHALTER: Screenshot zeigt Benutzerrollen und Berechtigungseinstellungen]
Quellenhinweis: Berechtigungen werden in CSU-479 über das zugehörige Ticket CSU-536 „Update: permissions 360“ erwähnt, das in Bearbeitung ist. Konkrete Berechtigungsstufen sind in den abgerufenen Quellen nicht dokumentiert – basierend auf dem Standard-Berechtigungsmodell von Cintoo.
Fehlerbehebung bei häufigen Problemen
Problem: Videos hängen im Status „Pending“ fest
Mögliche Ursachen:
- Die Verarbeitung läuft noch (kann bis zu 2 Stunden dauern)
- Die Server-Verarbeitungswarteschlange ist ausgelastet
Lösungen:
- Warten Sie und prüfen Sie später erneut
- Aktualisieren Sie den 360 Edition Explorer
- Wenn der Status länger als 4 Stunden auf Pending bleibt, kontaktieren Sie support@cintoo.com
Quellenhinweis: Das Verhalten des Pending-Status ist auf der Confluence-Seite dokumentiert, die SCAN-123 referenziert. Schätzungen zur Verarbeitungszeit sind nicht dokumentiert – basierend auf allgemeinen Systemerwartungen.
Problem: Status „Failed“ nach dem Import
Mögliche Ursachen:
- Beschädigte Videodatei
- Nicht unterstütztes Format oder Kameraeinstellungen
- Dateigröße überschreitet 5 GB
- Zeitüberschreitung bei der Verarbeitung
Lösungen:
- Klicken Sie auf „Information“, um Fehlerdetails anzuzeigen
- Versuchen Sie, zu löschen und erneut zu importieren
- Überprüfen Sie, ob das Originalvideo auf der Kamera korrekt abgespielt wird
- Kontaktieren Sie support@cintoo.com , wenn das Problem weiterhin besteht
Quellenhinweis: Aktionen für den Failed-Status aus der Confluence-Seite, die SCAN-123 referenziert: „Failed videos cannot be displayed in 3D viewer. Verfügbare Aktionen: Fehlerinformationen anzeigen, löschen, Import erneut versuchen." Dateigrößenlimit aus dem Confluence-FAQ zu 360.
Problem: Videopfad im 3D-Viewer nicht sichtbar
Mögliche Ursachen:
- Video ist ausgeblendet
- Viewer ist weit von der Pfadposition weg gezoomt
- Video wurde nicht ausgerichtet
Lösungen:
- Überprüfen Sie, ob das Video im 360 Edition Explorer auf „Show“ gesetzt ist
- Verwenden Sie die Aktion „Gehen zu“, um zum Videopfad zu navigieren
- Prüfen Sie, ob die Ausrichtung abgeschlossen wurde
Quellenhinweis: Die Sichtbarkeit des Pfads in Abhängigkeit vom Anzeigen-/Ausblenden-Status des Videos ist auf der Confluence-Seite dokumentiert, die SCAN-129 referenziert. Die Ausrichtungsanforderung wurde aus dem allgemeinen Workflow der 360 Edition abgeleitet (manuelle Ausrichtung erforderlich laut Confluence-FAQ zu 360).
Best Practices für die Nutzung von 360 Edition Explorer
Organisation
- Verwenden Sie aussagekräftige Namen – Benennen Sie Videos um, um den Bereich oder Zweck widerzuspiegeln (z. B. „Building A - Level 2 - North Wing“).
- Nach Work Zone organisieren – Gruppieren Sie verwandte Videos in derselben Work Zone
- Verwenden Sie konsistente Benennungskonventionen – Etablieren Sie ein Benennungsmuster in Ihrer Organisation
Performance
- Sichtbare Videos begrenzen – Blenden Sie derzeit nicht benötigte Videos aus, um die Viewer-Performance zu verbessern
- Nicht verwendete Explorer schließen – Lassen Sie nur notwendige Panels geöffnet
- Filter verwenden – Nach Status filtern, um Unordnung zu reduzieren
Quellenhinweis: Best Practices sind in den abgerufenen Quellen nicht dokumentiert – basierend auf allgemeinen Empfehlungen zum Projektmanagement in Cintoo und ähnlichen Mustern in Referenzartikeln.
Brauchen Sie Hilfe?
Bei Fragen zum 360 Edition Explorer und Support: support@cintoo.com
War dieser Artikel hilfreich?
Das ist großartig!
Vielen Dank für das Feedback
Leider konnten wir nicht helfen
Vielen Dank für das Feedback
Feedback gesendet
Wir wissen Ihre Bemühungen zu schätzen und werden versuchen, den Artikel zu korrigieren