This article describes the process of tag creation in Cintoo, as well as different actions that could be performed upon tags and tag lists in Cintoo project.
Permissions: users with roles including View Tags and P&IDs and Manage Tags permissions can create, edit, duplicate tags.
TABLE OF CONTENTS
- Create a Tag List
- Click&Tag
- Automatic AI Tag Detection
- Create a Tag from Model Element
- Duplicate a Tag
- Import a Tag List
Note: unlimited tagging capacity is available only with TWIN edition, while BIM edition users do not have access to this functionality.
Contact us via sales@cintoo.com to know more about the upgrade.
Learn more about editions BIM and TWIN.
Create a Tag List
1. Click on Add drop-down menu in the top right corner of the Cintoo interface and select Tag list.

Alternatively click Add at the bottom of Tag Explorer and choose Tag list to create a tag list in the selected work zone. 
Warning: it's strongly not recommended to create tag lists in the root work zone of the project. Tag lists belong with corresponding data or in a dedicated work zone for better data management.
4. Add Description, which can be regular text or a hyperlink.
5. Add custom Metadata (up to 50 custom fields). When naming tag metadata fields, avoid spaces in metadata field name, and avoid reserved keywords such as:
- id
- subId
- name
- boundingBox
- orientedBoundingBox
- model
- class
- cameraState
- unit
- functionalSystem
- description
- confidence
- scanUuids
- needValidation
- nature
- customFields
- metadata
6. Click Create to save tag list.
Click&Tag
Innovative semi-automated way of tag creation that allows selecting elements in 3D View in AI mode.
With this mode tagging objects in 3D View becomes smooth and requires less manual bounding box alignment work.
- Create a tag list.
- Make sure tag list is visible.

- Click Create tag on the bottom panel in Tag Explorer.

- In the opened on the right Create tag menu insert Id, being the name of the tag visible in Tag Explorer after saving. Description is optional. Make sure AI mode toggle is ON.

- VERY IMPORTANT Choose the scene so that the object tagged is fully visible. Like that the final tag result would include all the object and not only its part.
Note: it's recommended to use Surface display mode to ensure the best precision for bounding boxes placement.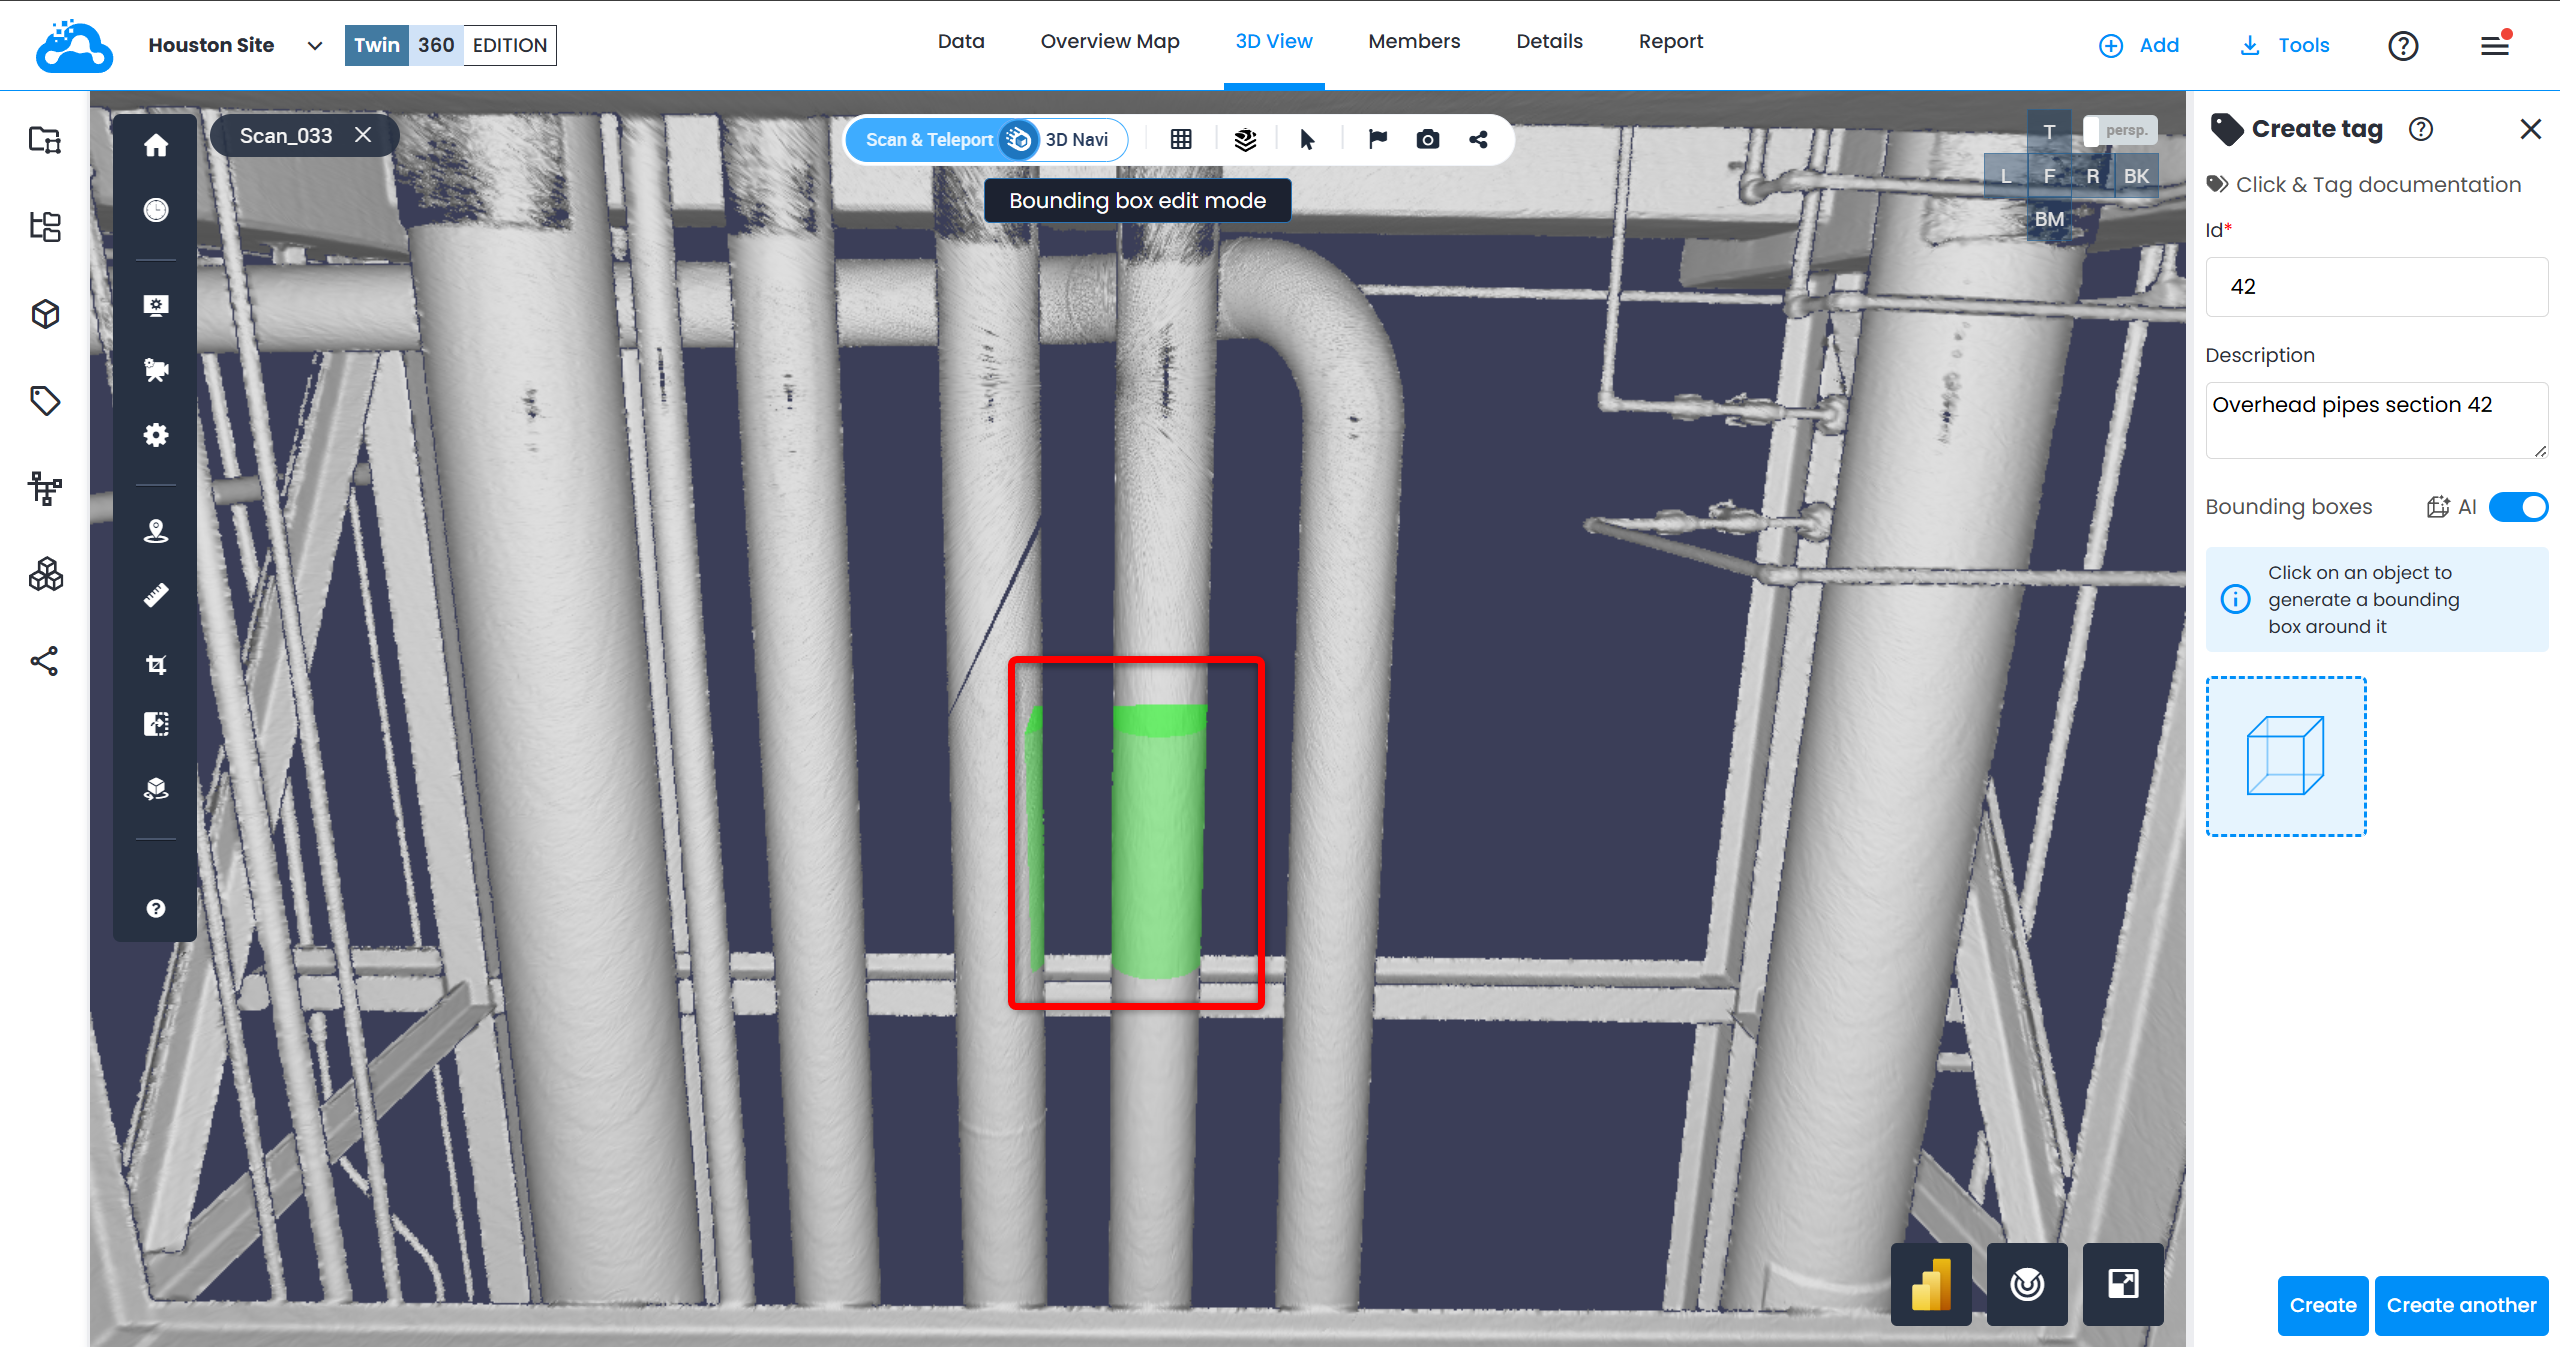
- Simply click on an object in 3D to generate a bounding box around it in 3D View and a dedicated bounding box indication in Create tag menu, that is used for control.
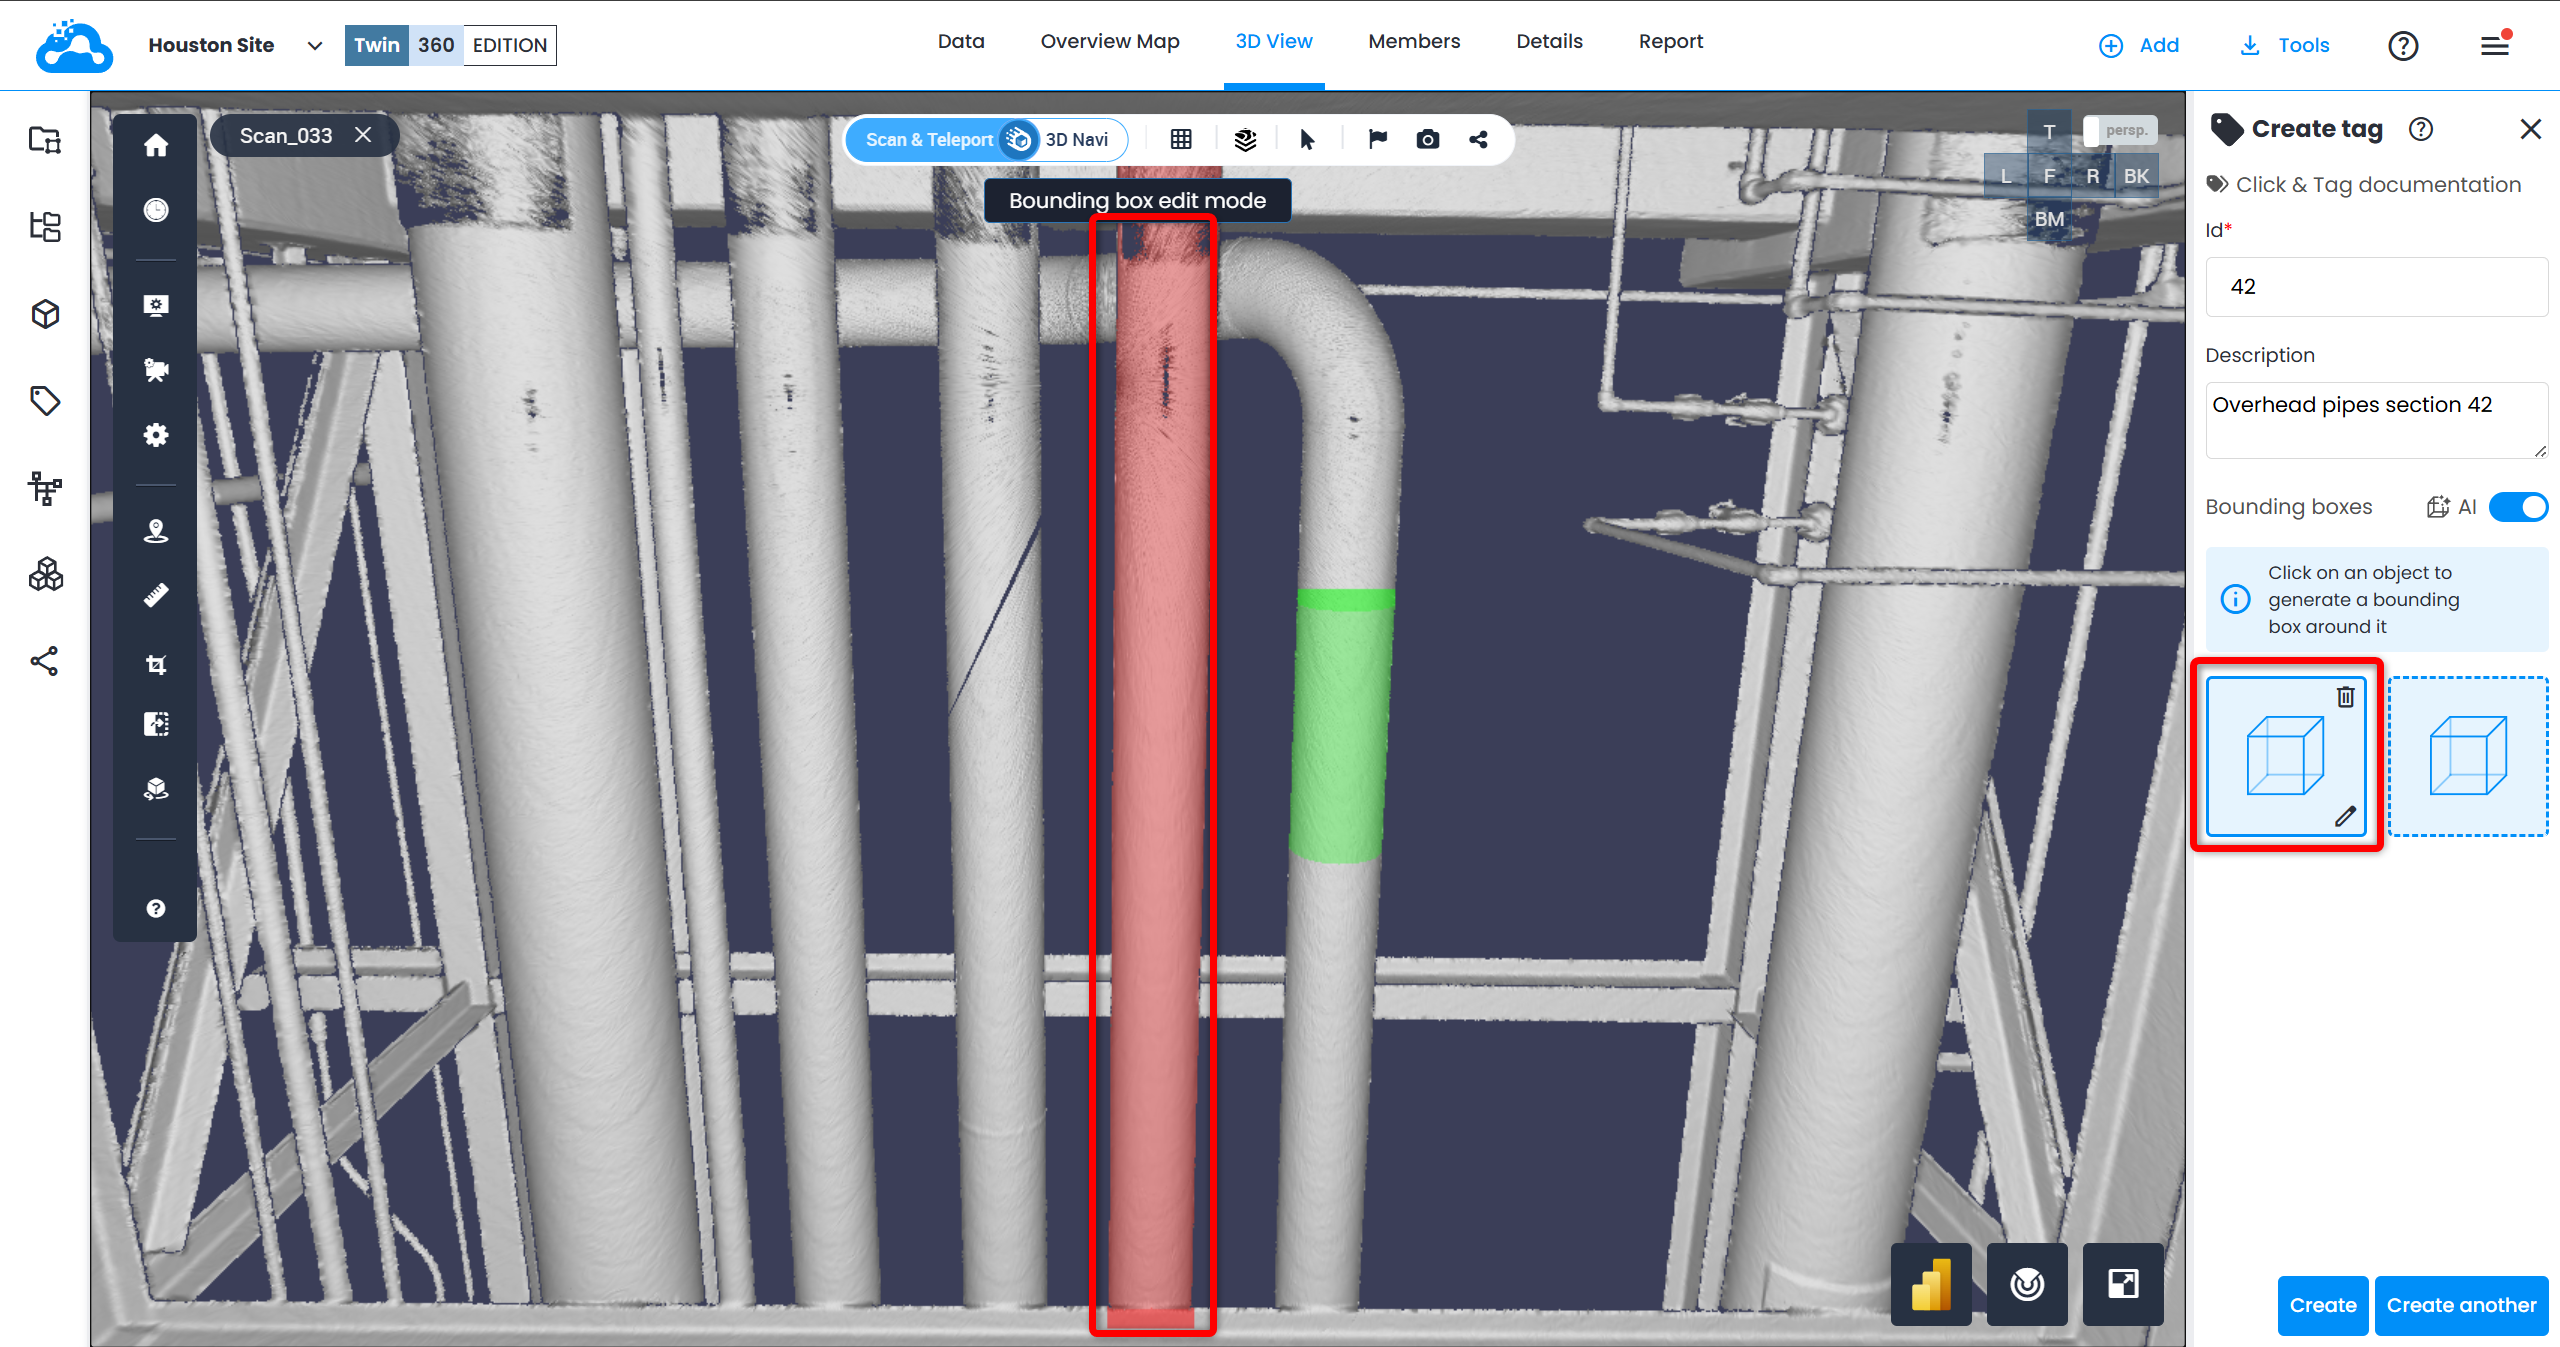
- Pass onto the next object to continue creating a complex tag. Already tagged sections of mesh could be distinguished by the red glow. This helps tagging the remaining parts of objects or remove and retag if needed.
Create a new tag by clicking Create another if objects must be separated.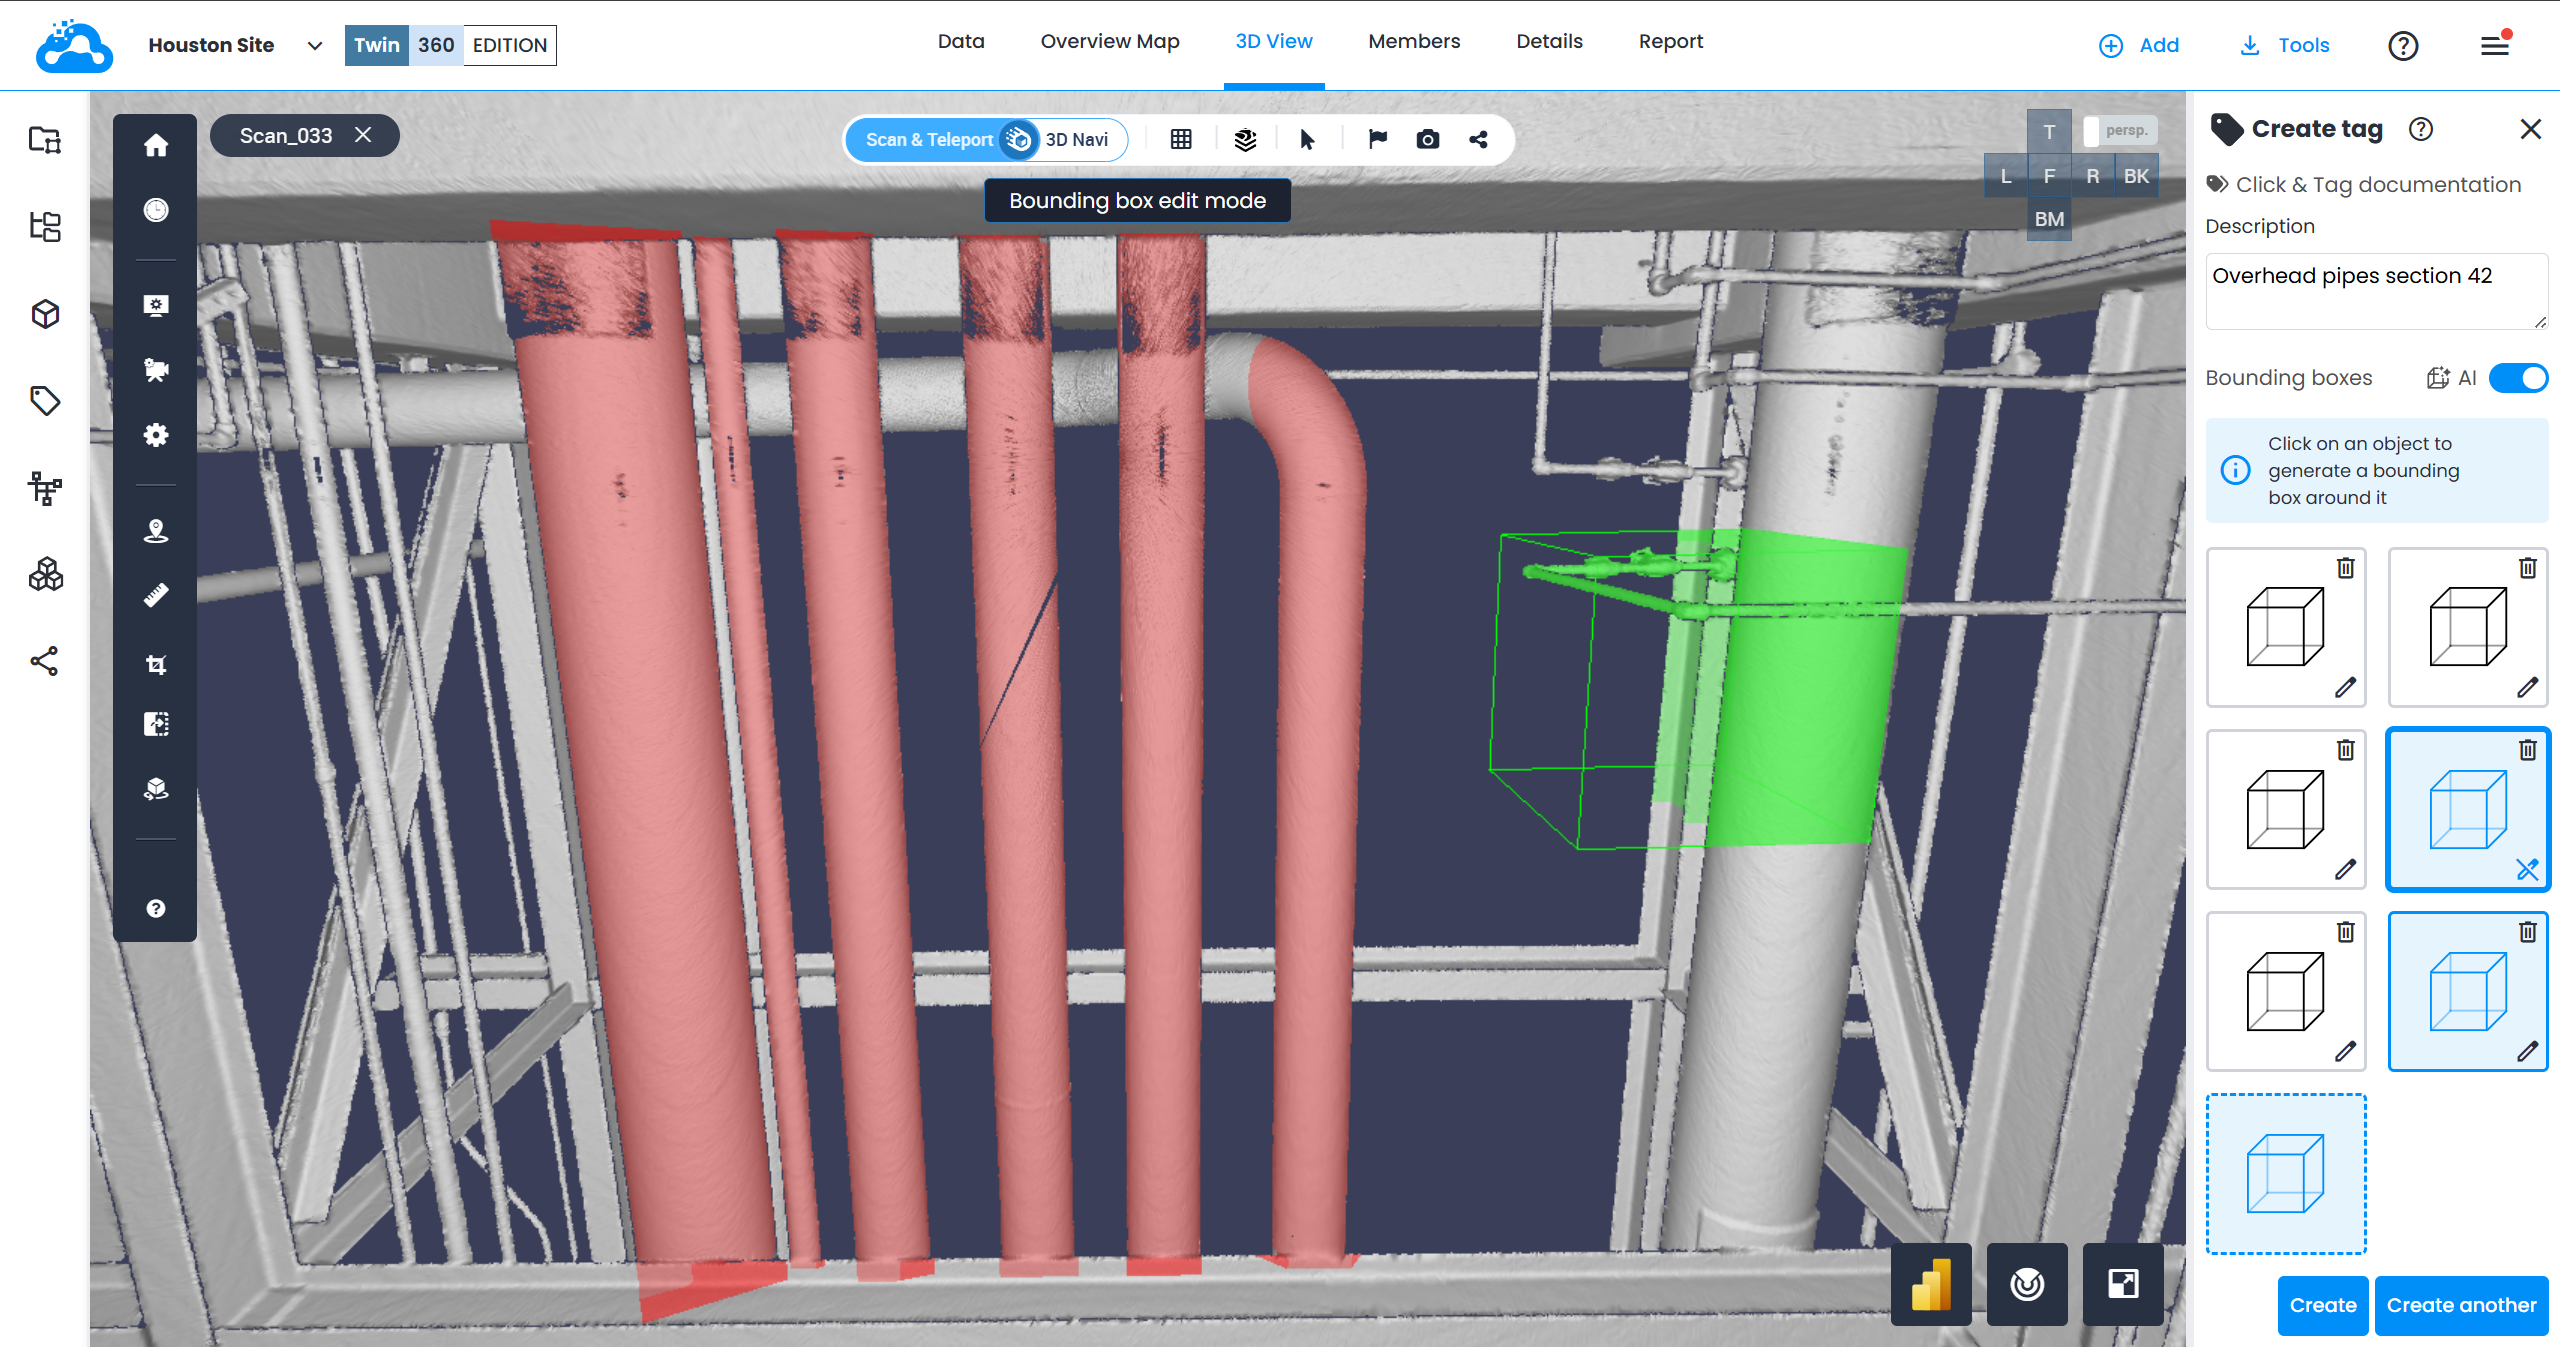
- Move around the environment, using different navigation modes (scan, teleport, 3D Navi) and different display modes (Surface (recommended), RGB, 2D panoramic) and continue tagging the equipment.

- Edit any bounding box at any time by clicking on Pen icon next to the bounding box on the menu on the right and adjust the gizmos in 3D View.

- Delete any bounding box at any time by clicking on Trash icon next to the bounding box on the right.

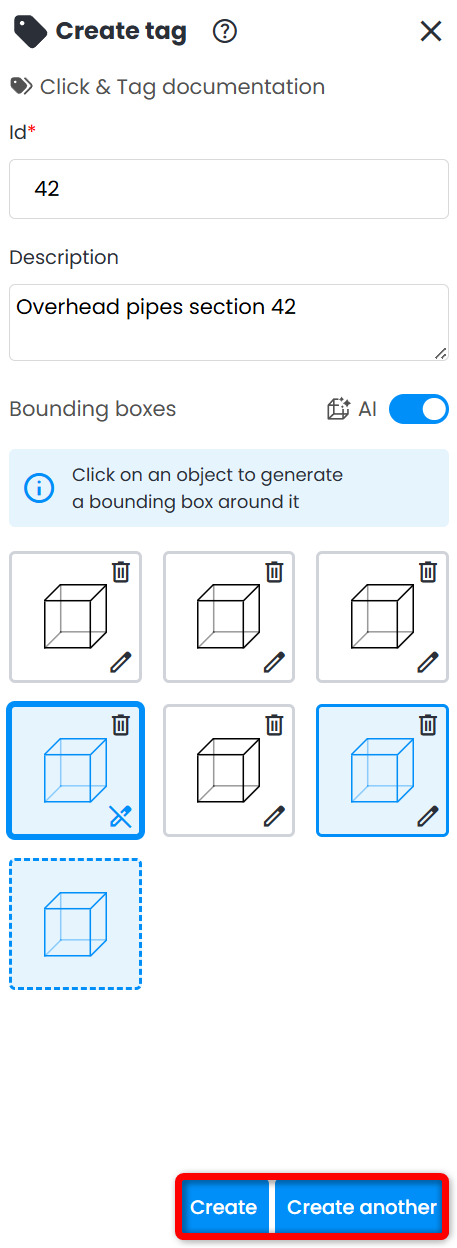
- Click Create to save the tag. Click Create another to set up another tag.
Automatic AI Tag Detection
Please find the description of the workflow and all corresponding information in Automatic AI tag detection.
Create a Tag from Model Element
Please find the description of the workflow in Tags from model elements.
Manual Tagging
Use bounding box tool to demarcate equipment in 3D View.
1. Go to 3D View, open Tag Explorer from the vertical tool bar.

2. In Tag Explorer, select a tag list by clicking on the name of the list.
If there are no tag lists displayed in Tag Explorer, see Create a Tag List section above and check if a work zone chosen is correct.
3. Click Show to toggle on tag list visibility. Clicking on Show will ensure display the tags for this list in 3D View, but it does not mean that this tag list is selected.
Both clicks (select Tag List + Show) are mandatory!

4. Before creating a tag, it is recommended to first set the viewpoint in 3D View to look at the element to be tagged. Both Scan & Teleport and 3D Navi modes are supported to capture default tag view.
5. With a tag list selected (highlighted in blue), click Create tag from the action bar at the bottom of Tag Explorer.
Note: same actions are also available from Data tab.

6. Create tag menu appears on the right side of the screen. Fill in ID and Description fields.

7. Disable AI toggle next to Bounding boxes field. A representation of the tag will appear below. 3D View passes into Boundary box edit mode which is indicated below navigation bar. Now a transparent green bounding box moves along with mouse cursor.

Add more bounding boxes representing tags by simply clicking in 3D view while in Bounding box edit mode.
Adding more than one bounding box converts a simple tag into a complex tag, which changes the icon in Tag Explorer. More information on complex tags could be found here:
Tag Explorer element types.
8. Click on Pen icon next to the bounding box in Create tag menu to display gizmos. After that point of view or display mode (e.g., 3D Surface, 3D RGB, etc.) could be changed to have a better understanding of the equipment’s form and size. For example, switch to 3D Surface in 3D Navi.

9. Use gizmos to adjust the bounding box to the equipment:
- Click & drag the cubes to adjust faces of the bounding box
- Click & drag the lines to move the bounding box along each axis
- Click & drag the curves to rotate the bounding box along each axis

10. Fill in all metadata fields if needed and click Create.
The view used for the creation of the bounding box (in Scan & Teleport mode or in 3D Navi mode) will be the default view for this tag.

11. Clicking on Create another leaves the right panel for tag creation process open but resets the fields.
12. Once created a tag appears in the corresponding tag list in Tag Explorer.
13. To edit a tag, click on it and then click on Edit at the bottom of Tag Explorer. The menu on the right opens, allowing to adjust the needed bounding box or add additional ones.
Duplicate a Tag
1. Select a tag in Tag Explorer.
2. Click Duplicate tag on actions tab at the bottom of Tag Explorer.

3. This will open Duplicate Tag menu, prefilled with information about the tag. Enter an appropriate ID for a tag duplicate.
4. Click Duplicate to create and save the duplicate tag or click Duplicate again to save the duplicated tag and create another copy.

Import a Tag List
Get a tag list from a Digital Twin or from a Revit or Navisworks model via a simple CSV file that contains the ID of each piece of equipment, their location (x, y, z coordinates), and various other metadata according to the tag data model that was set initially when creating this list of tags.
These tags from a Digital Twin or CAD model will then be displayed as bounding boxes overlaid on scans, with a possibility to edit each box to match reality, or to edit the list to add more metadata.
1. When creating a tag list (see Create a Tag List section above), make sure metadata fields in the tag list match exactly the column headings provided in the CSV file (e.g. a CSV column with heading Manufacturer must be included as a Cintoo metadata field called Manufacturer).
- A column with heading "ID" must be included in the CSV and populated with a chosen name of each tag.
- Note that the metadata fields in Cintoo do not need to be in the same order as the columns in the CSV file. But they need to be present to be populated correctly.
1.1. (optional) It is possible to change the default size of the bounding box by adding a column named size. A value of 0.1 corresponds to a 10cm x 10cm bounding box.
2. Once the corresponding list has been selected in Tag Explorer, click on Import tags from CSV from the list of actions at the bottom of Tag Explorer.
Note: same actions are also available from Data tab.


Was this article helpful?
That’s Great!
Thank you for your feedback
Sorry! We couldn't be helpful
Thank you for your feedback
Feedback sent
We appreciate your effort and will try to fix the article