Cet article décrit la navigation dans l'application Cintoo VR Experience à la fois en modes Bureau et VR. Aide à mieux connaître la structure et la visualisation des données ainsi que les principaux éléments d’interface et outils disponibles.
TABLE DES MATIÈRES
- Desktop Mode
- VR Mode
Desktop Mode
Tout d'abord, cliquez sur Projects onglet à gauche, puis choisissez un projet à expérimenter en VR. Après l'ouverture du projet dans Resources et Work Zones tabs choisissez les objets à activer.

Cliquer sur Déconnexion en haut redirigera vers le menu de connexion.
Workzones and Resources
Workzones tab reflects project's work zone structure with number of objects indicators in blue.
À gauche de chaque zone de travail there are clickable icons:
 L'icône d'œil ouvert signifie qu'une zone de travail est active
 L'œil fermé signifie qu'une zone de travail est inactive
Activez les zones de travail nécessaires pour voir leur contenu dans l'onglet Ressources .
Ressources l'onglet contient uniquement les zones de travail actives avec tous les objets de type scan et modèle.
À gauche des objets dans Ressources l'onglet il y a des icônes cliquables :
- L’icône d’œil ouvert signifie qu’un objet est actif
- L'œil fermé signifie qu'un objet est inactif
 La cible permet de sauter directement à un objet depuis Ressources onglet
- Une fois la configuration de la bonne quantité de données à afficher terminée, les onglets peuvent être réduits en cliquant sur Workzones et Resources once again.
Panneau d'affichage des modes
At the top of the screen in the middle Display modes panel that controls visualization is located:

- RGB – image colorée extraite des données du scanner
- X-ray – mode transparent pour comparer plusieurs scans
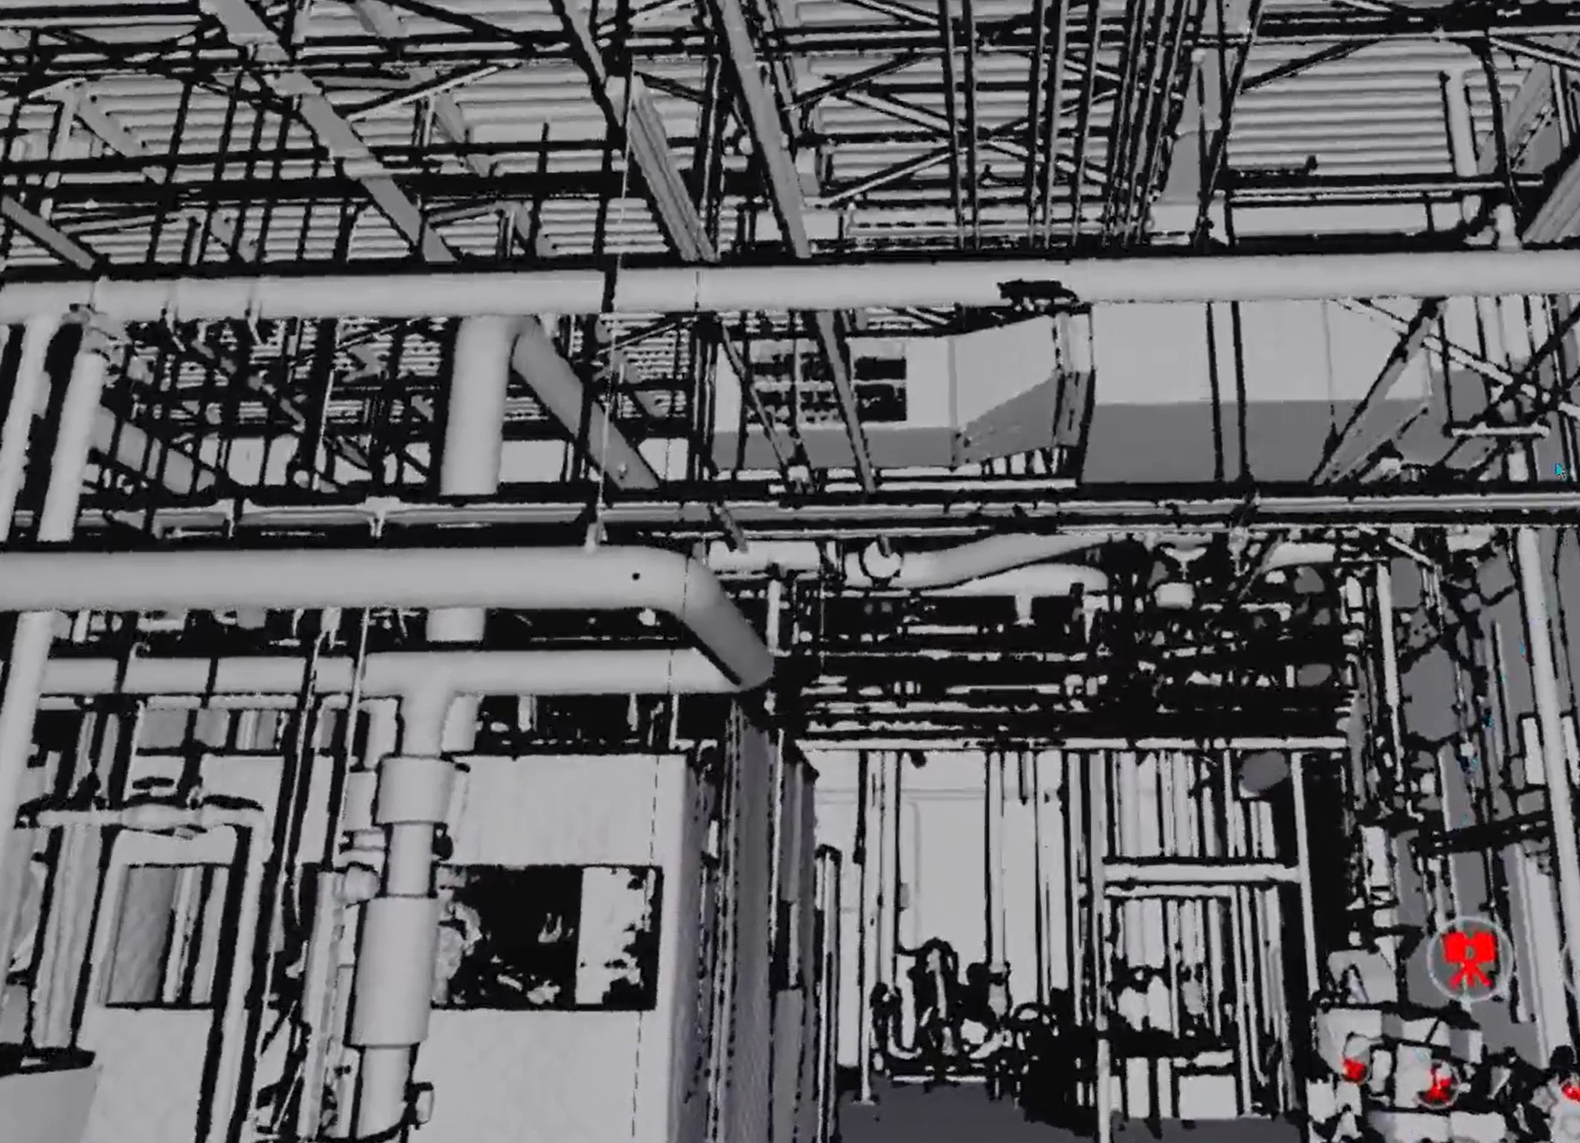
- Surface - maillage généré à partir des données de numérisation
- Intérieur – à l'intérieur des bâtiments mode permettant d'assombrir l'environnement
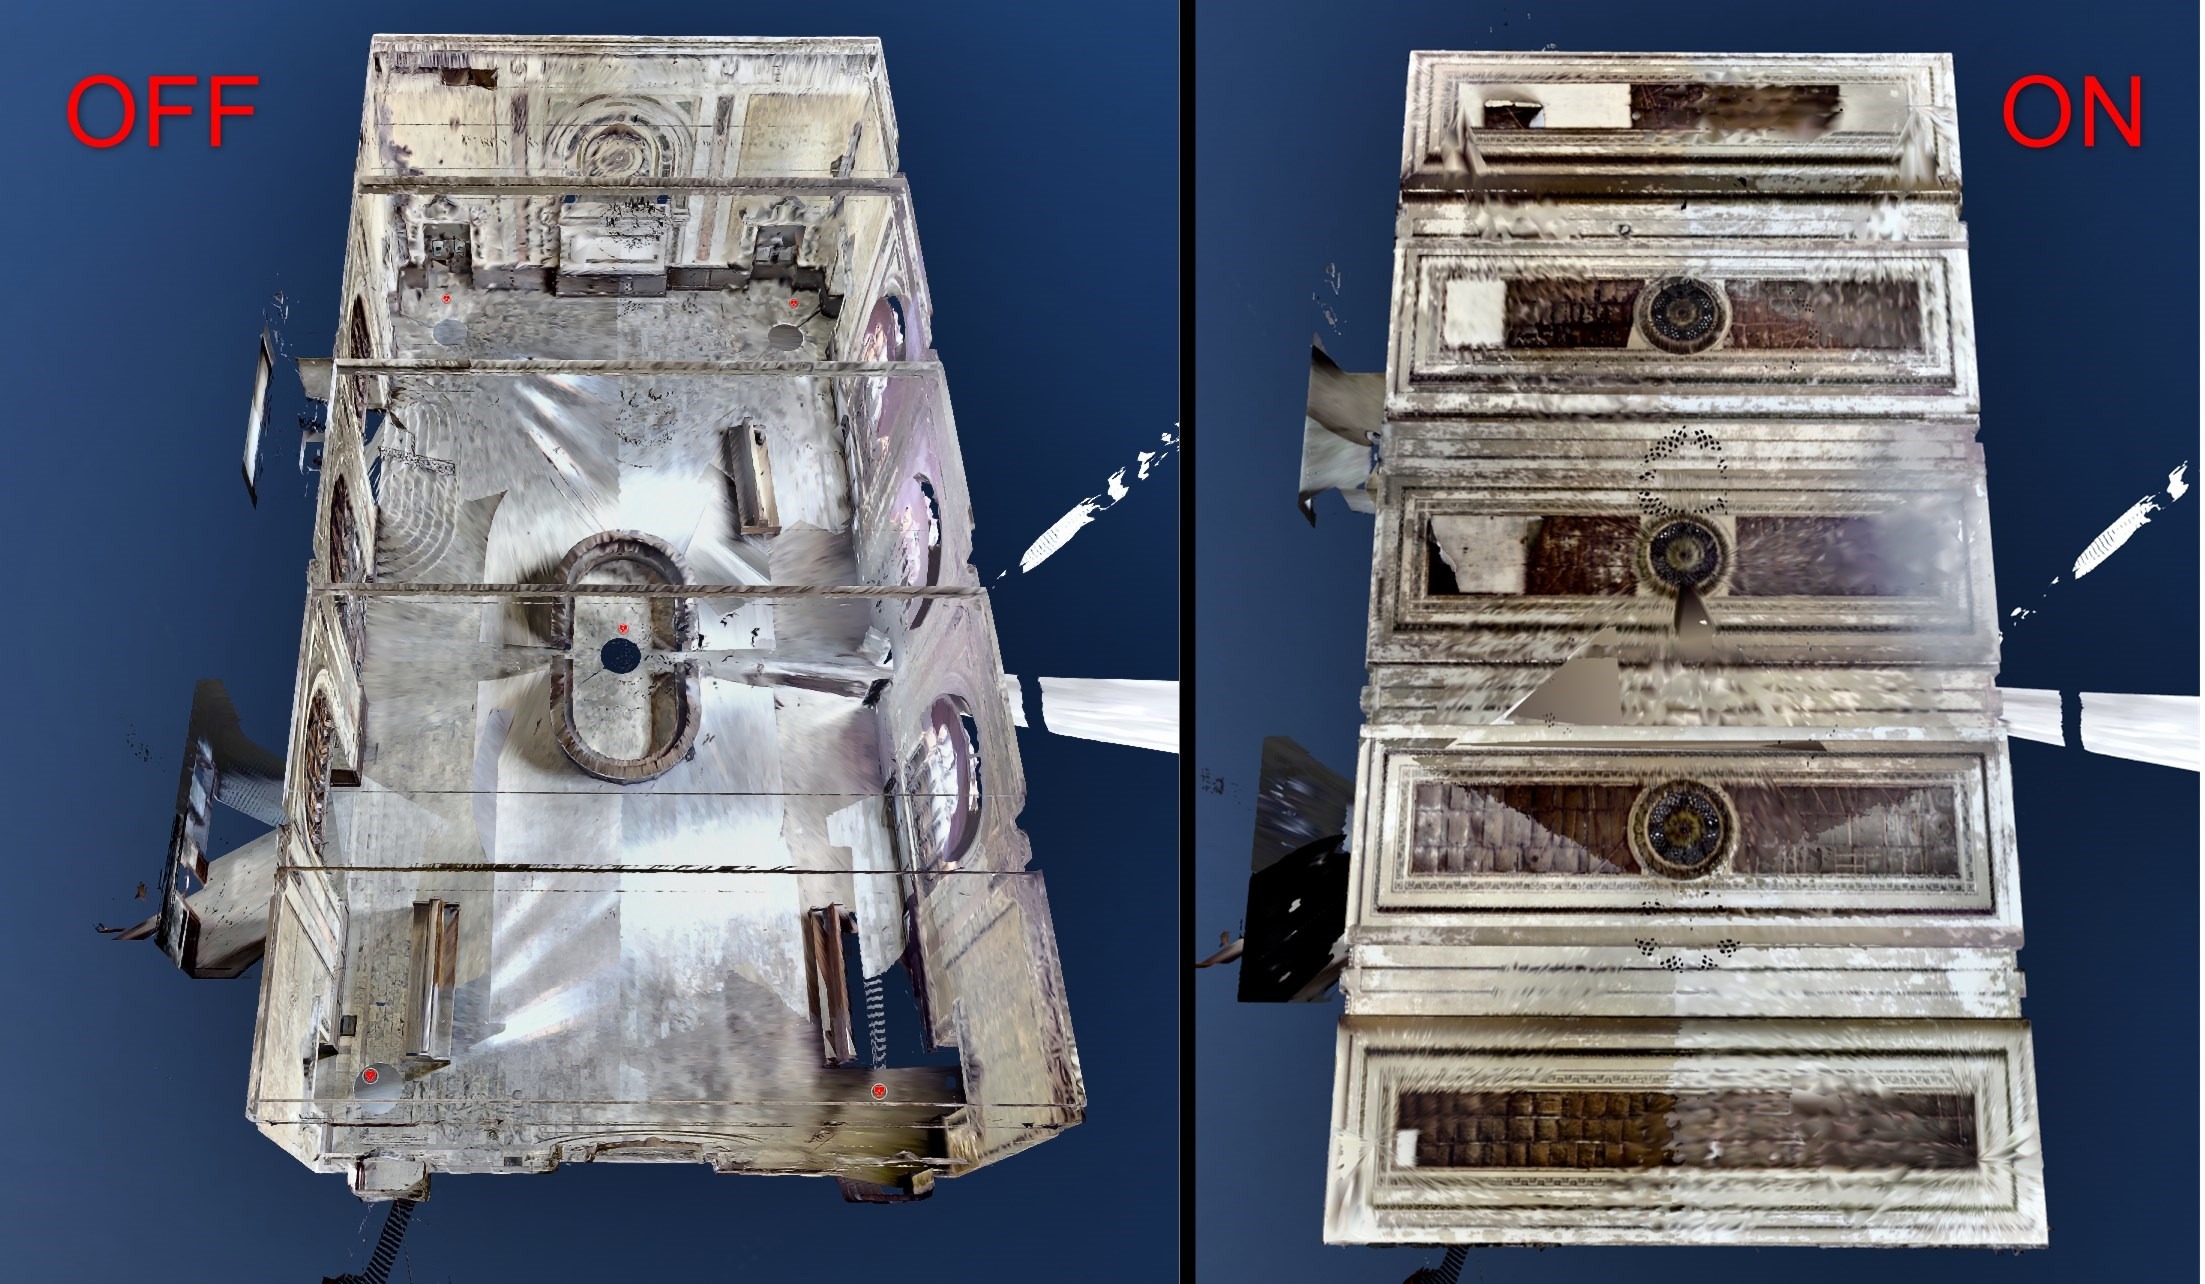
- Backface – permet de masquer les faces arrière des surfaces de maillage 3D afin de pouvoir voir l’intérieur des bâtiments depuis l’extérieur et nettoyer la scène des morceaux de maillage inutiles
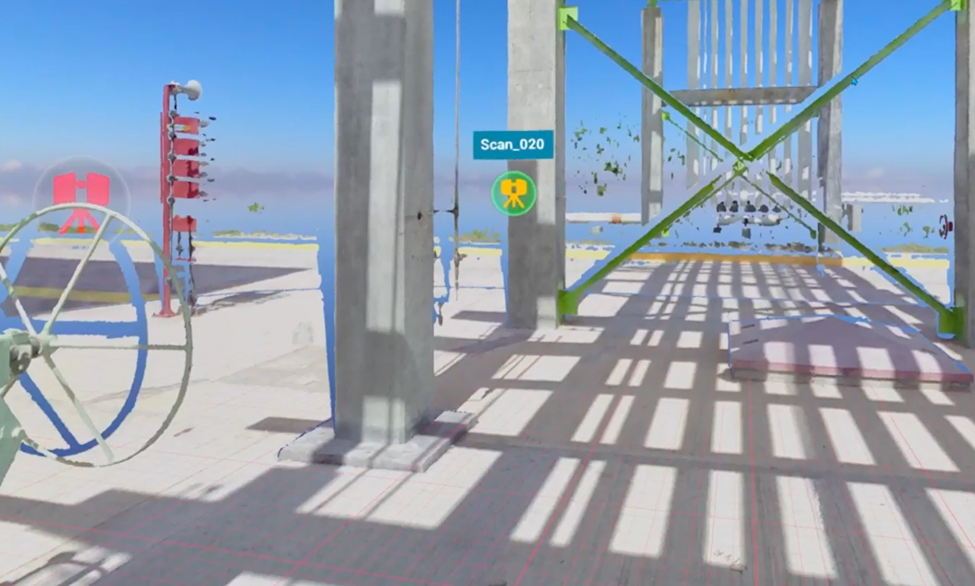
Navigation
En mode Bureau de l'application Cintoo VR Experience, il est possible de naviguer de scan en scan ou en mode libre dans l'espace 3D. Cliquez sur les icônes de scanner flottantes ou déplacez-vous librement en maintenant un bouton de la souris enfoncé et en déplaçant la souris, utilisez Shift pour faire pivoter la caméra.
Options
Dans le panneau supérieur, ouvrez le menu Options pour modifier les paramètres de visualisation dans l'application et choisir des paramètres supplémentaires.

- Pré-charger les annotations - permet de récupérer les annotations pour le projet sélectionné.
Semblable à Récupérer depuis le Cloud dans Annotations. - VR Tunnel Vision - en raison du changement de locomotion de navigation, les utilisateurs peuvent activer cette option pour rendre le mouvement plus fluide. Peut également être activé depuis le menu VR Tools.
- Qualité visuelle - même réglage que sur la page de connexion décrit en détail dans Découvrir l'application
- Qualité des scans - même réglage que sur la page de connexion décrit en détail dans Découvrir l'application
VR Mode
Connection
- (pour appareils Meta) Après cela, établissez la connexion avec Meta Quest Link depuis l'appareil en naviguant jusqu'à Paramètres, en choisissant Lien, et en cliquant sur Lancer. Ou choisissez Lien dans le menu Paramètres Rapides.
Instructions plus détaillées de Meta : Configurez votre Meta Quest avec Meta Quest Link - pour d'autres appareils - établir la connexion avec le PC.
Pour passer en mode VR et commencer le streaming vers le casque, cliquez sur Réalité Virtuelle dans le coin inférieur droit.

Controllers
Le contrôleur principal choisi au démarrage de l’application s’appelle Navigation controller. Le réglage pour les droitiers comprend les boutons A et B et il est utilisé pour naviguer dans un projet.
Le deuxième contrôleur s’appelle Tools controller. Il a boutons X et Y , dans le réglage pour droitier, et son utilisation est fonctionnelle. L’interface pour naviguer dans les projets et les données peut être affichée en appuyant sur le bouton B. Les contrôles de navigation et de visualisation sont les mêmes qu’en mode Bureau.

Navigation Methods
Cintoo VR Experience supports multiple navigation methods depending on your hardware setup. Each method below shows which platforms support it - use legend to find what works on your device, and check controls column for hardware-specific inputs.
Platform legend
| Icon | Platform |
|---|---|
 | VR - headset (Meta Quest, etc.) |
 | Desktop - PC with mouse & keyboard |
 | Igloo - large-format immersive display |
 | Web - browser-based viewer (standard Cintoo web experience) |
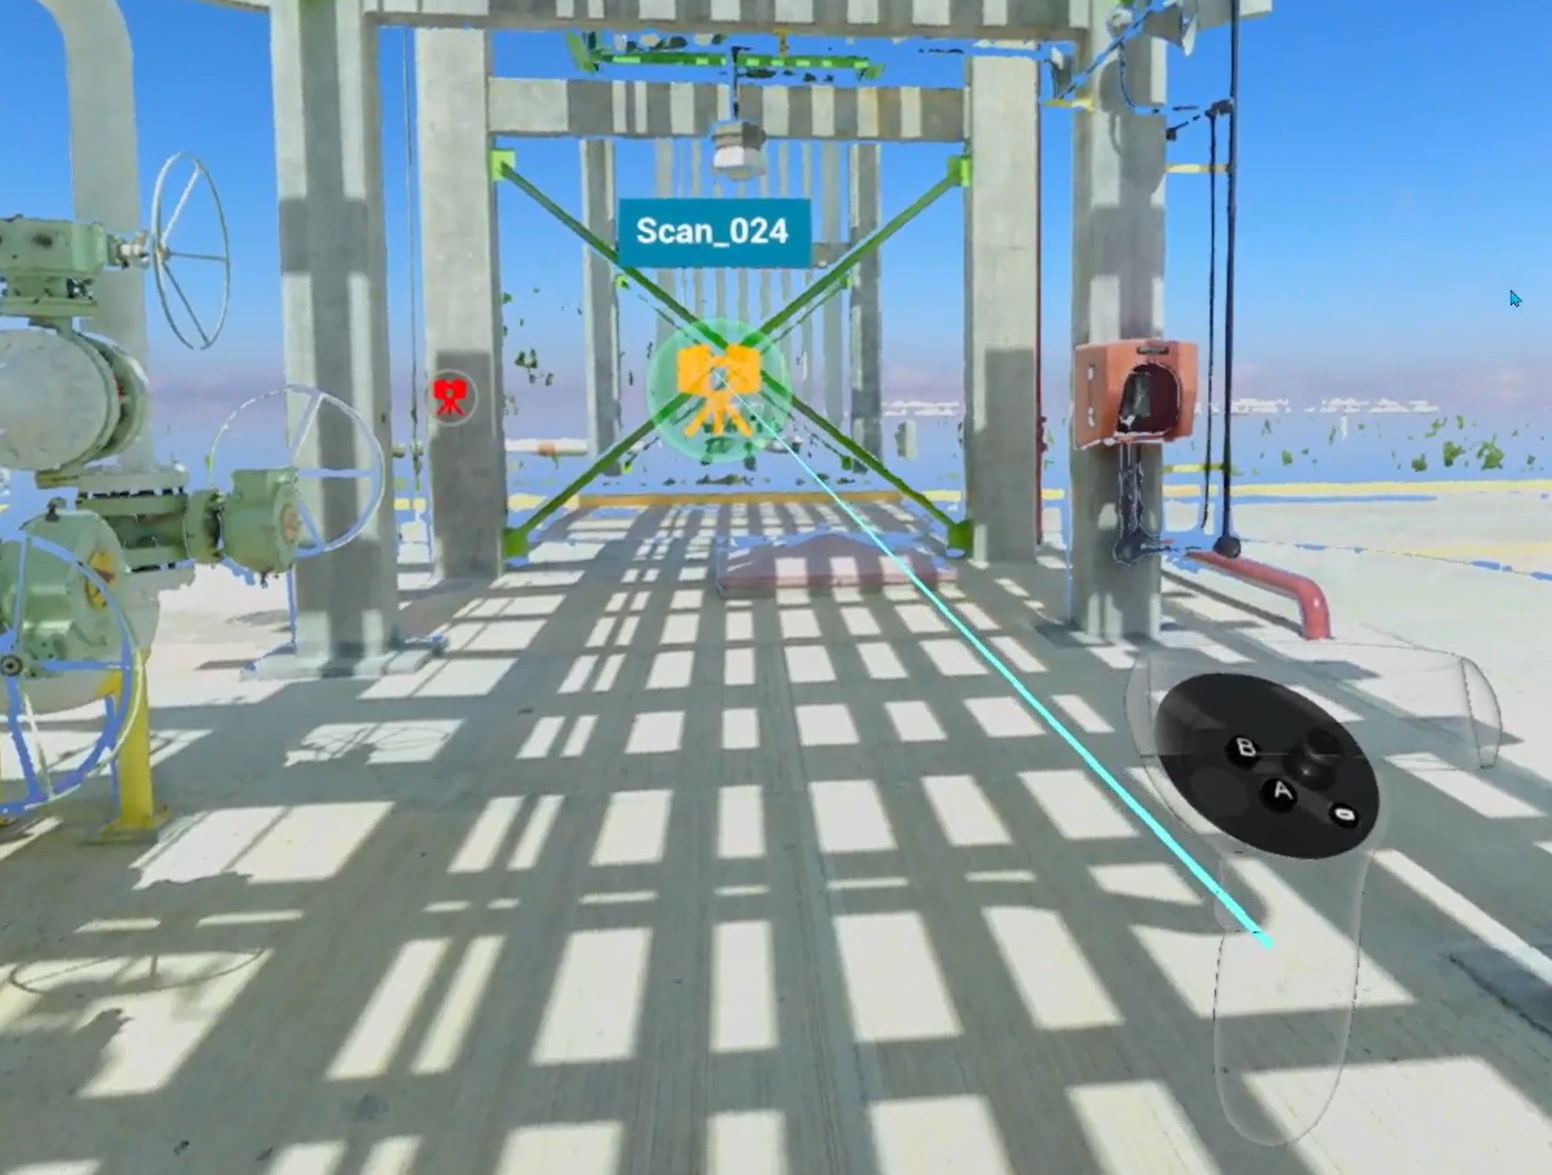
VR: Navigation controller projects a dynamic parabola that follows hand movement and adjusts in length - used as the primary targeting mechanism for scan selection, teleportation, and switching to Fly mode.
Core Locomotion
Methods for physically moving and orienting yourself within a scene - turning, walking, flying, and repositioning the view.
Look Around
Rotate the camera to look in any direction around you.
| Platform | Controls |
|---|---|
 VR VR | Physically turn your head |
 Desktop Desktop | Click and hold mouse wheel button, then move the mouse; hold Shift to turn camera |
 Igloo Igloo | Physically look and move around within tracked space |
 Web Web | Right-click + left-click drag (3D navigation look around) |
Walk Around
Move freely through physical space mapped onto the scene.
| Platform | Controls |
|---|---|
 VR VR | Walk naturally within the area around you |
 Igloo Igloo | Walk within Igloo tracking space |
Rotations rapides
Snap-rotate view in 90-degree increments - useful when physically turning is limited.
| Platform | Controls |
|---|---|
 VR VR | Press Navigation controller joystick left or right |
 Igloo Igloo | Use 90-degree turn input on controller |
Pan
Shift viewpoint along an axis without rotating - useful for fine positional adjustments or aligning view.
| Platform | Controls |
|---|---|
 VR VR | Hold Tools controller grip to enter Pan mode, then move controller in desired direction. Works in both Egocentric and Exocentric scale. |
 Desktop Desktop | Vertical pan: hold right mouse button + drag. Horizontal pan: hold left mouse button + drag. Field of view: scroll mouse wheel. |
 Web Web | Vertical pan: right-click drag. Horizontal pan: left-click drag. Field of view: scroll wheel (3D navigation). |

Find more details in Control tips menu in Desktop mode or in the dedicated section Pan Mode.
Mode Vol
Move freely in all directions through 3D space, imitating flight.
Works in both Egocentric and Exocentric scale.
Note: Fly mode activates Turbomesh, using nearby active scans and models for real-time 3D reconstruction.
| Platform | Controls |
|---|---|
 VR VR | Starting from Teleport mode (blue parabola), click Navigation controller joystick 3 times - parabola cycles through yellow → pink → off. Once parabola disappears, Fly mode is active. Vertical movement: Tools controller joystick. Horizontal movement: Navigation controller joystick. |
Orbite
Rotate entire scene in parallel to the ground while your position stays fixed - useful for inspecting from multiple angles.
| Platform | Controls |
|---|---|
 VR VR | Hold both controller grips simultaneously. Move hands in opposite directions - one forward, one backward - as if rotating a large object. A line appears between controllers to confirm two-handed mode. |
 Web Web | Use 3D navigation Orbit control. |
Find more details in Control tips menu in Desktop mode or in the dedicated section Orbit.
Jump Around
Methods for jumping directly to a specific location or scan without continuous movement.
Scan to Scan
Jump directly to viewpoint of a specific scan by selecting it in scene or in Resources panel.
Note: display is limited to single scan when navigating this way.
| Platform | Controls |
|---|---|
 VR VR | Point Navigation controller at a scan icon - parabola becomes a straight line and icon highlights. Press trigger to go there. |
 Desktop Desktop | Click any floating scanner icon in 3D view, or click Target icon next to a scan in Resources tab. |
 Igloo Igloo | Point controller at a scan icon until it highlights, then press trigger. |
 Web Web | Click scan icon in scene. |
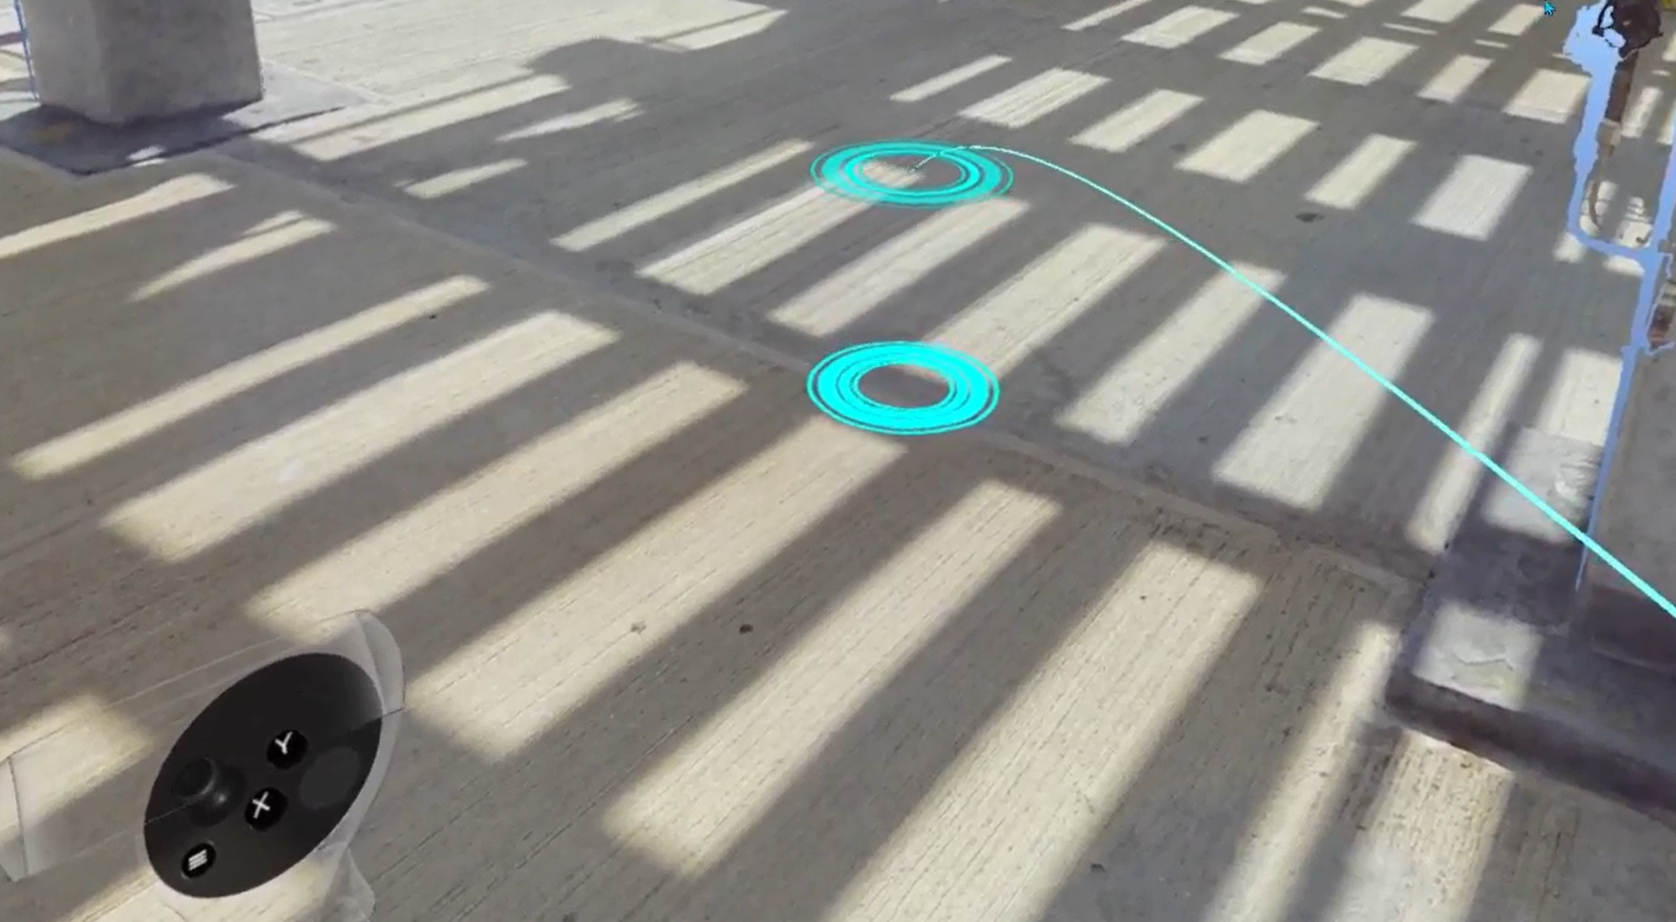
Teleport
Free teleportation to any floor-level position in scene.
Warning: teleportation is disabled while any interface menu is open.
| Platform | Controls |
|---|---|
 VR VR | Aim parabola - a red/blue floor grid and a target marker appear. When both targets merge, landing spot is locked. Press Navigation controller trigger to jump there. To set view height before teleporting: press X on Tools controller, then adjust with Navigation controller joystick up/down. Height is saved across all subsequent teleports. |
 Igloo Igloo | Aim controller at desired floor location and press trigger. |
 Web Web | Hold Shift and click target location. |
See also: Change Teleportation Height.
Scaling
Methods for changing your perspective scale - from 1:1 ground-level exploration to a full site overview and anywhere in between.
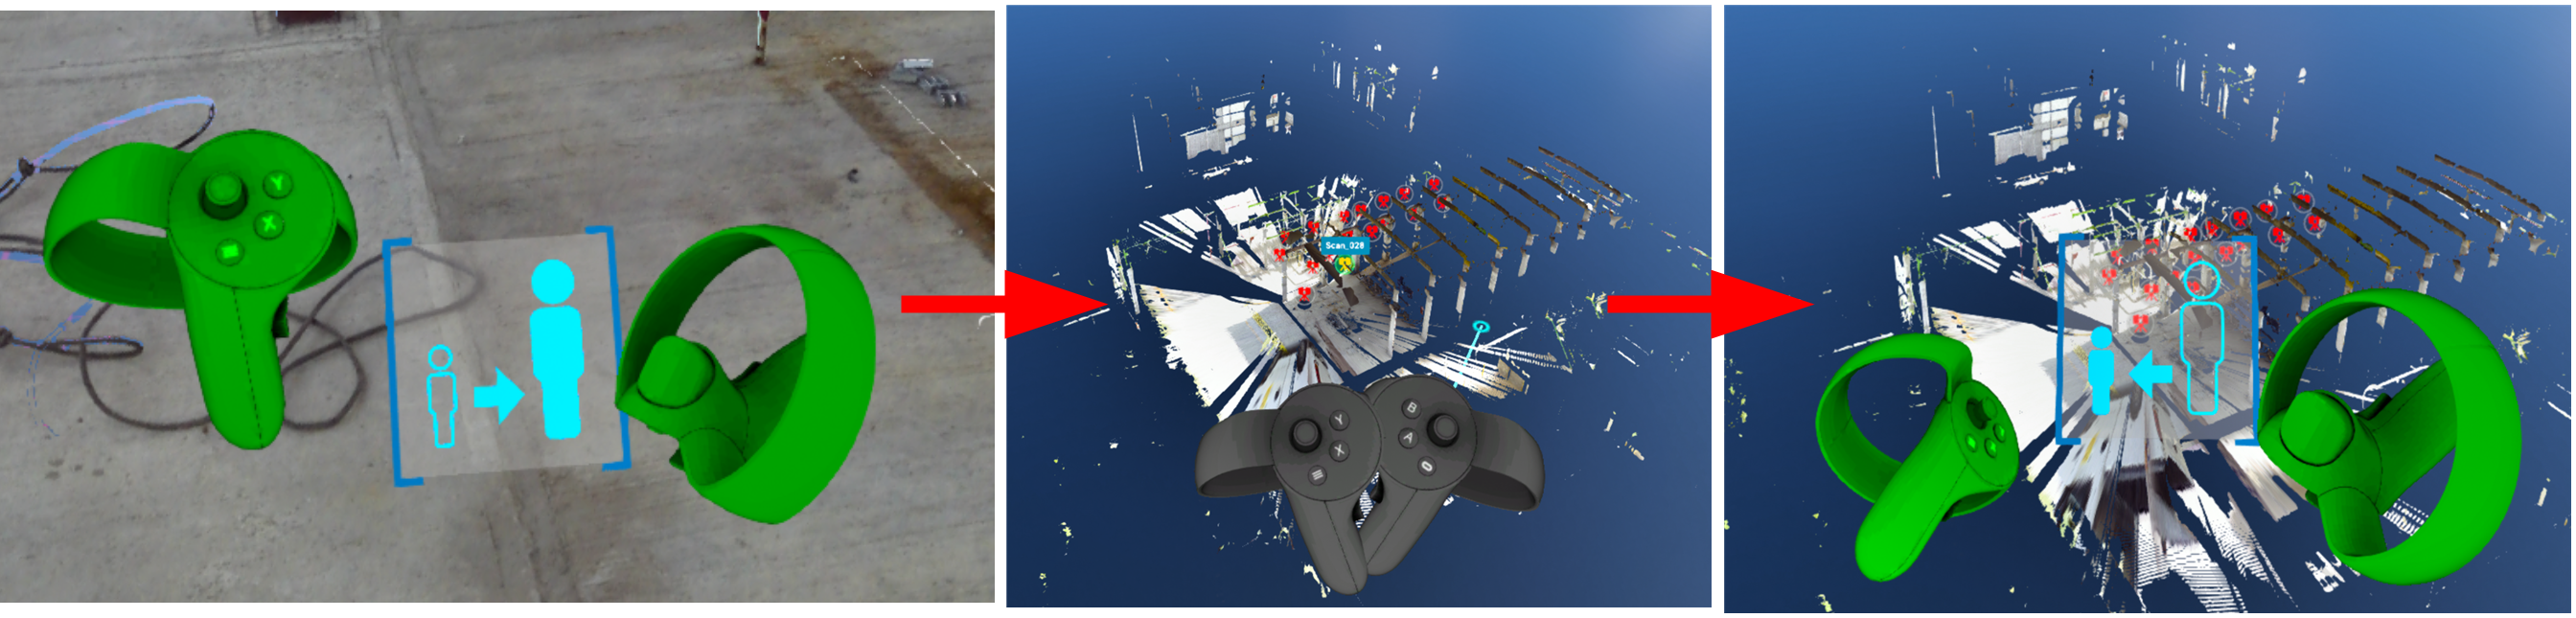
Exo / Egocentric Scale
Switch between 1:1 human-scale exploration (Egocentric) and a miniature overhead view of the full site (Exocentric). Exocentric mode enables full-site observation, architectural walkthrough evaluation, spatial relationship assessment, and measurement of distances beyond 1:1 scale.
| Platform | Controls |
|---|---|
 VR VR | Enter Exocentric: point Navigation controller toward the sky - a special indicator appears - then press trigger. Return to Egocentric: repeat same upward gesture (reverse indicator shown), or use teleport to jump back to ground level. Exo/Ego |
 Web Web | Click home / recenter camera button in 3D navigation controls. |
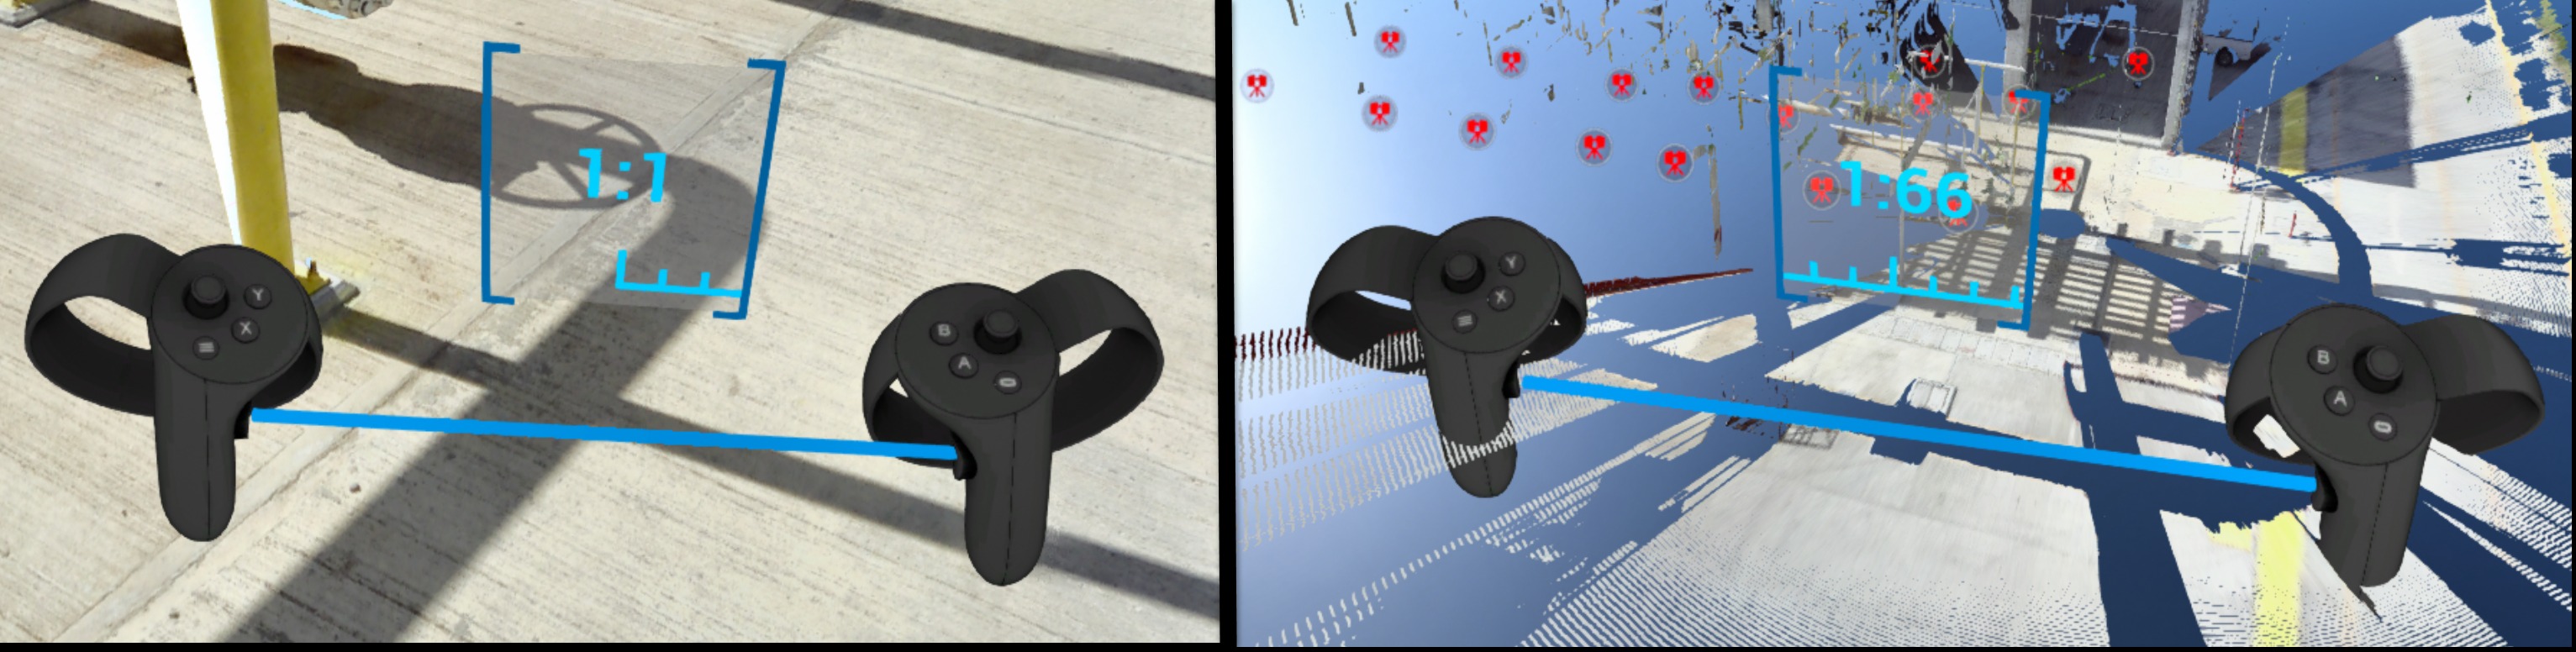
Échelle dynamique
Continuously zoom scene between 1:1 and 1:250 scale - useful for navigating between site-wide overview and detail inspection without leaving your position.
| Platform | Controls |
|---|---|
 VR VR | Hold both controller grips simultaneously. Spread hands apart to zoom in (toward 1:1). Bring hands together to zoom out (toward 1:250). A scale indicator appears between controllers showing current ratio. |
 Web Web | Scroll mouse wheel, or use 3D navigation Dynamic Scaling control. |
Find more details in Control tips menu in Desktop mode or in the dedicated section Dynamic Scaling.
Navigation Aids
Settings and modes that assist navigation, reduce motion discomfort, or control how the scene environment is displayed.
Tunnel Vision
Reduces motion sickness by narrowing peripheral field of view during locomotion (e.g. while teleporting).
| Platform | Controls |
|---|---|
 VR VR | Enable from Options menu (top panel in Desktop mode before entering VR) or from VR Tools Menu once in headset. |
Vision (Gaze) Control
Navigate using head gaze alone - no active controller input required. Useful when you want hands-free movement.
Note: display is limited to single scan when using gaze-based navigation.
| Platform | Controls |
|---|---|
 VR VR | Let your arms hang at your sides - controllers disappear from view. Orient your gaze toward a scan icon. Once icon highlights, press Navigation controller trigger to go there. |
Yellow / Magenta Gaze-Based Navigation
Special modes to control teleportation.
| Platform | Controls |
|---|---|
 VR VR | Teleport helpers |
Display Modes
Switch how point cloud data is rendered. Available modes vary by platform.
- RGB - colorful image taken from scanner data
- X-ray - transparent mode for comparison of multiple scans
- Surface - mesh generated from scan data
- Heightmap - scene colored according to object heights (VR and Igloo only)
| Platform | Available modes |
|---|---|
 VR VR | All modes except Intensity and 2D panoramic. Switch from VR Tools Menu or press Y on Tools controller to cycle. |
 Desktop Desktop | All modes except heightmap, intensity, and 2D panoramic. Available in Display Modes panel at top of screen. |
 Igloo Igloo | All modes except Intensity and 2D panoramic |
 Web Web | All display modes |

Heightmap (VR)
Displays scene colored according to object heights. Clicking Heightmap button changes display mode and shows a color legend. Move window by grabbing title of legend with Navigation controller trigger.
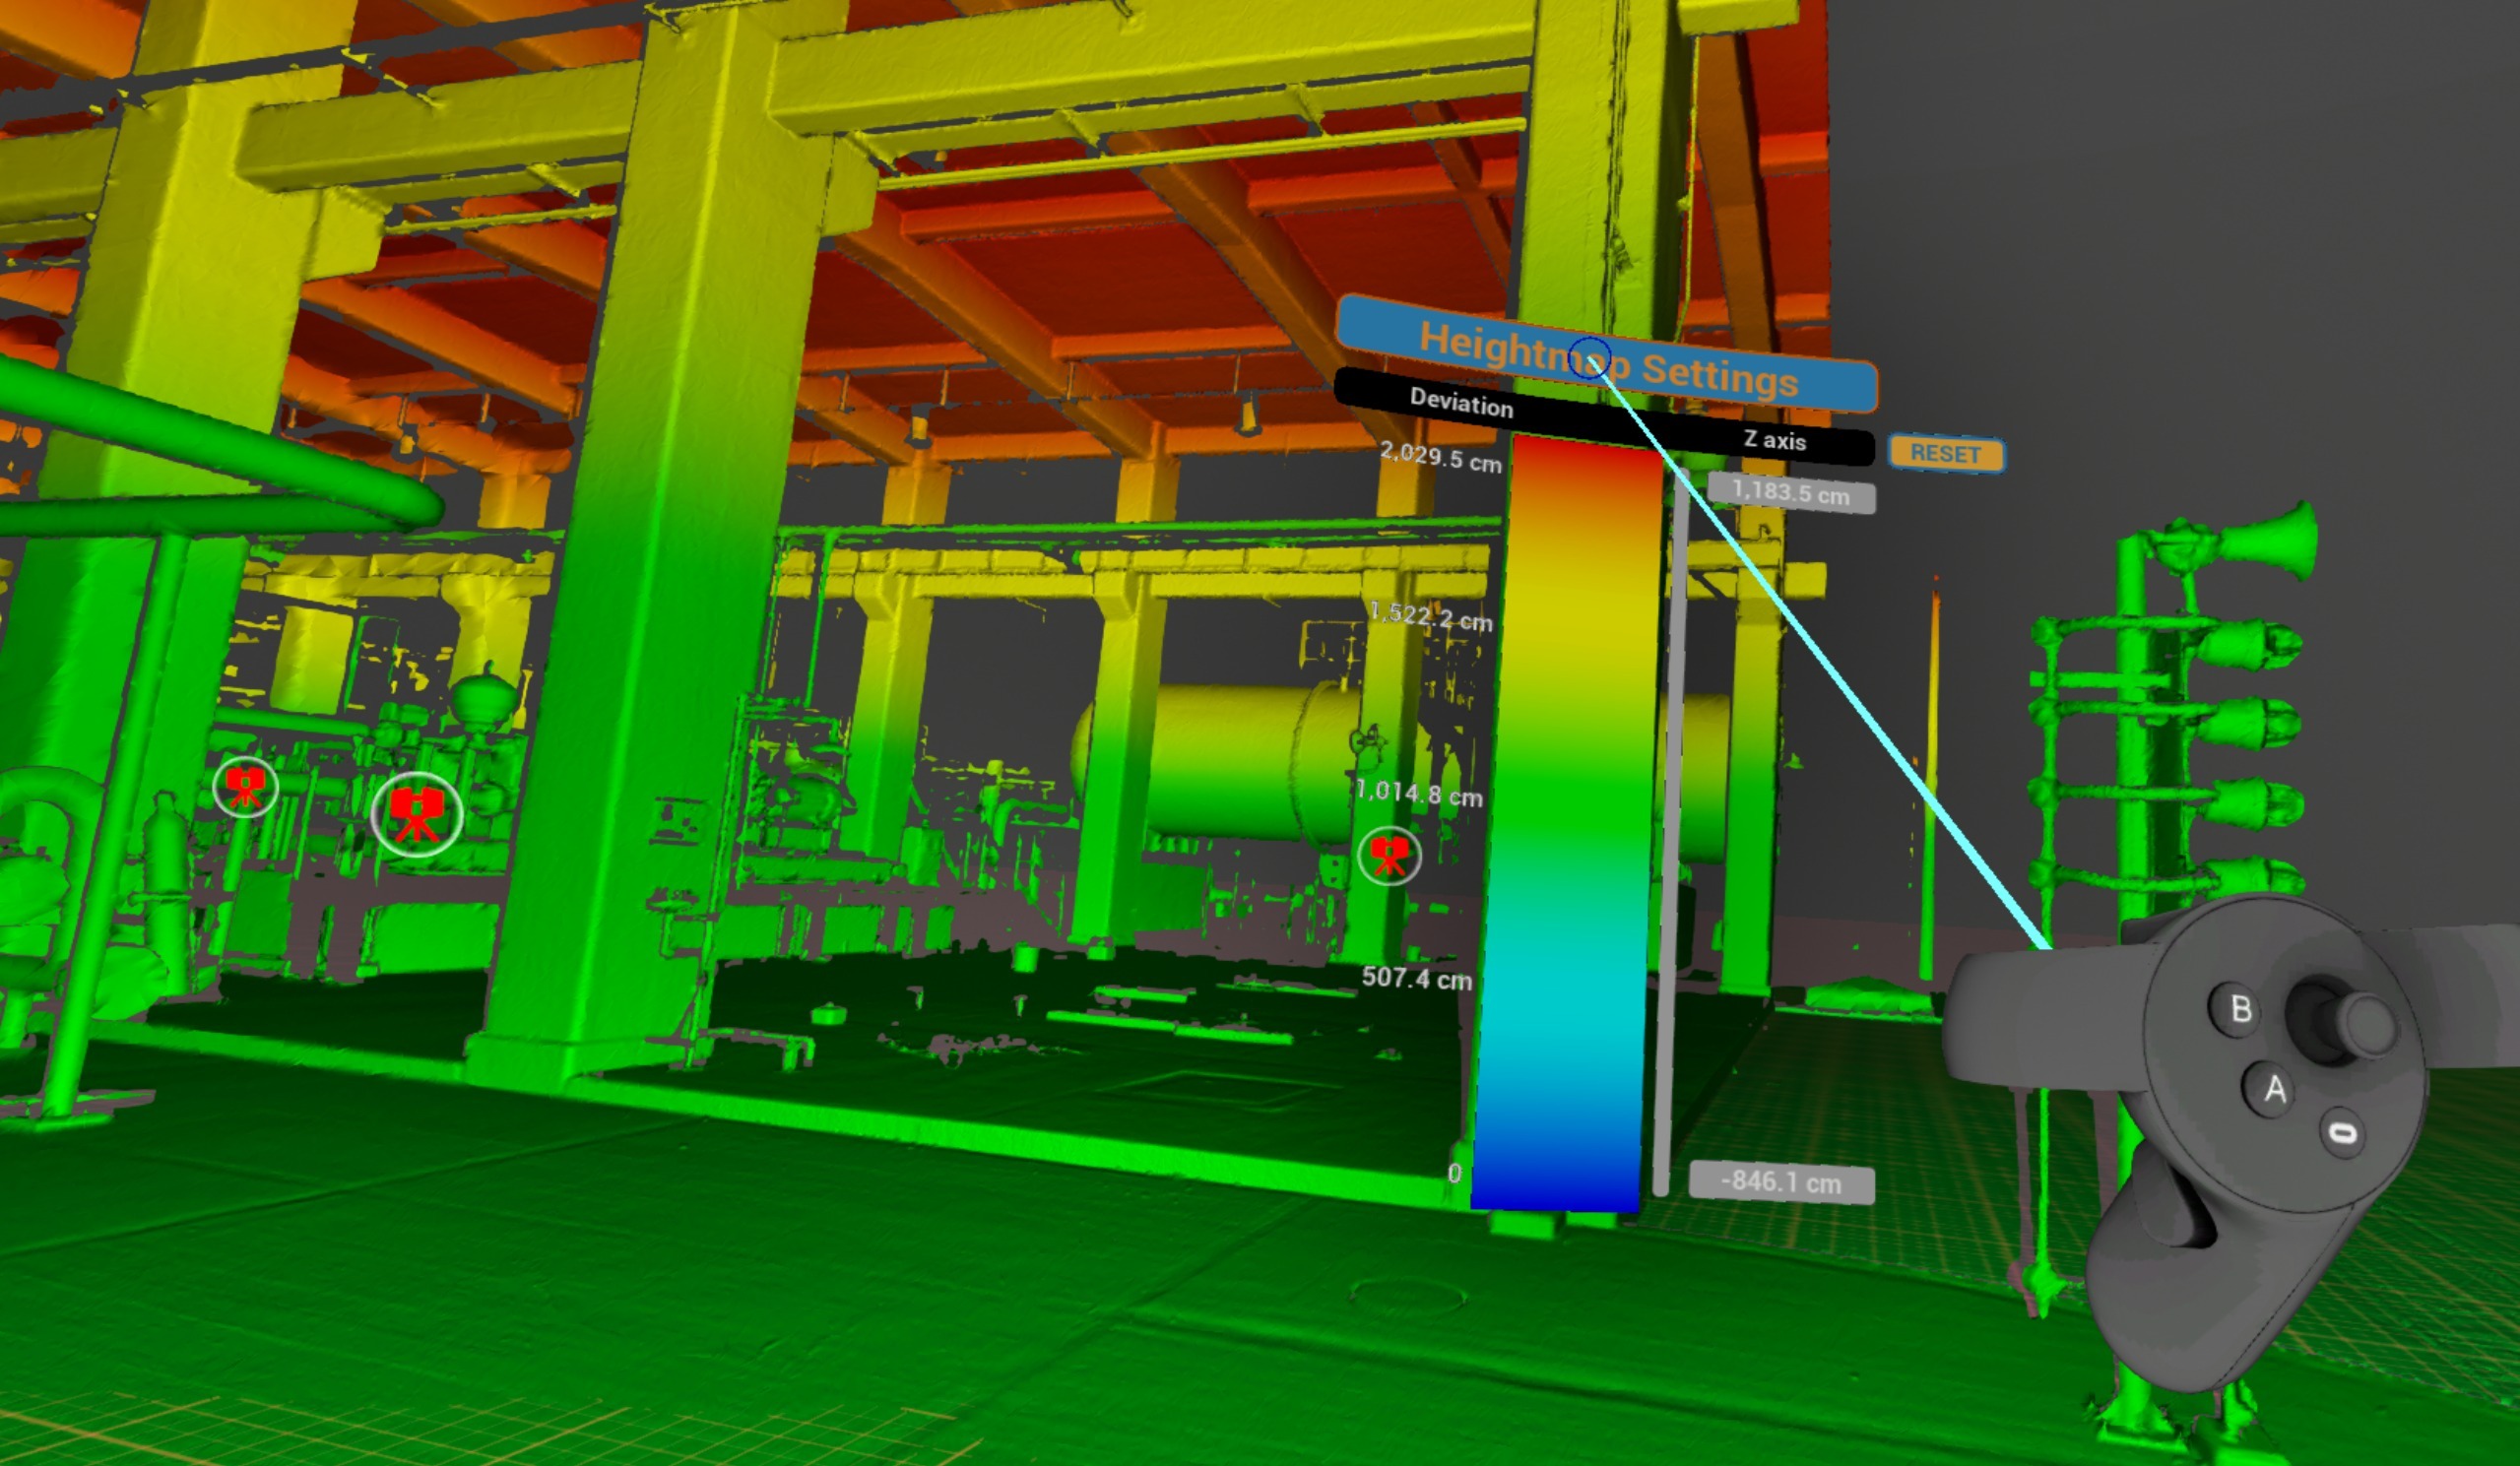
To adjust height limits point at a number and pull or push Navigation controller thumbstick.

Slide grey bar up and down to offset range set.
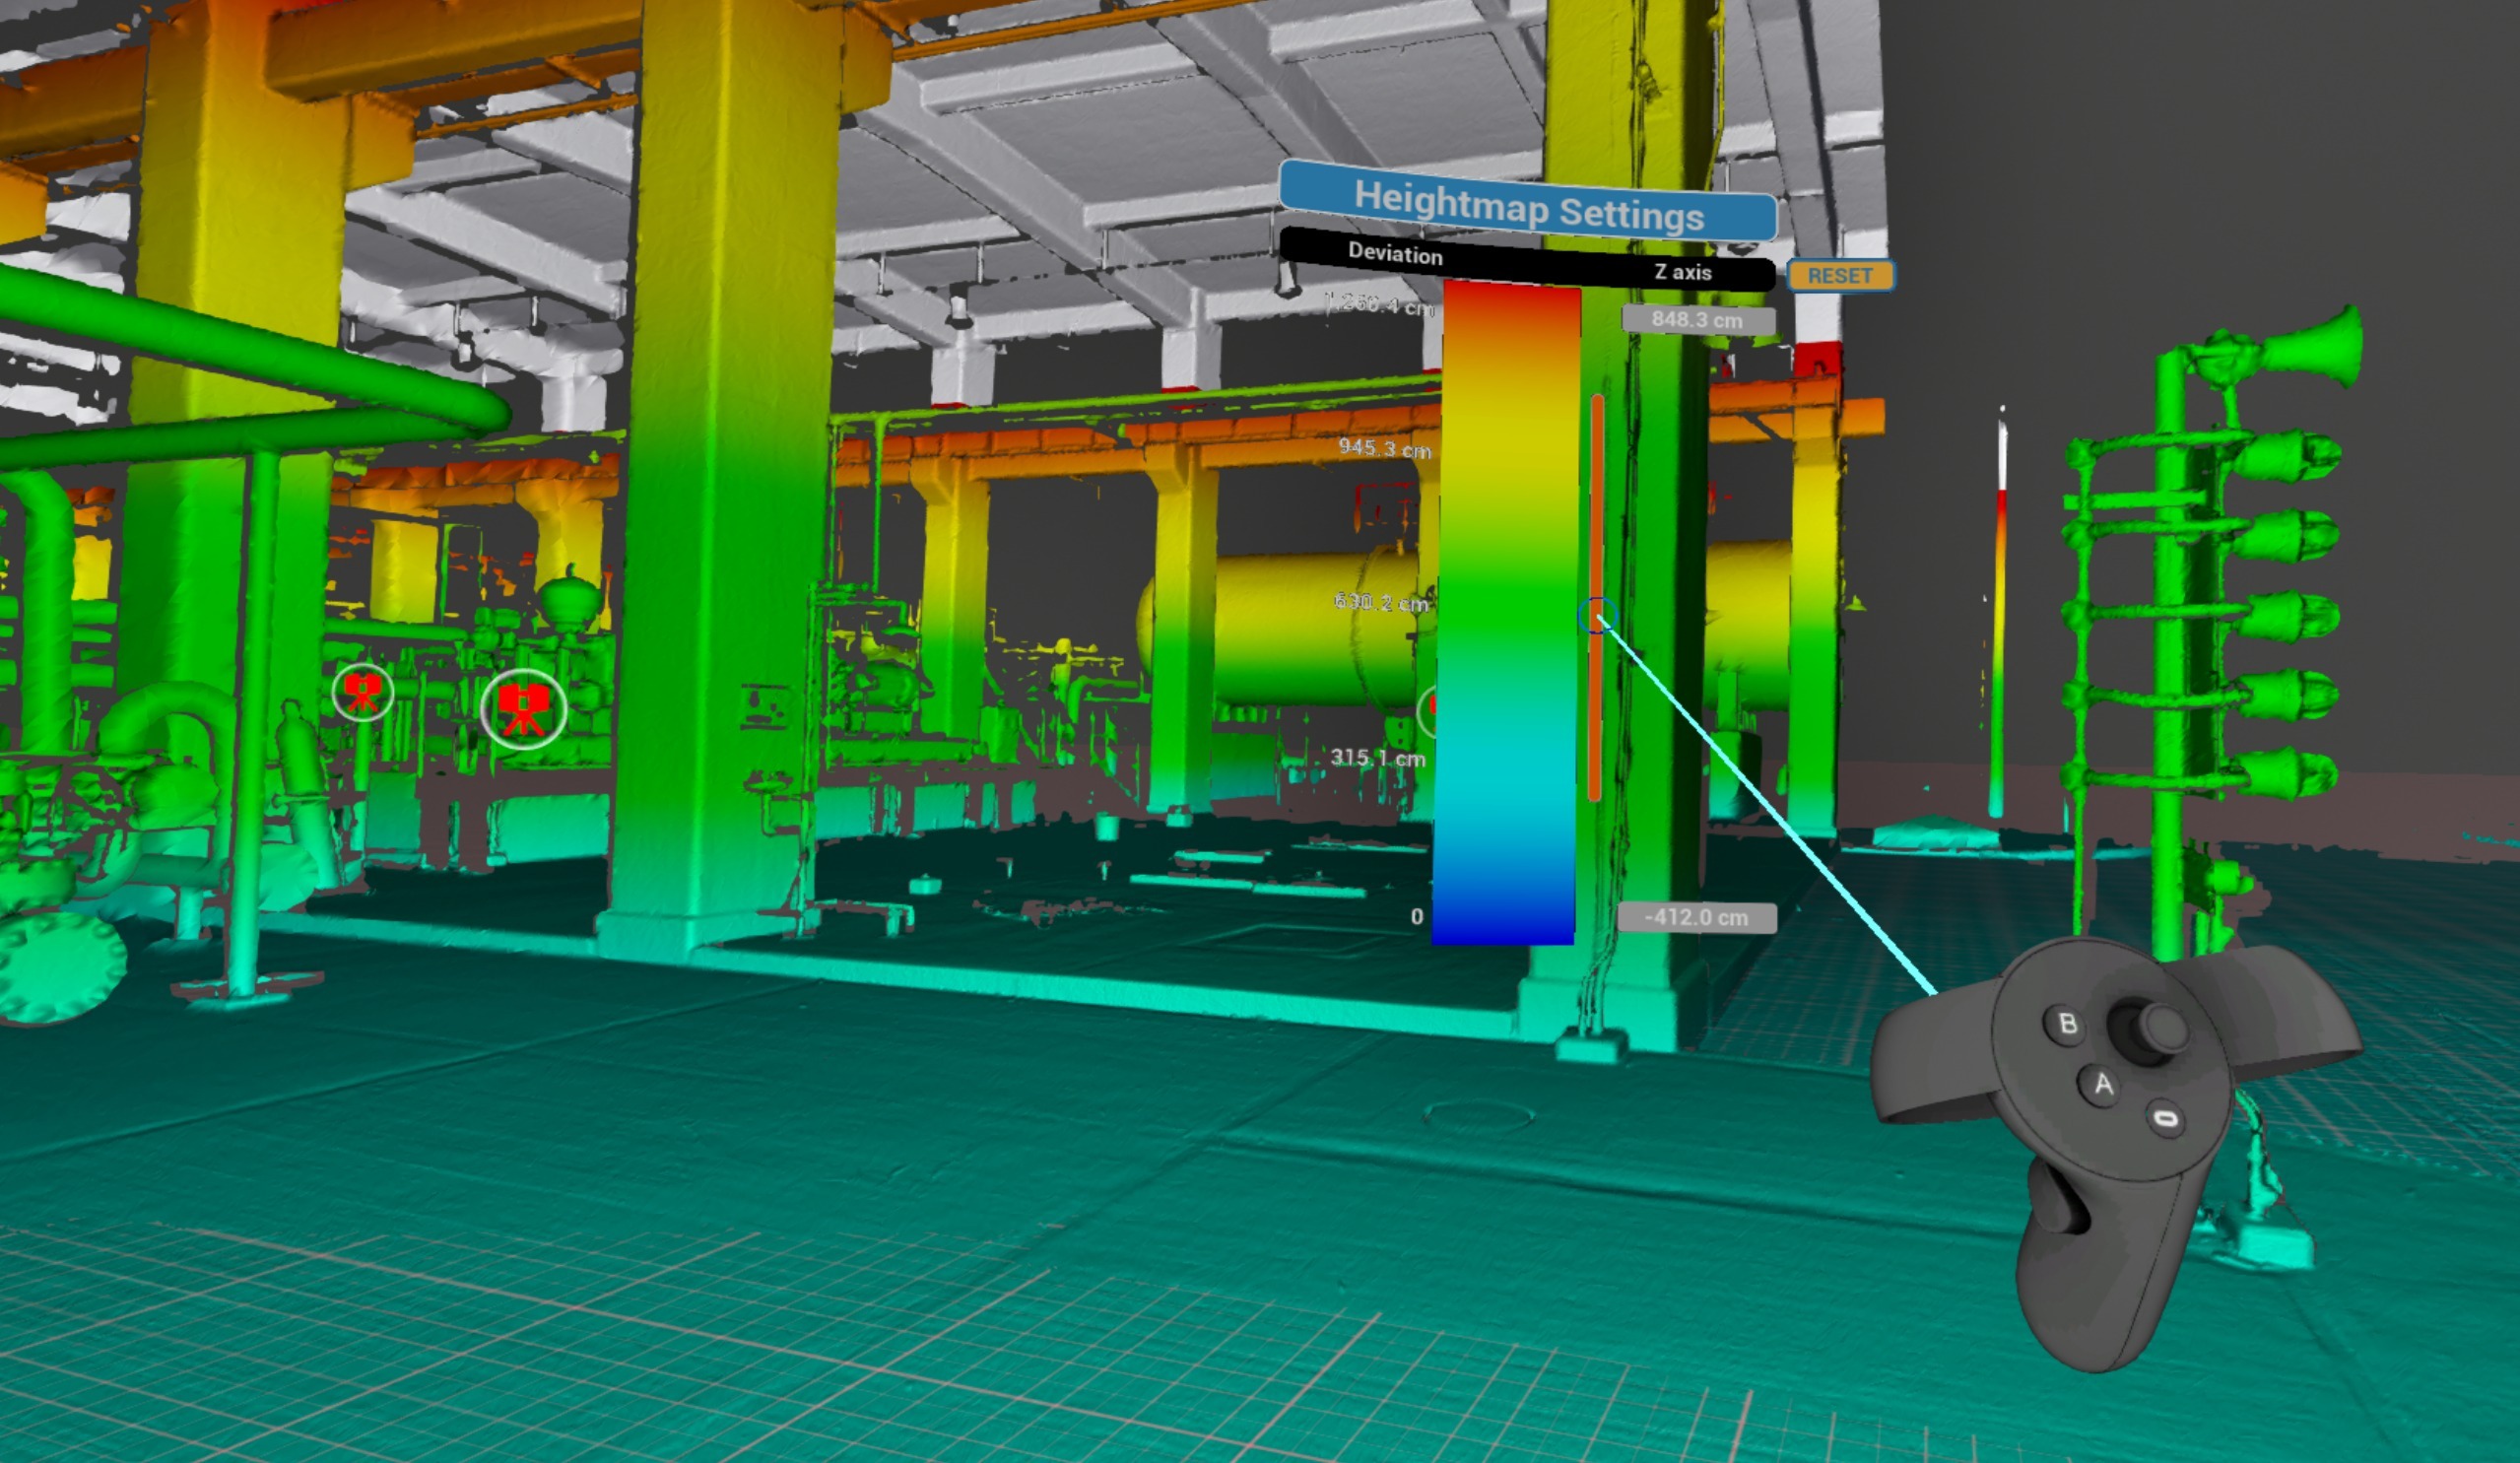
Click Reset to return to default settings.
Indoor / Outdoor
Replace sky background with a black one for indoor scenes. Can be used alongside other display modes (RGB, X-ray, Surface).
| Platform | Controls |
|---|---|
 VR VR | Switch from VR Tools Menu |
 Desktop Desktop | Available in Display Modes panel at top of screen |
 Web Web | Background color/image control |
Virtual Floor Grid
Display a reference grid on floor plane to aid spatial orientation.
| Platform | Controls |
|---|---|
 VR VR | Available |
 Igloo Igloo | Available |
Performance Options
Settings that affect rendering quality and visual output of point cloud data and 3D geometry.
Backfaces
Show or hide back-facing surfaces of 3D mesh - useful for seeing inside buildings from outside and cleaning up the scene from unnecessary mesh pieces. Can be used alongside other display modes (RGB, X-ray, Surface).
| Platform | Controls |
|---|---|
 VR VR | Switch from VR Tools Menu. |
 Desktop Desktop | Available in Display Modes panel at top of screen. |
 Igloo Igloo | Available |
 Web Web | Available |
Visual / Scan Quality
Adjust rendering quality level for point cloud scans and 3D visuals.
| Platform | Controls |
|---|---|
 VR VR | Available |
 Desktop Desktop | Available |
 Igloo Igloo | Available |
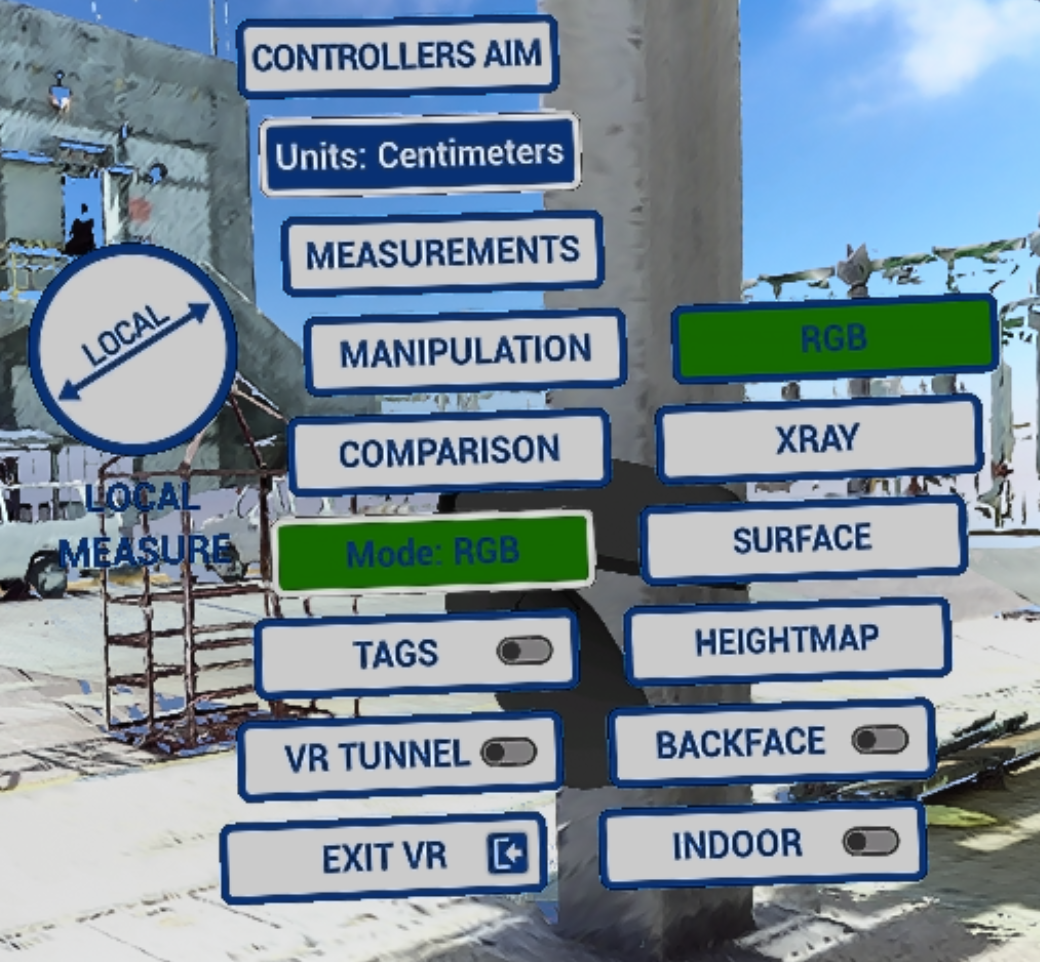
Menu d'outils VR
Ce menu sert de contrôle principal pour activer/désactiver les modes et accéder aux fonctionnalités.
Pour entrer dans le menu VR Tools , appuyez sur le joystick du Tools controller. 
- Configurer l'orientation des contrôleurs (plus d'infos Orientation du contrôleur)
- Changer les unités à utiliser dans les mesures et la carte altimétrique
- Obtenir différentes mesures (Mesures des actions VR)
- Effectuer la manipulation de modèles CAD (pas encore activé !)
- Utilisez les outils de comparaison (Comparaison des actions VR). Seul le contrôle visuel est disponible.
- Changer de mode d'affichage y compris Carte altimétrique, Backface et Intérieur
Note: switch between display modes by clicking Y button on Tools controller. Cycle Display Modes
- Activer les balises à revoir (Balises des actions VR)
- VR Tunnel - navigation plus fluide de scan en scan et téléportation. Plus de détails dans Options
- Exit VR mode – exit to Desktop mode
Cet article a-t-il été utile ?
C'est super !
Merci pour votre commentaire
Désolé ! Nous n'avons pas pu vous être utile
Merci pour votre commentaire
Commentaires envoyés
Nous apprécions vos efforts et nous allons corriger l'article