Este artículo describe la navegación en la aplicación Cintoo VR Experience tanto en modo de escritorio como en modo VR. Ayuda a conocer mejor la estructura y visualización de datos, así como de los principales elementos de la interfaz y herramientas disponibles.
ÍNDICE DE CONTENIDOS
- Desktop Mode
- VR Mode
Desktop Mode
Primero, haz clic en Proyectos pestaña a la izquierda y luego elige un proyecto para experimentar en VR. Después de que el proyecto esté abierto en Recursos y Zonas de Trabajo pestañas elige objetos para ser activados.

Al hacer clic en Cerrar sesión en la parte superior, serás redirigido de vuelta al menú de inicio de sesión.
Workzones and Resources
Workzones tab reflects project's work zone structure with number of objects indicators in blue.
A la izquierda de cada zona de trabajo hay iconos clicables:
 El icono de ojo abierto significa que una zona de trabajo está activa
 El ojo cerrado significa que una zona de trabajo está inactiva
Activa las zonas de trabajo necesarias para ver su contenido en la pestaña Recursos .
Recursos contiene solo zonas de trabajo activas con todos los objetos de tipo escaneo y modelo.
A la izquierda de los objetos en Recursos pestaña hay iconos clicables:
- El icono de ojo abierto significa que un objeto está activo
- El ojo cerrado significa que un objeto está inactivo
 Objetivo permite saltar a un objeto directamente desde Recursos pestaña
- Una vez configurada la cantidad correcta de datos a mostrar, las pestañas se pueden minimizar haciendo clic en Workzones y Resources una vez más.
Panel de Modos de Visualización
At the top of the screen in the middle Display modes panel that controls visualization is located:

- RGB – imagen colorida tomada de datos del escáner
- Rayos X – modo transparente para la comparación de múltiples escaneos
- Superficie - malla generada a partir de datos de escaneo
- Interior – dentro de edificios modo que permite oscurecer el entorno
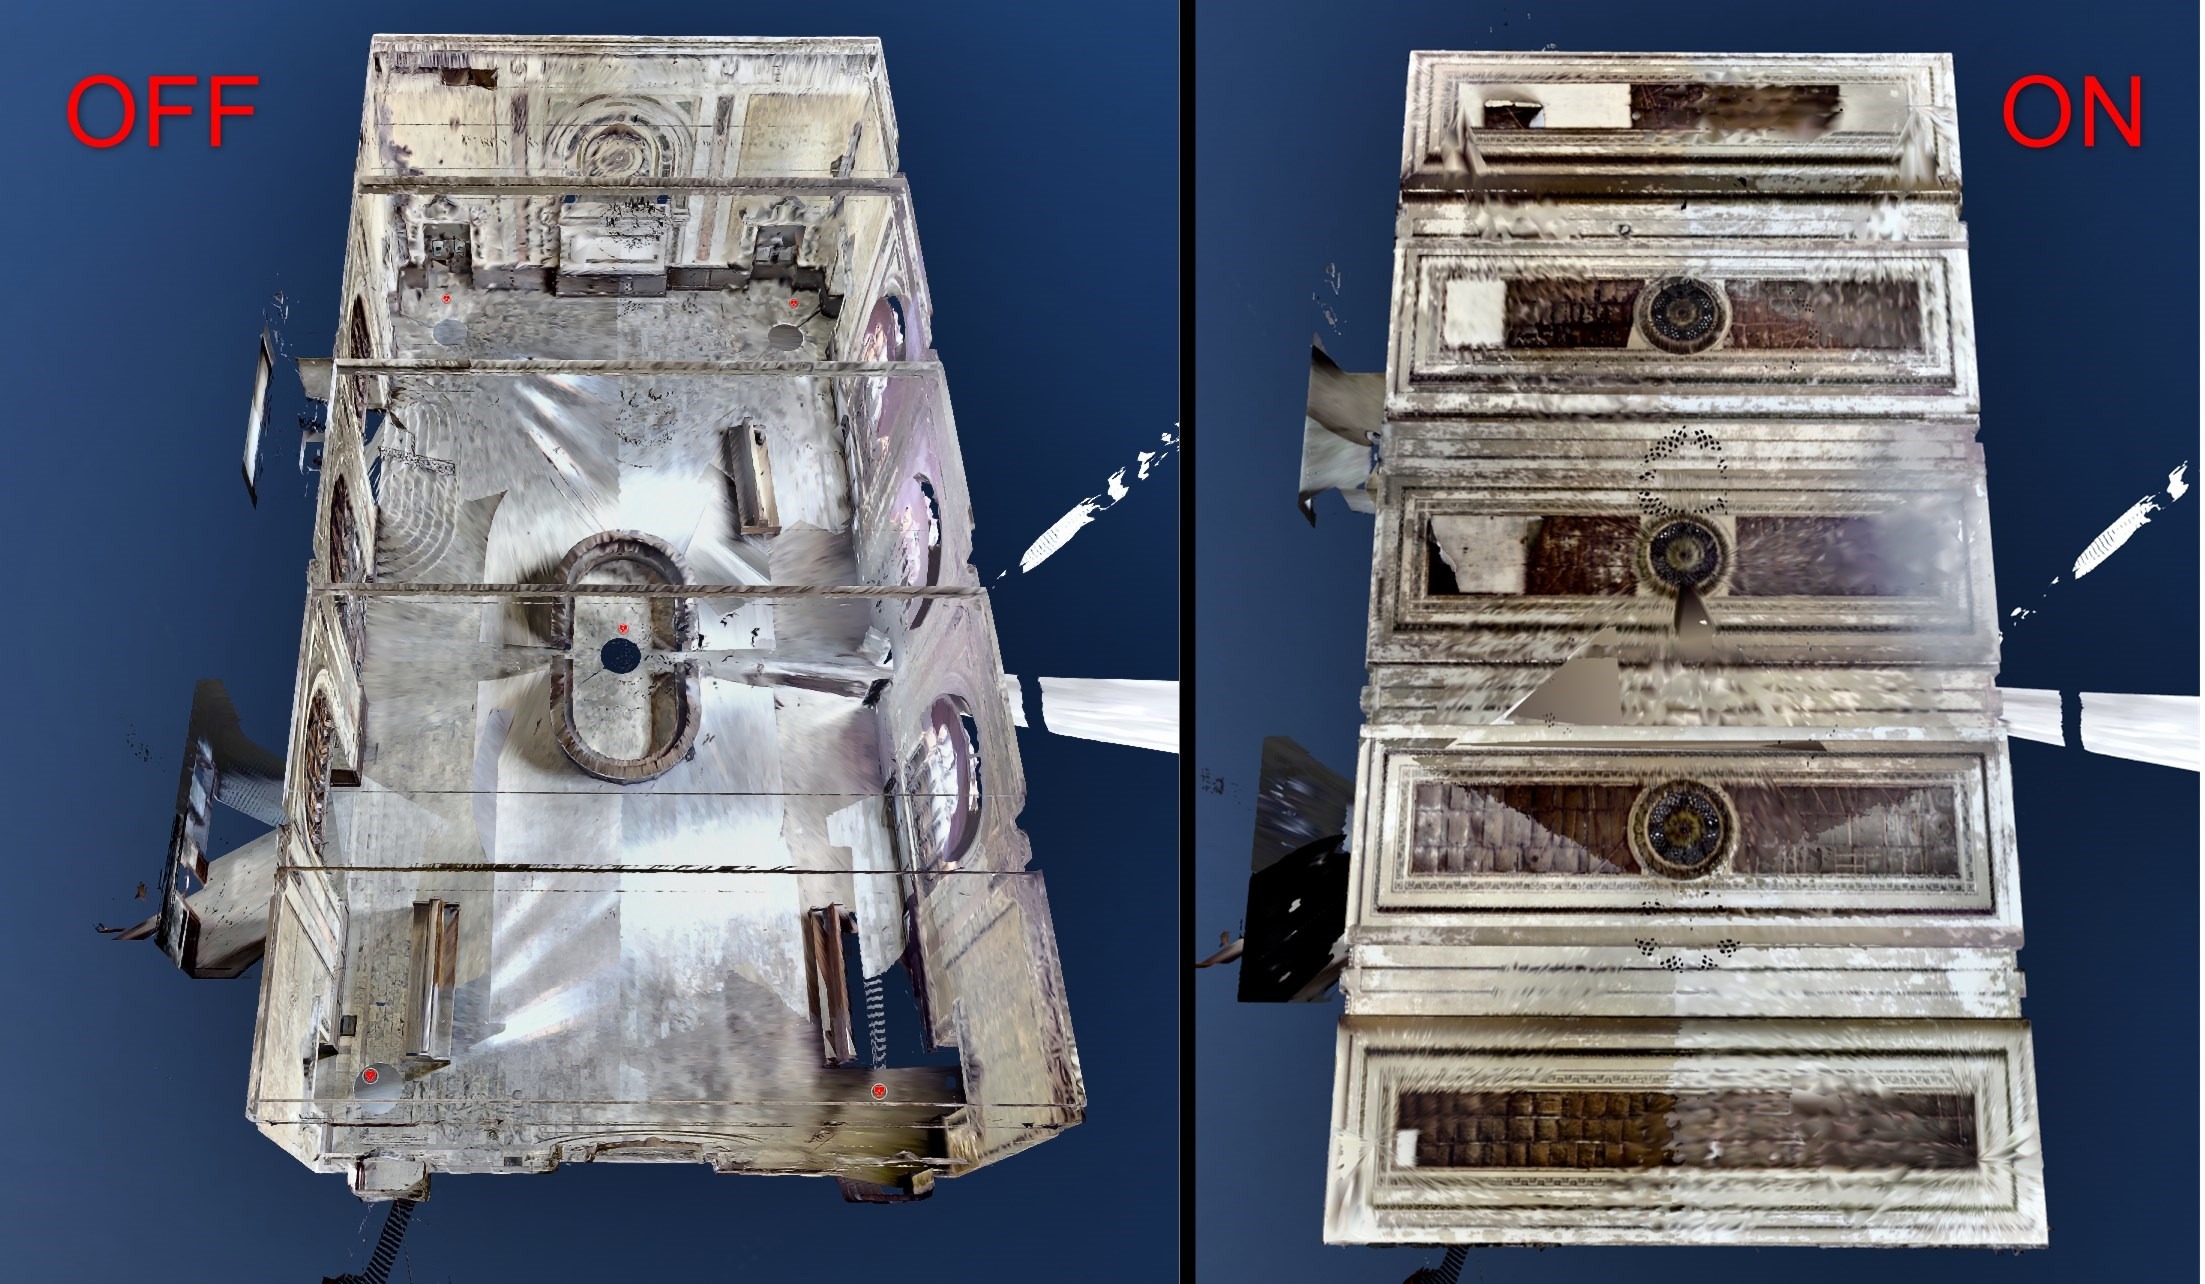
- Cara posterior – permite ocultar las caras posteriores de las superficies de malla 3D para poder ver el interior de los edificios desde afuera y limpiar la escena de piezas de malla innecesarias
Navegación
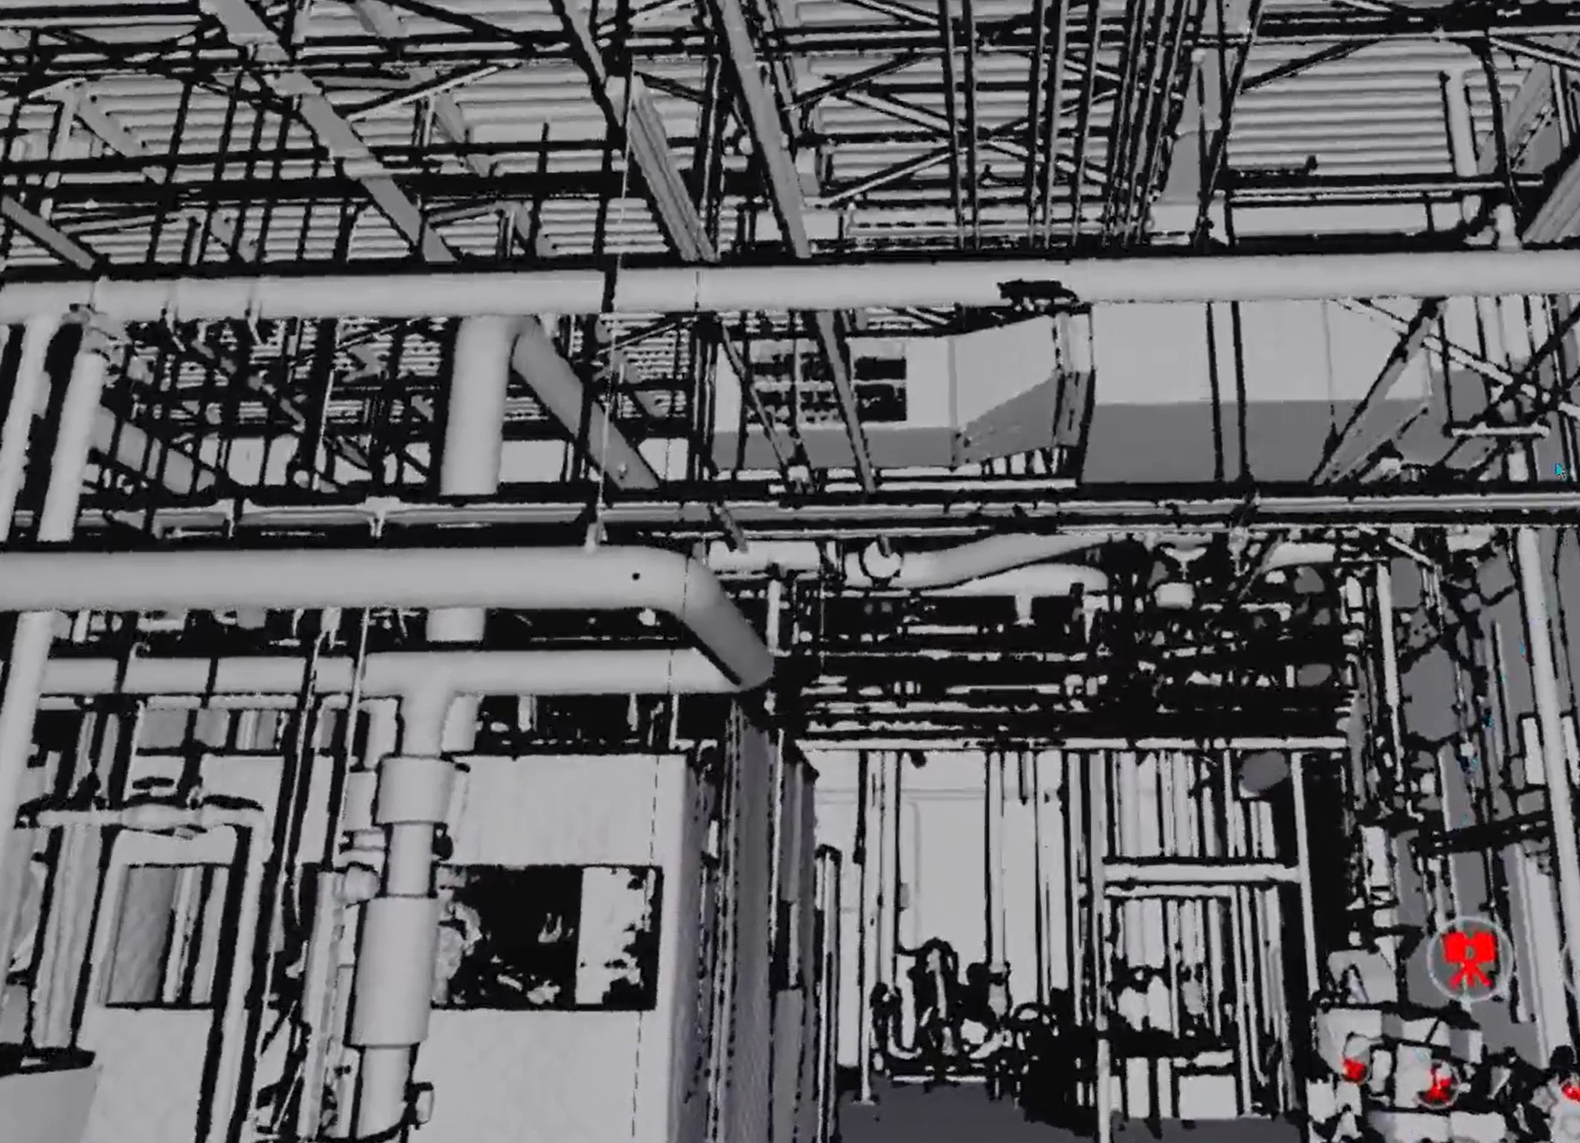
En el Modo de escritorio de la aplicación de Cintoo VR Experience es posible navegar de escaneo a escaneo o en modo vuelo libremente en el espacio 3D. Haz clic en los iconos de escáner flotantes o muévete libremente manteniendo presionado cualquier botón del ratón y moviendo el ratón, usa Shift para girar la cámara.
Options
En el panel superior, abre el menú Opciones para cambiar los parámetros de visualización dentro de la aplicación y elegir configuraciones adicionales.

- Precargar Anotaciones - permite obtener anotaciones para el proyecto seleccionado.
Similar a Fetch from cloud en Anotaciones. - VR Tunnel Vison - debido al cambio de locomoción de navegación, los usuarios pueden activar esta opción para hacer el movimiento más suave. También se puede activar desde el menú VR Tools.
- Calidad visual - la misma configuración que en la página de inicio de sesión descrita en detalle en Descubre la aplicación
- Calidad de los escaneos - la misma configuración que en la página de inicio de sesión descrita en detalle en Descubre la aplicación
VR Mode
Connection
- para dispositivos Meta - after that establish connection with Meta Quest Link from the device by navigating to Settings, choosing Link, and clicking Launch. Or choose Link in Quick Settings menu.
Instrucciones más detalladas de Meta: Configura tu Meta Quest con Meta Quest Link - para otros dispositivos - establece conexión con la PC.
Para cambiar a VR mode y comenzar a transmitir al auricular haga clic en Virtual Reality en la esquina inferior derecha.

Controllers
Main controller chosen when starting the application is called Navigation controller. La configuración para diestros tendría botones A y B y se utiliza para navegar en un proyecto.
El segundo controlador se llama Tools controller. Tiene botones X e Y, en la configuración para diestros, y su uso es funcional. La interfaz para navegar por proyectos y datos se puede visualizar presionando botón B. Los controles de navegación y visualización son los mismos que en el modo de escritorio.

Navigation Methods
Cintoo VR Experience supports multiple navigation methods depending on your hardware setup. Each method below shows which platforms support it - use legend to find what works on your device, and check controls column for hardware-specific inputs.
Platform legend
| Icon | Platform |
|---|---|
 | VR - headset (Meta Quest, etc.) |
 | Desktop - PC with mouse & keyboard |
 | Igloo - large-format immersive display |
 | Web - browser-based viewer (standard Cintoo web experience) |
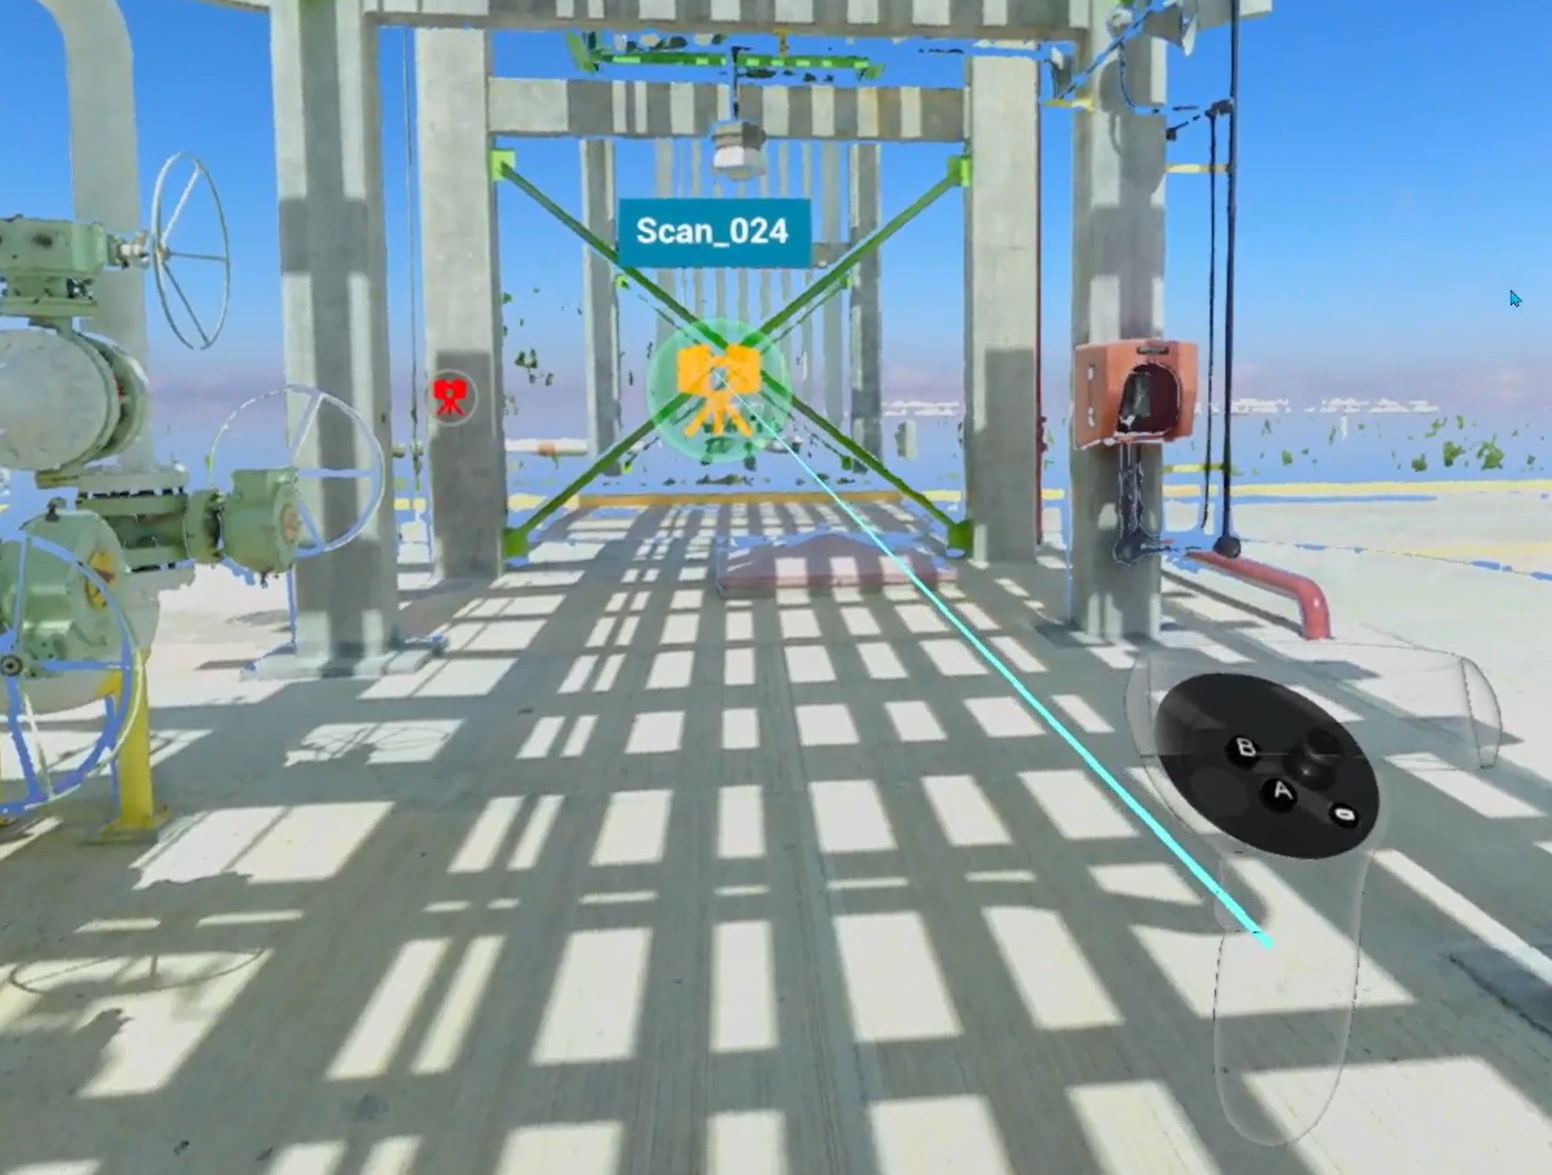
VR: Navigation controller projects a dynamic parabola that follows hand movement and adjusts in length - used as the primary targeting mechanism for scan selection, teleportation, and switching to Fly mode.
Core Locomotion
Methods for physically moving and orienting yourself within a scene - turning, walking, flying, and repositioning the view.
Look Around
Rotate the camera to look in any direction around you.
| Platform | Controls |
|---|---|
 VR VR | Physically turn your head |
 Desktop Desktop | Click and hold mouse wheel button, then move the mouse; hold Shift to turn camera |
 Igloo Igloo | Physically look and move around within tracked space |
 Web Web | Right-click + left-click drag (3D navigation look around) |
Walk Around
Move freely through physical space mapped onto the scene.
| Platform | Controls |
|---|---|
 VR VR | Walk naturally within the area around you |
 Igloo Igloo | Walk within Igloo tracking space |
Giros rápidos
Snap-rotate view in 90-degree increments - useful when physically turning is limited.
| Platform | Controls |
|---|---|
 VR VR | Press Navigation controller joystick left or right |
 Igloo Igloo | Use 90-degree turn input on controller |
Pan
Shift viewpoint along an axis without rotating - useful for fine positional adjustments or aligning view.
| Platform | Controls |
|---|---|
 VR VR | Hold Tools controller grip to enter Pan mode, then move controller in desired direction. Works in both Egocentric and Exocentric scale. |
 Desktop Desktop | Vertical pan: hold right mouse button + drag. Horizontal pan: hold left mouse button + drag. Field of view: scroll mouse wheel. |
 Web Web | Vertical pan: right-click drag. Horizontal pan: left-click drag. Field of view: scroll wheel (3D navigation). |

Find more details in Control tips menu in Desktop mode or in the dedicated section Pan Mode.
Modo de vuelo
Move freely in all directions through 3D space, imitating flight.
Works in both Egocentric and Exocentric scale.
Note: Fly mode activates Turbomesh, using nearby active scans and models for real-time 3D reconstruction.
| Platform | Controls |
|---|---|
 VR VR | Starting from Teleport mode (blue parabola), click Navigation controller joystick 3 times - parabola cycles through yellow → pink → off. Once parabola disappears, Fly mode is active. Vertical movement: Tools controller joystick. Horizontal movement: Navigation controller joystick. |
Órbita
Rotate entire scene in parallel to the ground while your position stays fixed - useful for inspecting from multiple angles.
| Platform | Controls |
|---|---|
 VR VR | Hold both controller grips simultaneously. Move hands in opposite directions - one forward, one backward - as if rotating a large object. A line appears between controllers to confirm two-handed mode. |
 Web Web | Use 3D navigation Orbit control. |
Find more details in Control tips menu in Desktop mode or in the dedicated section Orbit.
Jump Around
Methods for jumping directly to a specific location or scan without continuous movement.
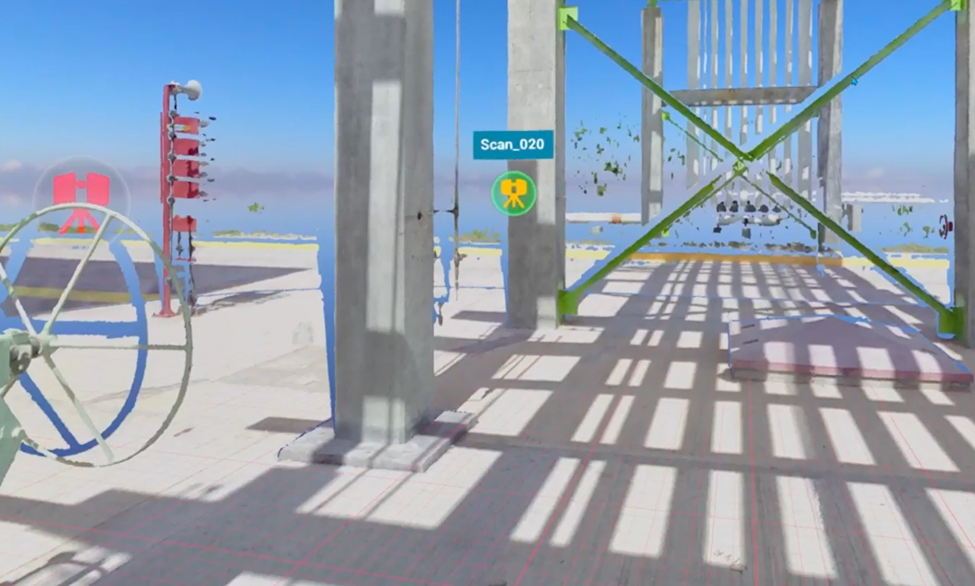
Scan to Scan
Jump directly to viewpoint of a specific scan by selecting it in scene or in Resources panel.
Note: display is limited to single scan when navigating this way.
| Platform | Controls |
|---|---|
 VR VR | Point Navigation controller at a scan icon - parabola becomes a straight line and icon highlights. Press trigger to go there. |
 Desktop Desktop | Click any floating scanner icon in 3D view, or click Target icon next to a scan in Resources tab. |
 Igloo Igloo | Point controller at a scan icon until it highlights, then press trigger. |
 Web Web | Click scan icon in scene. |
Teleport
Free teleportation to any floor-level position in scene.
Warning: teleportation is disabled while any interface menu is open.
| Platform | Controls |
|---|---|
 VR VR | Aim parabola - a red/blue floor grid and a target marker appear. When both targets merge, landing spot is locked. Press Navigation controller trigger to jump there. To set view height before teleporting: press X on Tools controller, then adjust with Navigation controller joystick up/down. Height is saved across all subsequent teleports. |
 Igloo Igloo | Aim controller at desired floor location and press trigger. |
 Web Web | Hold Shift and click target location. |
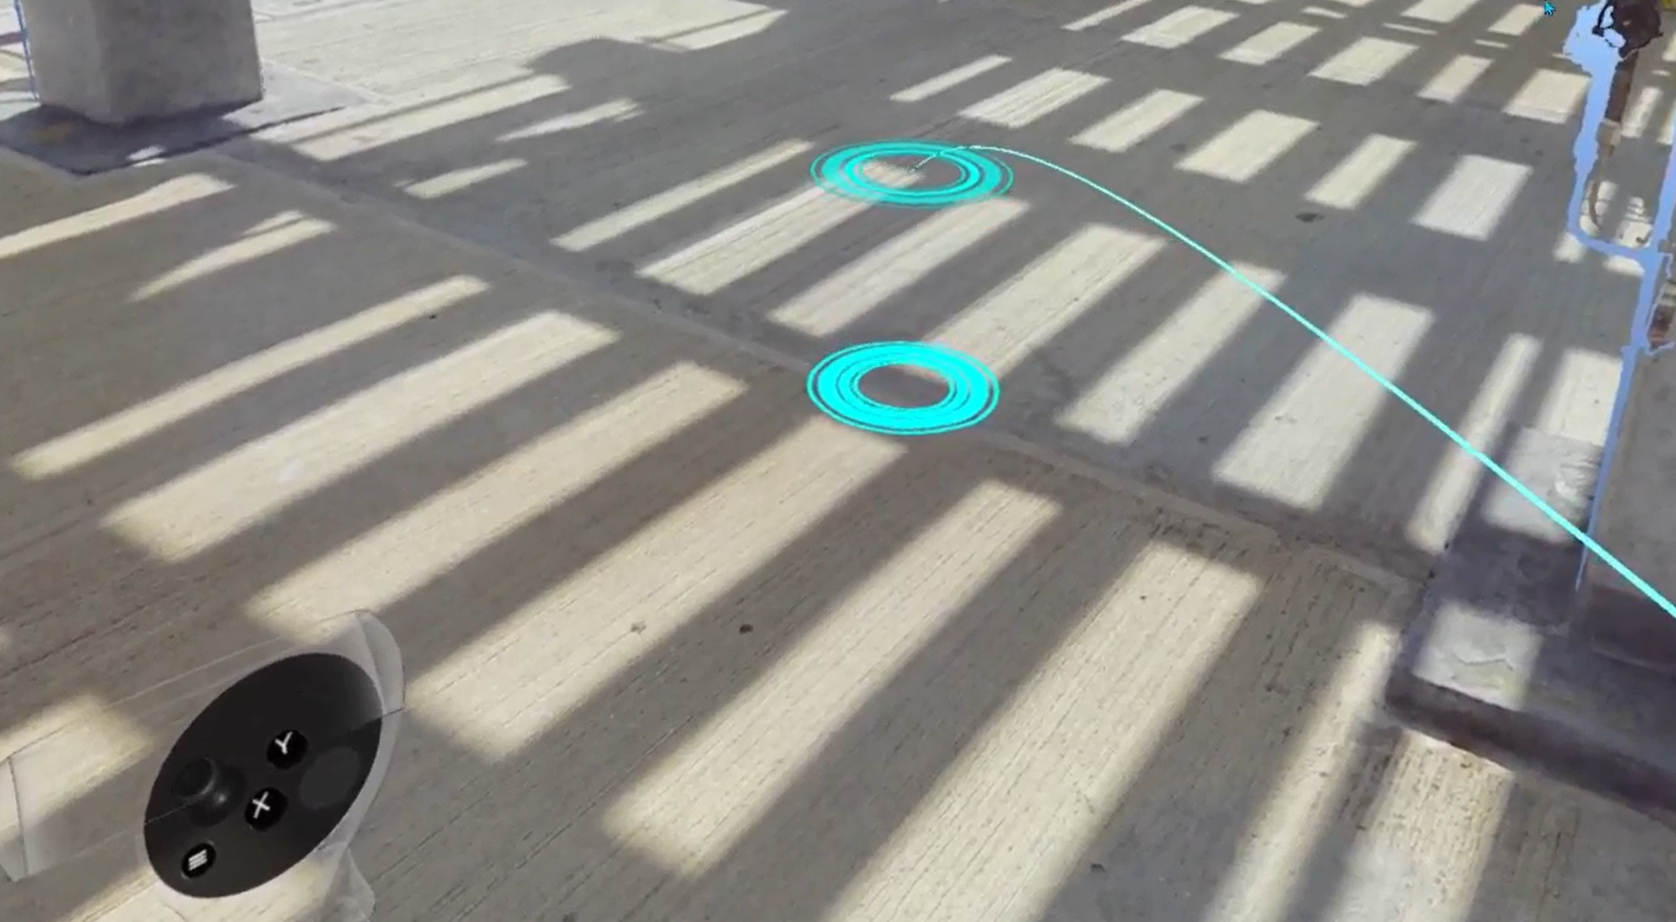
See also: Change Teleportation Height.
Scaling
Methods for changing your perspective scale - from 1:1 ground-level exploration to a full site overview and anywhere in between.
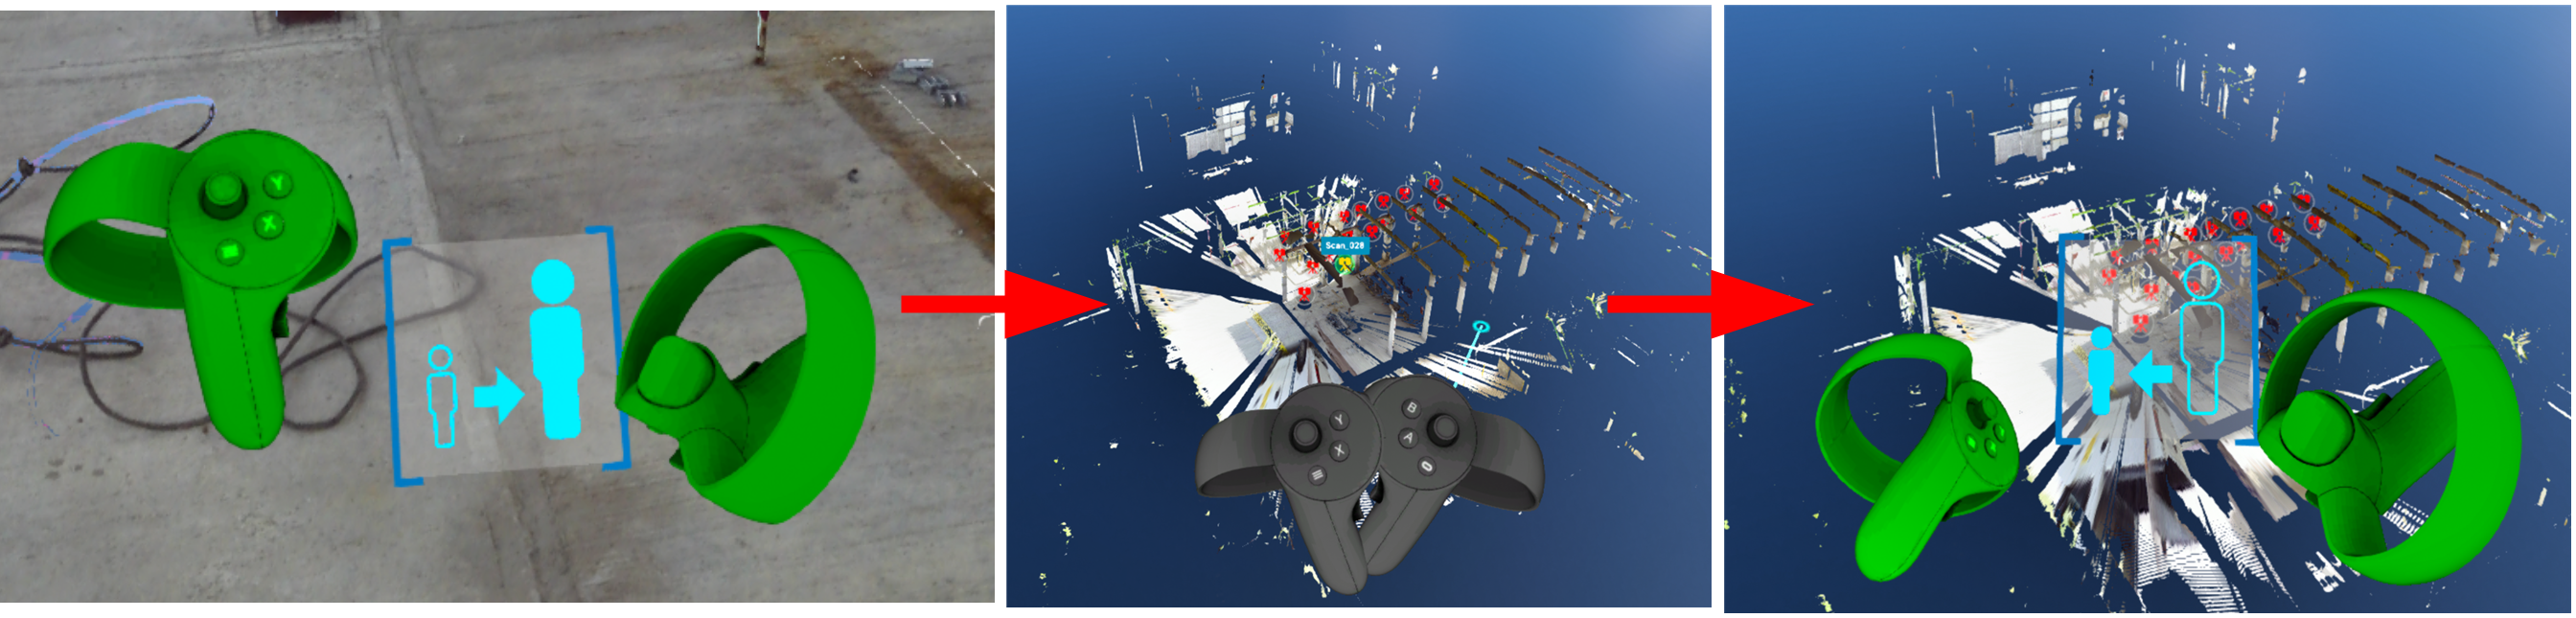
Exo / Egocentric Scale
Switch between 1:1 human-scale exploration (Egocentric) and a miniature overhead view of the full site (Exocentric). Exocentric mode enables full-site observation, architectural walkthrough evaluation, spatial relationship assessment, and measurement of distances beyond 1:1 scale.
| Platform | Controls |
|---|---|
 VR VR | Enter Exocentric: point Navigation controller toward the sky - a special indicator appears - then press trigger. Return to Egocentric: repeat same upward gesture (reverse indicator shown), or use teleport to jump back to ground level. Exo/Ego |
 Web Web | Click home / recenter camera button in 3D navigation controls. |
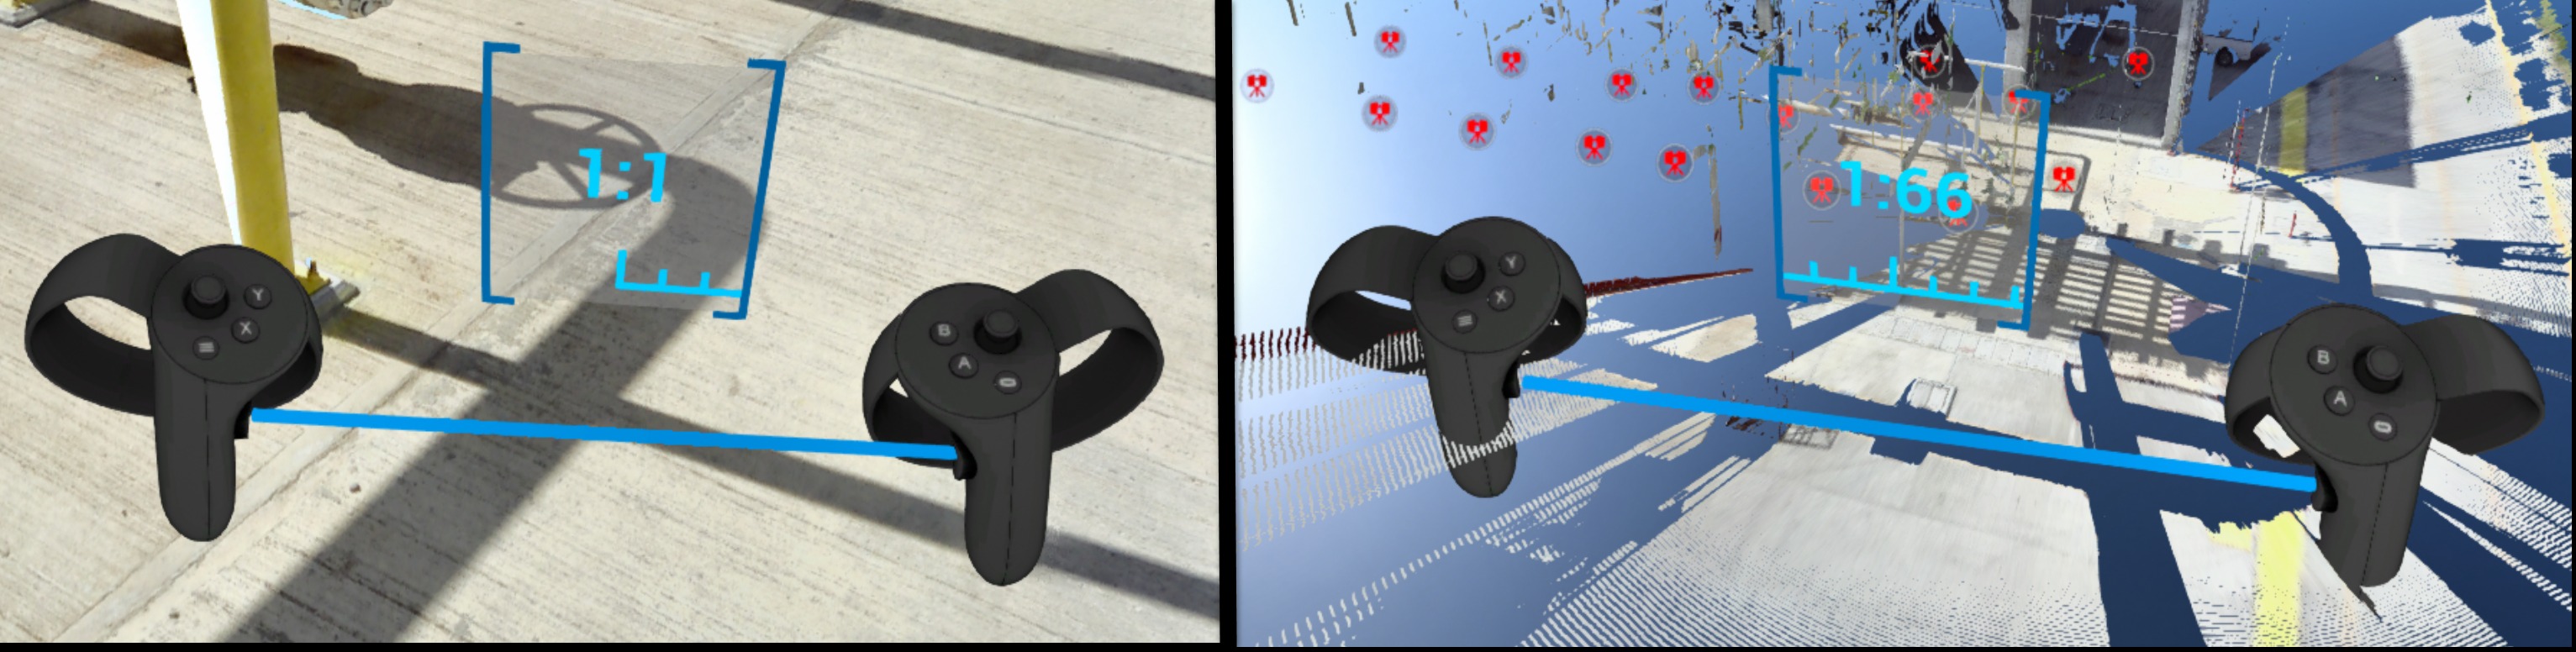
Escalado dinámico
Continuously zoom scene between 1:1 and 1:250 scale - useful for navigating between site-wide overview and detail inspection without leaving your position.
| Platform | Controls |
|---|---|
 VR VR | Hold both controller grips simultaneously. Spread hands apart to zoom in (toward 1:1). Bring hands together to zoom out (toward 1:250). A scale indicator appears between controllers showing current ratio. |
 Web Web | Scroll mouse wheel, or use 3D navigation Dynamic Scaling control. |
Find more details in Control tips menu in Desktop mode or in the dedicated section Dynamic Scaling.
Navigation Aids
Settings and modes that assist navigation, reduce motion discomfort, or control how the scene environment is displayed.
Tunnel Vision
Reduces motion sickness by narrowing peripheral field of view during locomotion (e.g. while teleporting).
| Platform | Controls |
|---|---|
 VR VR | Enable from Options menu (top panel in Desktop mode before entering VR) or from VR Tools Menu once in headset. |
Vision (Gaze) Control
Navigate using head gaze alone - no active controller input required. Useful when you want hands-free movement.
Note: display is limited to single scan when using gaze-based navigation.
| Platform | Controls |
|---|---|
 VR VR | Let your arms hang at your sides - controllers disappear from view. Orient your gaze toward a scan icon. Once icon highlights, press Navigation controller trigger to go there. |
Yellow / Magenta Gaze-Based Navigation
Special modes to control teleportation.
| Platform | Controls |
|---|---|
 VR VR | Teleport helpers |
Display Modes
Switch how point cloud data is rendered. Available modes vary by platform.
- RGB - colorful image taken from scanner data
- X-ray - transparent mode for comparison of multiple scans
- Surface - mesh generated from scan data
- Heightmap - scene colored according to object heights (VR and Igloo only)
| Platform | Available modes |
|---|---|
 VR VR | All modes except Intensity and 2D panoramic. Switch from VR Tools Menu or press Y on Tools controller to cycle. |
 Desktop Desktop | All modes except heightmap, intensity, and 2D panoramic. Available in Display Modes panel at top of screen. |
 Igloo Igloo | All modes except Intensity and 2D panoramic |
 Web Web | All display modes |

Heightmap (VR)
Displays scene colored according to object heights. Clicking Heightmap button changes display mode and shows a color legend. Move window by grabbing title of legend with Navigation controller trigger.
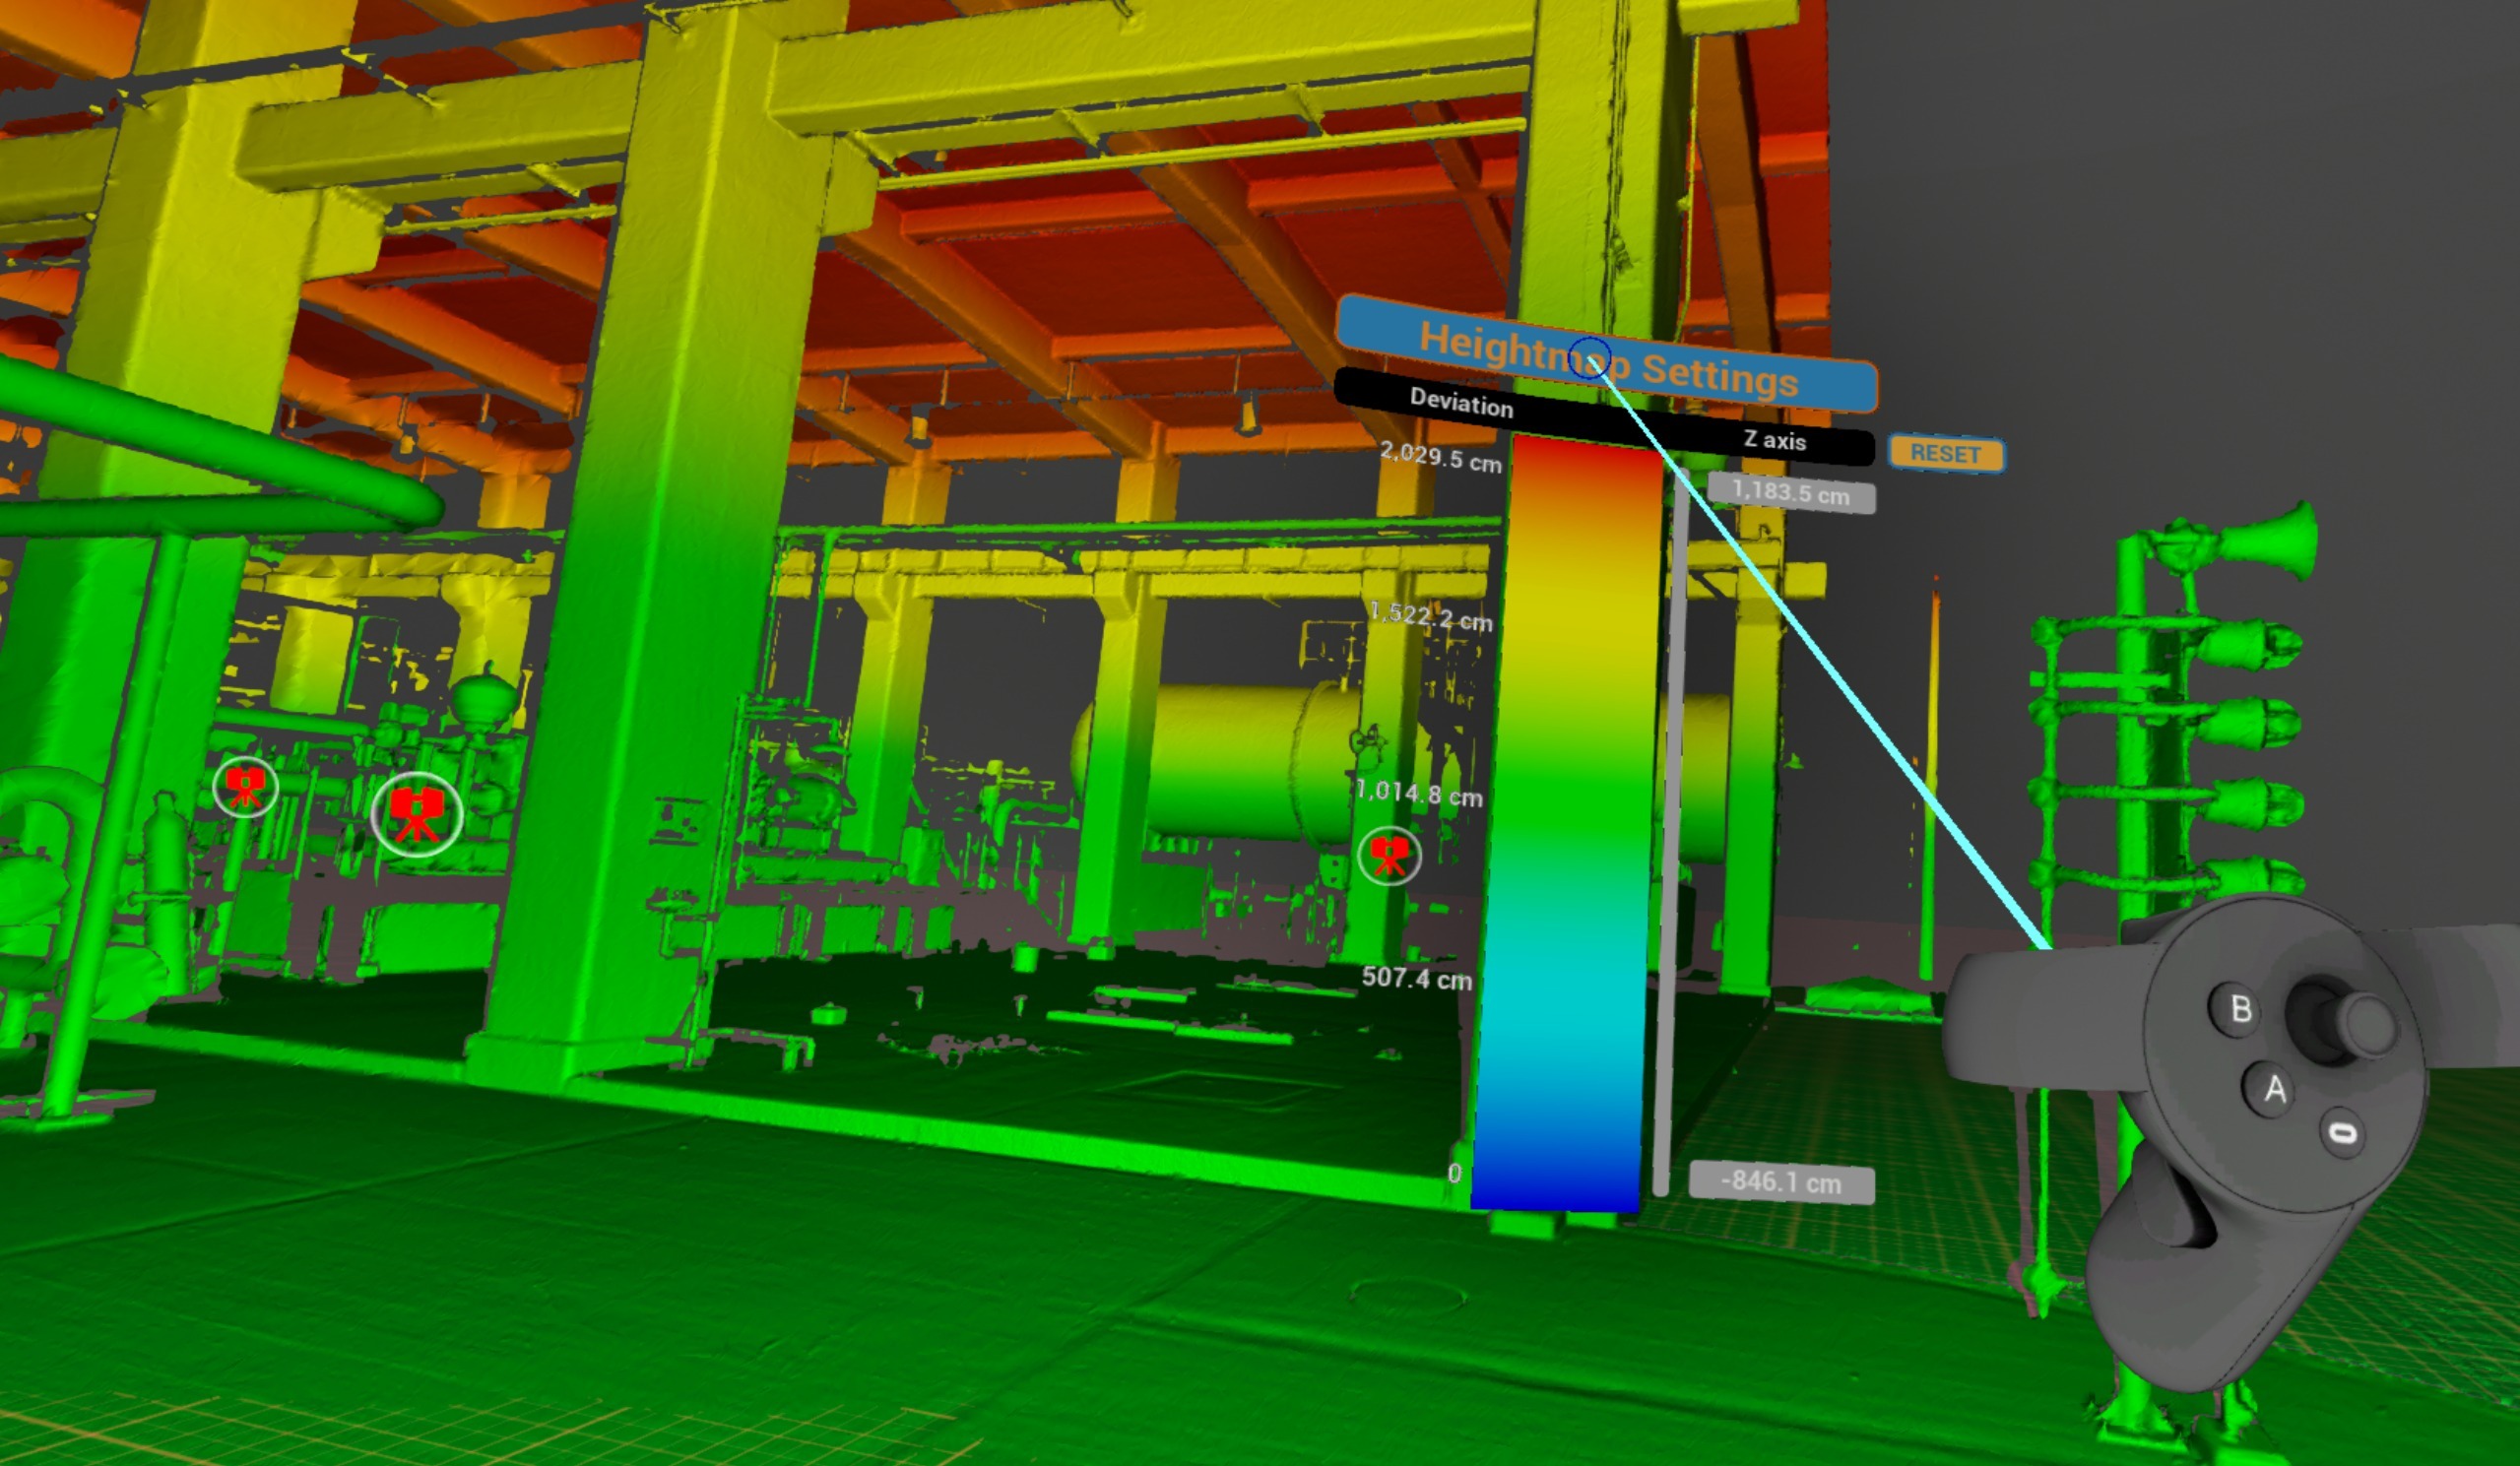
To adjust height limits point at a number and pull or push Navigation controller thumbstick.

Slide grey bar up and down to offset range set.
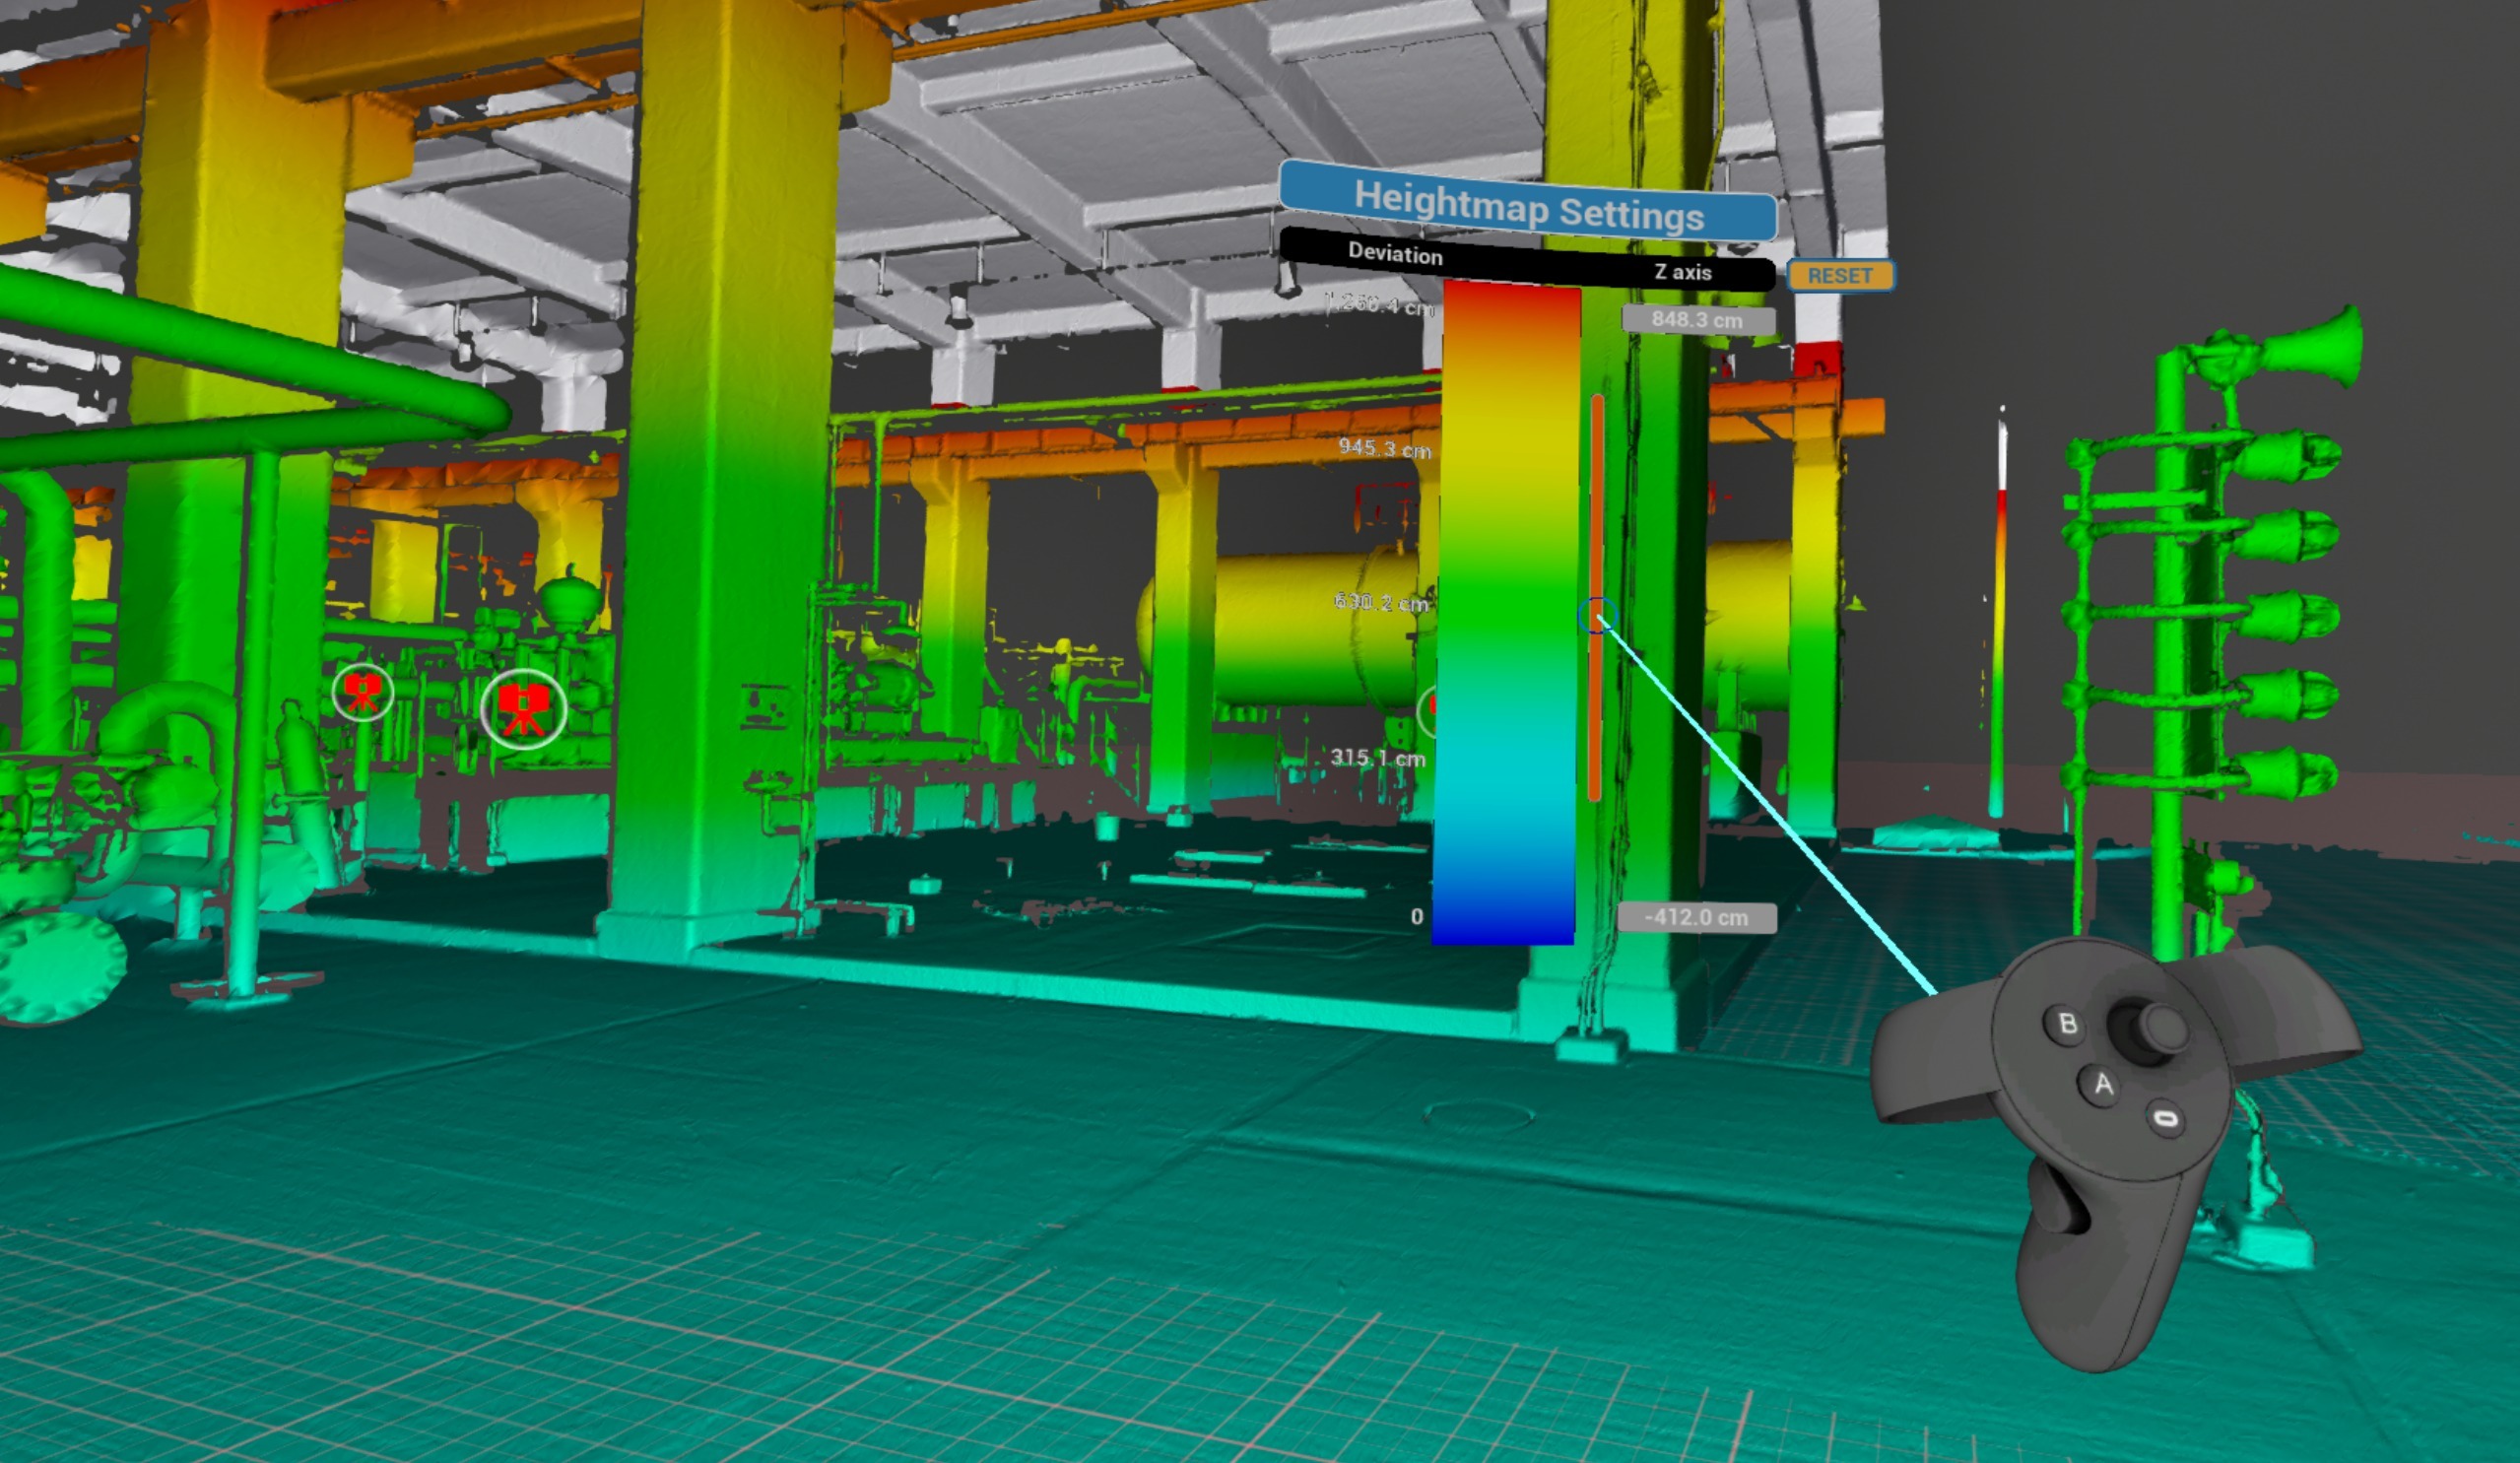
Click Reset to return to default settings.
Indoor / Outdoor
Replace sky background with a black one for indoor scenes. Can be used alongside other display modes (RGB, X-ray, Surface).
| Platform | Controls |
|---|---|
 VR VR | Switch from VR Tools Menu |
 Desktop Desktop | Available in Display Modes panel at top of screen |
 Web Web | Background color/image control |
Virtual Floor Grid
Display a reference grid on floor plane to aid spatial orientation.
| Platform | Controls |
|---|---|
 VR VR | Available |
 Igloo Igloo | Available |
Performance Options
Settings that affect rendering quality and visual output of point cloud data and 3D geometry.
Backfaces
Show or hide back-facing surfaces of 3D mesh - useful for seeing inside buildings from outside and cleaning up the scene from unnecessary mesh pieces. Can be used alongside other display modes (RGB, X-ray, Surface).
| Platform | Controls |
|---|---|
 VR VR | Switch from VR Tools Menu. |
 Desktop Desktop | Available in Display Modes panel at top of screen. |
 Igloo Igloo | Available |
 Web Web | Available |
Visual / Scan Quality
Adjust rendering quality level for point cloud scans and 3D visuals.
| Platform | Controls |
|---|---|
 VR VR | Available |
 Desktop Desktop | Available |
 Igloo Igloo | Available |
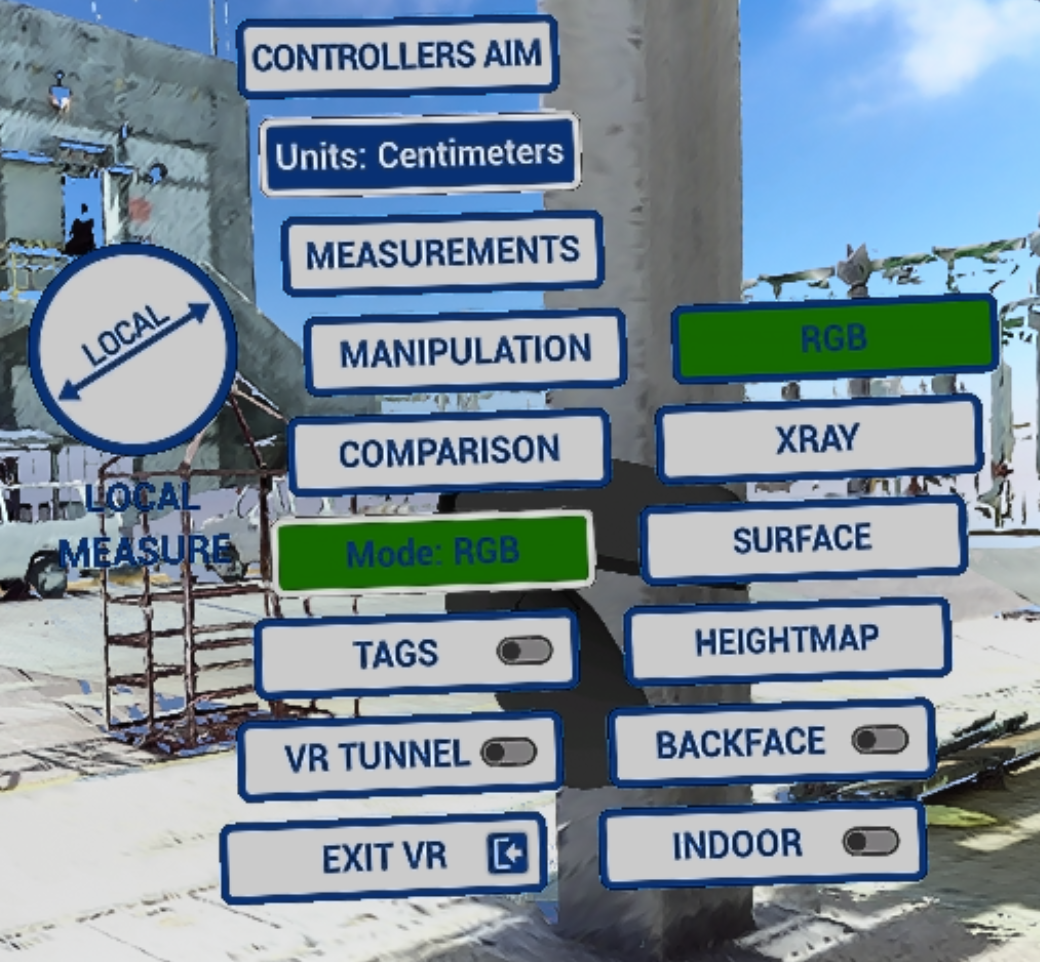
Menú de Herramientas VR
Este menú sirve como el control principal para habilitar/deshabilitar modos y acceder a funciones.
Para ingresar al menú de VR Tools haz clic en el thumbstick del Tools controller. 
- Configura Controllers Aim (más información en Controller Aim)
- Cambia las Unidades que se utilizarán en mediciones y mapa de altura
- Obtén diferentes Mediciones (VR actions Measurements)
- Realiza la manipulación de modelos CAD (¡aún no está activada!)
- Utiliza las herramientas de Comparación (VR actions Comparison). Solo está disponible la Verificación visual.
- Cambia el Display mode incluyendo Heightmap, Backface y Interior
Note: switch between display modes by clicking Y button on Tools controller. Cycle Display Modes
- Activar Etiquetas para revisión (VR actions Tags)
- Túnel VR - navegación y teletransportación más suaves de escaneo a escaneo. Más detalles en Opciones
- Exit VR mode – exit to Desktop mode
¿Le fue útil este artículo?
¡Qué bueno!
Gracias por sus comentarios
¡Sentimos mucho no haber sido de ayuda!
Gracias por sus comentarios
Comentarios enviados
Agradecemos su iniciativa, e intentaremos corregir el artículo