この記事では、Cintoo VR Experience アプリケーションのデスクトップモードおよびVRモードでのナビゲーションについて説明します。 データの構造と可視化、および利用可能な主要なインターフェース要素とツールについてよりよく理解するのに役立ちます。
目次
- Desktop Mode
- VR Mode
Desktop Mode
まず、左側の Projects タブをクリックし、VRで体験するプロジェクトを選択します。 プロジェクトが開かれたら in Resources および Work Zones tabs choose objects to be activated.

上部の Log Out ボタンをクリックすると、ログインメニューに戻ります。
Workzones and Resources
Workzones tab reflects project's work zone structure with number of objects indicators in blue.
To the left of each work zone there are clickable icons:
 Open eye icon means that a work zone is active
 Closed eye means that a work zone is inactive
Activate needed work zones to see their content in Resources tab.
Resources tab contains only active work zones with all scan and model type objects.
オブジェクトの左側( Resources タブ内)には、クリック可能なアイコンがあります:
- 目のアイコンが開いている場合はオブジェクトがアクティブであることを意味します
- 閉じた目はオブジェクトが非アクティブであることを示します
 ターゲット を使用すると、リソース Resources タブから直接オブジェクトにジャンプできます
- 表示するデータの量を設定した後、ワークゾーン および リソース を再度クリックすることでタブを最小化できます。
表示モードパネル
At the top of the screen in the middle Display modes panel that controls visualization is located:

- RGB – スキャナーデータから取得したカラフルな画像
- X線 – 複数スキャンの比較のための透明モード
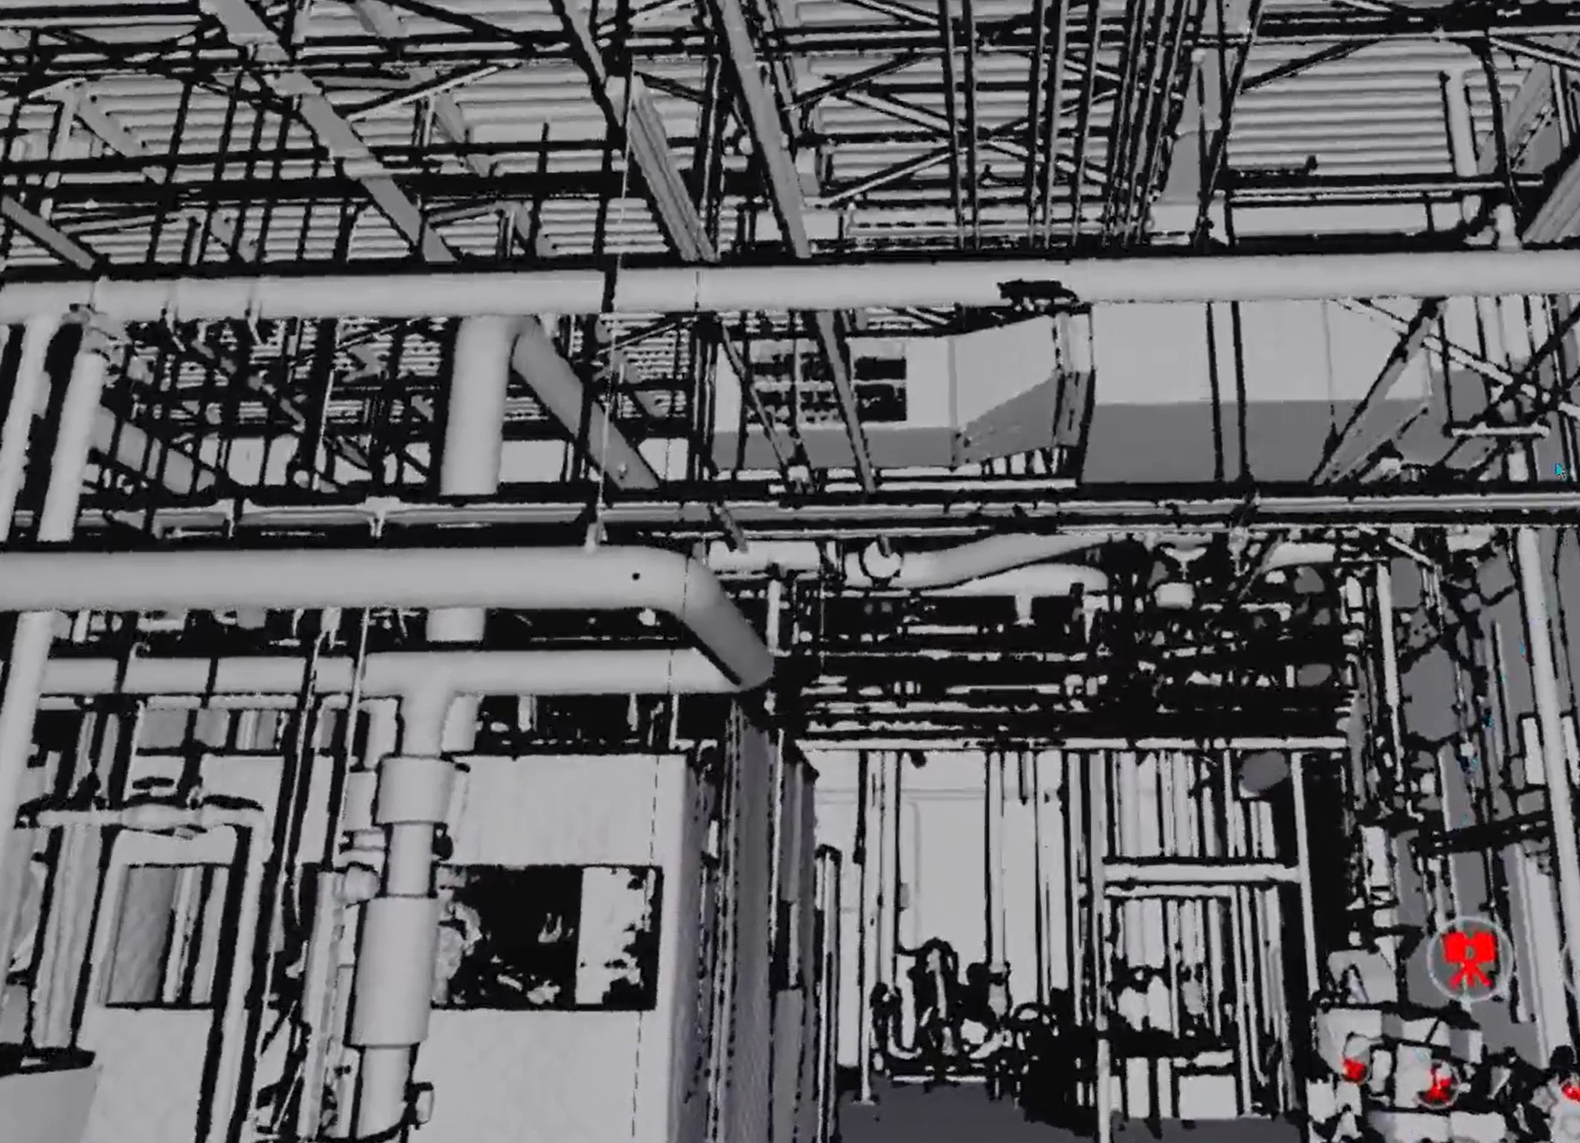
- サーフェス - スキャンデータから生成されたメッシュ
- 屋内 – 建物 環境を暗くするモード
- Backface – 3Dメッシュの裏面を隠すことができ、建物の内部を外から見ることができ、シーンから不要なメッシュを取り除くことができます。
Navigation
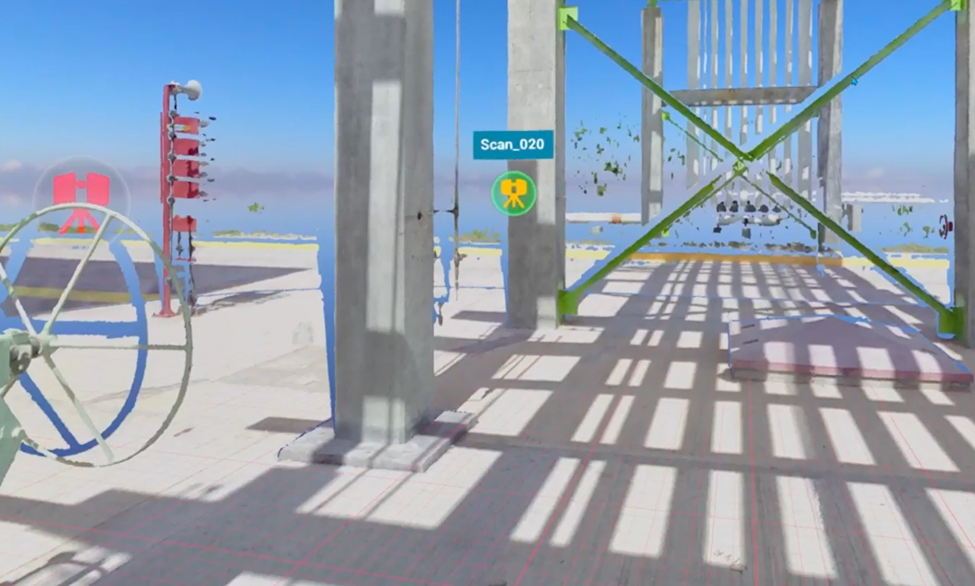
Cintoo VR Experienceアプリケーションのデスクトップモードでは、スキャンからスキャンへ移動するか、飛行モードで3D空間内を自由に移動できます。 フローティングスキャナーアイコンをクリックするか、任意のマウスボタンを押しながらマウスを移動して自由に動き回り、mouse, Shiftを使ってカメラを回転させます。
Options
上部パネルでオプション メニューを開き、アプリケーション内の視覚化パラメータを変更し、追加の設定を選択します。

- 注釈を事前に読み込む - 選択したプロジェクトの注釈を取得できます。
注釈のクラウドからの取得に似ています。 - VRトンネルビジョン - ナビゲーション移動が変更されたため、ユーザーはこのオプションを有効にして移動をスムーズにすることができます。 VR ツールメニューからも起動できます。
- 視覚品質 - ログインページでの同じ設定がさらに詳細に説明されています アプリケーションの探索
- スキャン 品質 - ログインページでの同じ設定が詳細に
説明されています アプリケーションの探索
VR Mode
Connection
- Meta デバイスの場合 - その後、デバイスから Meta Quest リンクをナビゲートして設定を選び、リンクを選択して、開始をクリックして接続を確立します。 またはリンク をクイック設定メニューで選択します。
Metaによるより詳細な手順: Meta QuestをMeta Quest Linkでセットアップする - その他のデバイスの場合 - PCとの接続を確立します。
VRモードに切り替えて ヘッドセットへのストリーミングを開始するには 右下のVirtual Reality をクリックします。

Controllers
アプリケーションを開始するときに選択されるメインコントローラーはNavigation controller。 右利き設定では AとB ボタン があり、プロジェクト内のナビゲーションに使用します。
2番目のコントローラーはTools controller。 右利き設定では、 XとY ボタン があり、機能操作に使用します。 プロジェクトとデータのナビゲーションインターフェースは、B buttonを押すことで可視化できます。 ナビゲーションおよび視覚化コントロールは、デスクトップモードと同じです。

Navigation Methods
Cintoo VR Experience supports multiple navigation methods depending on your hardware setup. Each method below shows which platforms support it - use legend to find what works on your device, and check controls column for hardware-specific inputs.
Platform legend
| Icon | Platform |
|---|---|
 | VR - headset (Meta Quest, etc.) |
 | Desktop - PC with mouse & keyboard |
 | Igloo - large-format immersive display |
 | Web - browser-based viewer (standard Cintoo web experience) |
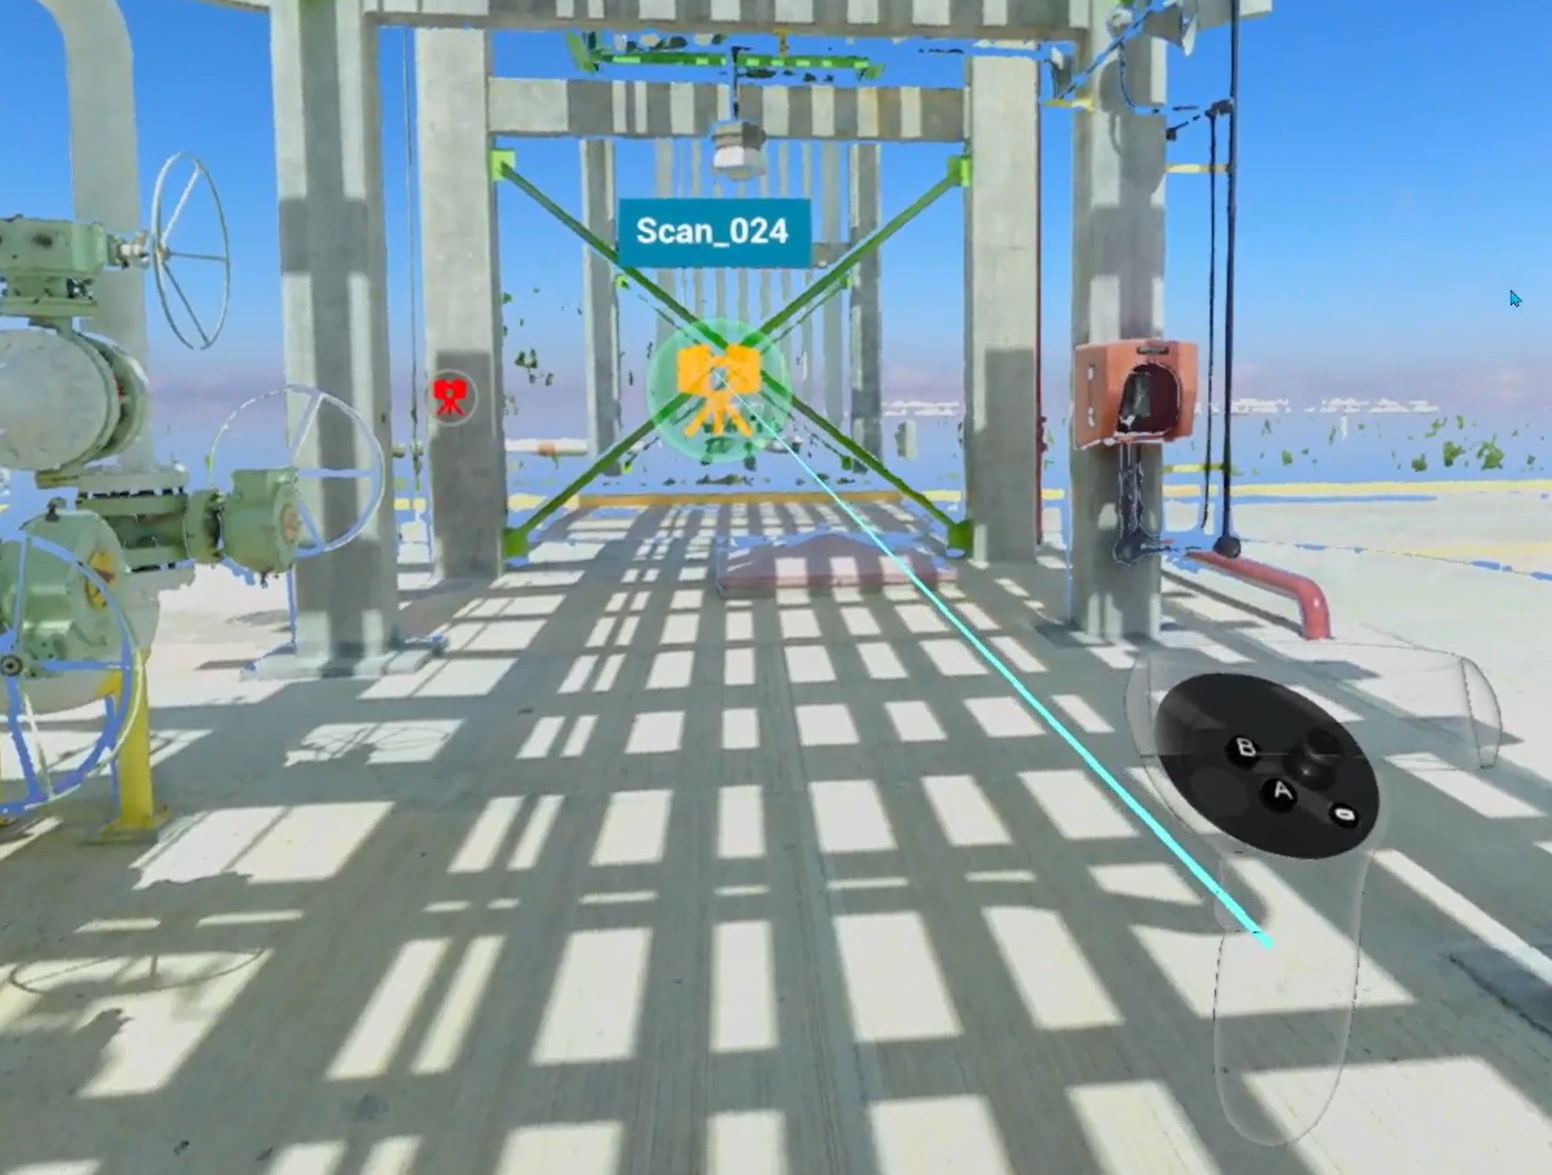
VR: Navigation controller projects a dynamic parabola that follows hand movement and adjusts in length - used as the primary targeting mechanism for scan selection, teleportation, and switching to Fly mode.
Core Locomotion
Methods for physically moving and orienting yourself within a scene - turning, walking, flying, and repositioning the view.
Look Around
Rotate the camera to look in any direction around you.
| Platform | Controls |
|---|---|
 VR VR | Physically turn your head |
 Desktop Desktop | Click and hold mouse wheel button, then move the mouse; hold Shift to turn camera |
 Igloo Igloo | Physically look and move around within tracked space |
 Web Web | Right-click + left-click drag (3D navigation look around) |
Walk Around
Move freely through physical space mapped onto the scene.
| Platform | Controls |
|---|---|
 VR VR | Walk naturally within the area around you |
 Igloo Igloo | Walk within Igloo tracking space |
クイックターン
Snap-rotate view in 90-degree increments - useful when physically turning is limited.
| Platform | Controls |
|---|---|
 VR VR | Press Navigation controller joystick left or right |
 Igloo Igloo | Use 90-degree turn input on controller |
Pan
Shift viewpoint along an axis without rotating - useful for fine positional adjustments or aligning view.
| Platform | Controls |
|---|---|
 VR VR | Hold Tools controller grip to enter Pan mode, then move controller in desired direction. Works in both Egocentric and Exocentric scale. |
 Desktop Desktop | Vertical pan: hold right mouse button + drag. Horizontal pan: hold left mouse button + drag. Field of view: scroll mouse wheel. |
 Web Web | Vertical pan: right-click drag. Horizontal pan: left-click drag. Field of view: scroll wheel (3D navigation). |

Find more details in Control tips menu in Desktop mode or in the dedicated section Pan Mode.
飛行モード
Move freely in all directions through 3D space, imitating flight.
Works in both Egocentric and Exocentric scale.
Note: Fly mode activates Turbomesh, using nearby active scans and models for real-time 3D reconstruction.
| Platform | Controls |
|---|---|
 VR VR | Starting from Teleport mode (blue parabola), click Navigation controller joystick 3 times - parabola cycles through yellow → pink → off. Once parabola disappears, Fly mode is active. Vertical movement: Tools controller joystick. Horizontal movement: Navigation controller joystick. |
オービット
Rotate entire scene in parallel to the ground while your position stays fixed - useful for inspecting from multiple angles.
| Platform | Controls |
|---|---|
 VR VR | Hold both controller grips simultaneously. Move hands in opposite directions - one forward, one backward - as if rotating a large object. A line appears between controllers to confirm two-handed mode. |
 Web Web | Use 3D navigation Orbit control. |
Find more details in Control tips menu in Desktop mode or in the dedicated section Orbit.
Jump Around
Methods for jumping directly to a specific location or scan without continuous movement.
Scan to Scan
Jump directly to viewpoint of a specific scan by selecting it in scene or in Resources panel.
Note: display is limited to single scan when navigating this way.
| Platform | Controls |
|---|---|
 VR VR | Point Navigation controller at a scan icon - parabola becomes a straight line and icon highlights. Press trigger to go there. |
 Desktop Desktop | Click any floating scanner icon in 3D view, or click Target icon next to a scan in Resources tab. |
 Igloo Igloo | Point controller at a scan icon until it highlights, then press trigger. |
 Web Web | Click scan icon in scene. |
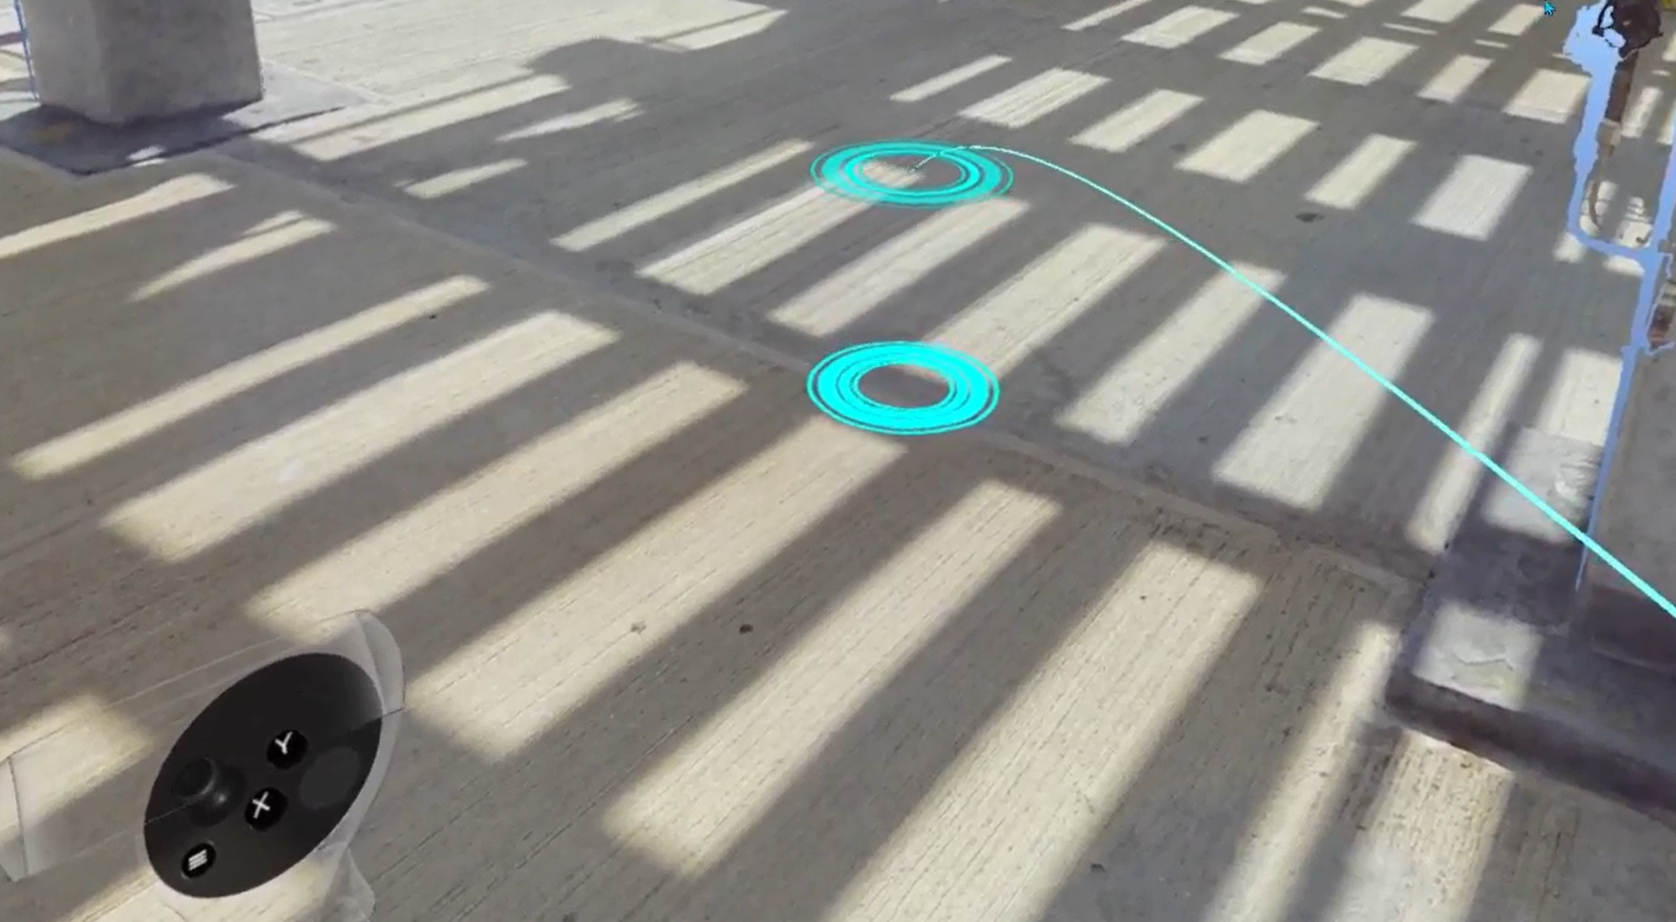
Teleport
Free teleportation to any floor-level position in scene.
Warning: teleportation is disabled while any interface menu is open.
| Platform | Controls |
|---|---|
 VR VR | Aim parabola - a red/blue floor grid and a target marker appear. When both targets merge, landing spot is locked. Press Navigation controller trigger to jump there. To set view height before teleporting: press X on Tools controller, then adjust with Navigation controller joystick up/down. Height is saved across all subsequent teleports. |
 Igloo Igloo | Aim controller at desired floor location and press trigger. |
 Web Web | Hold Shift and click target location. |
See also: Change Teleportation Height.
Scaling
Methods for changing your perspective scale - from 1:1 ground-level exploration to a full site overview and anywhere in between.
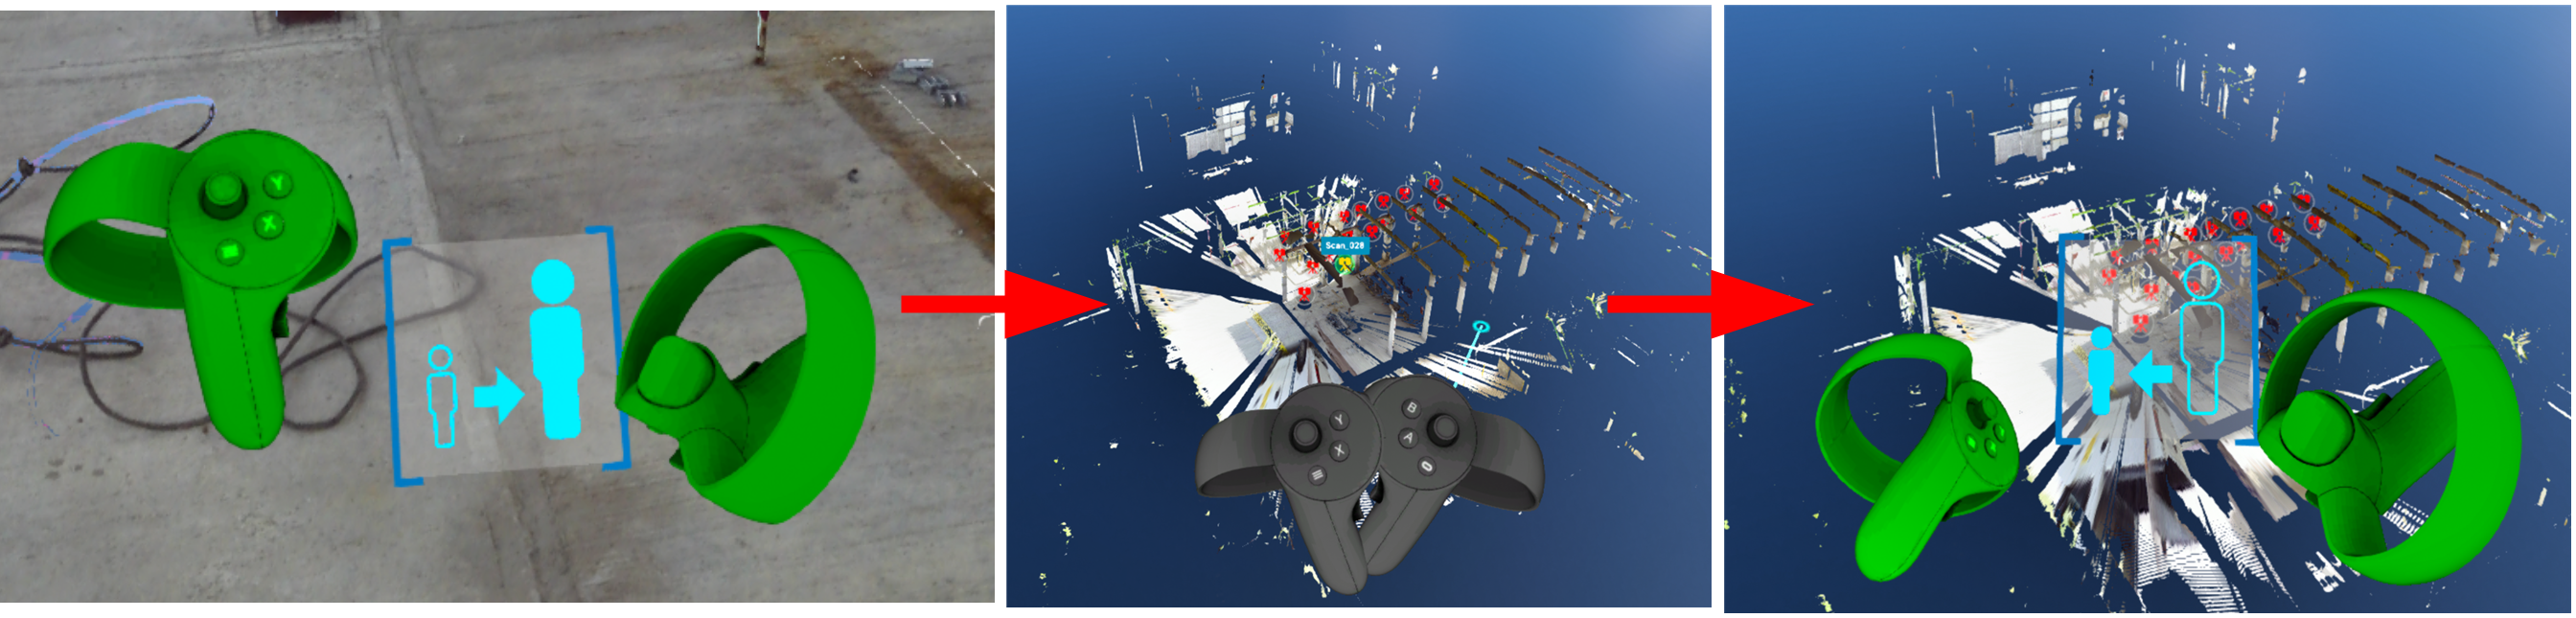
Exo / Egocentric Scale
Switch between 1:1 human-scale exploration (Egocentric) and a miniature overhead view of the full site (Exocentric). Exocentric mode enables full-site observation, architectural walkthrough evaluation, spatial relationship assessment, and measurement of distances beyond 1:1 scale.
| Platform | Controls |
|---|---|
 VR VR | Enter Exocentric: point Navigation controller toward the sky - a special indicator appears - then press trigger. Return to Egocentric: repeat same upward gesture (reverse indicator shown), or use teleport to jump back to ground level. Exo/Ego |
 Web Web | Click home / recenter camera button in 3D navigation controls. |
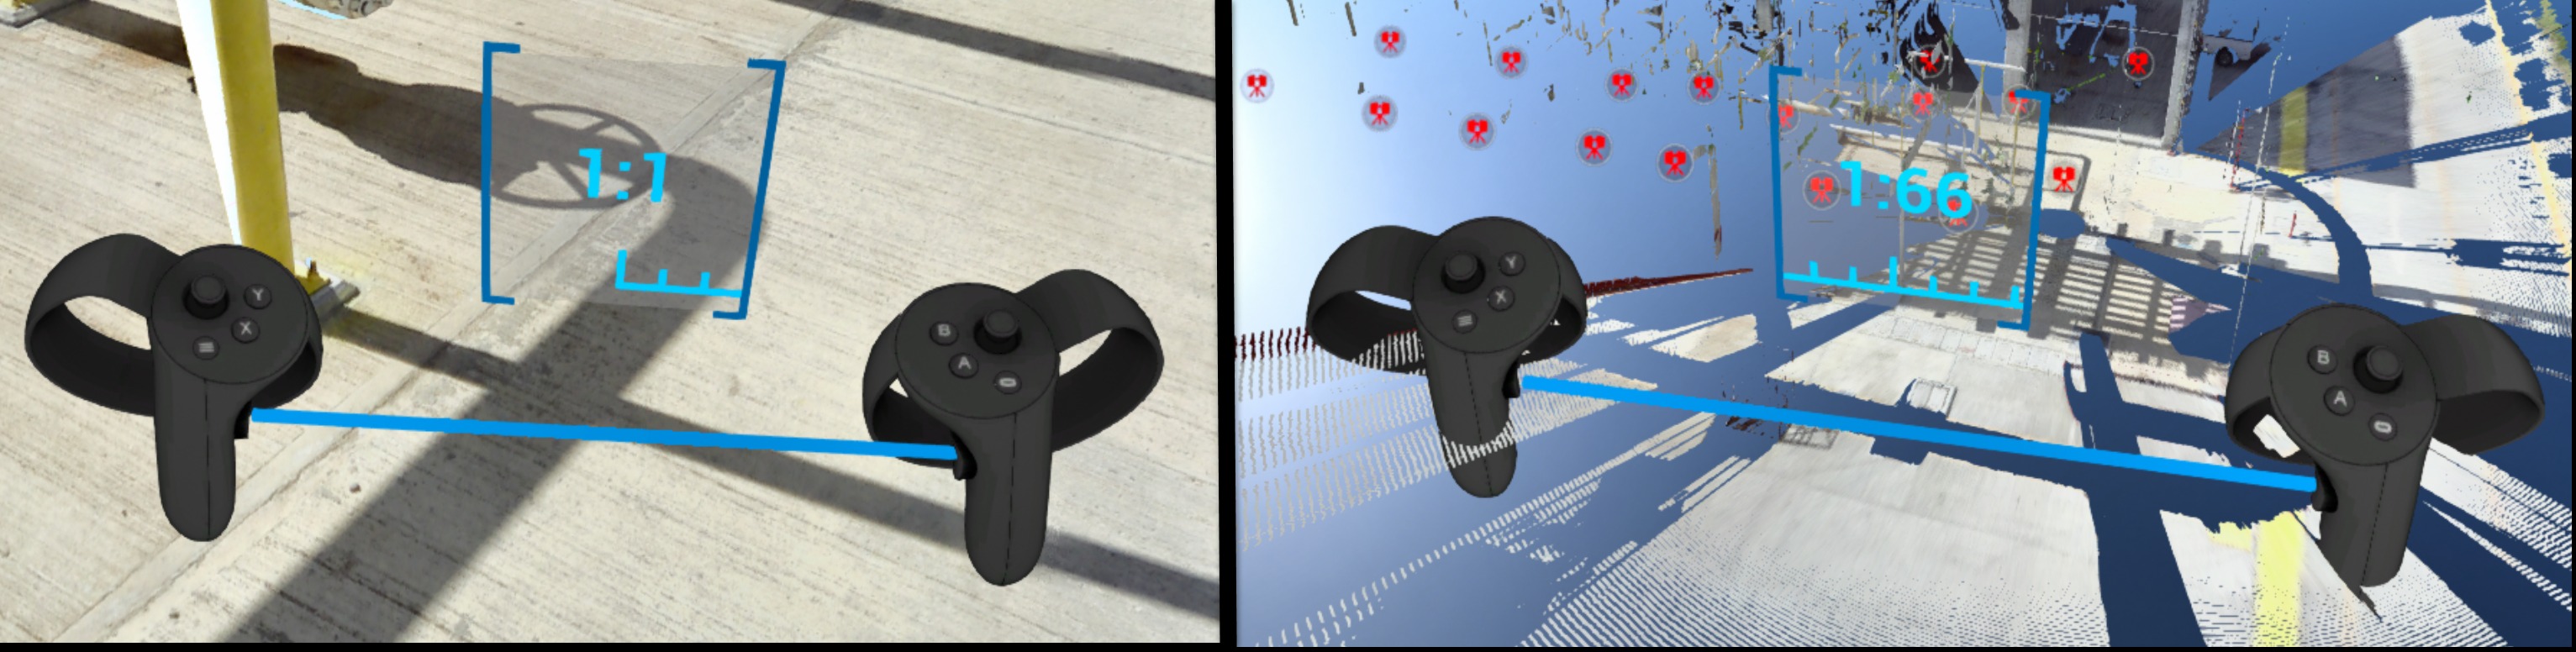
動的スケーリング
Continuously zoom scene between 1:1 and 1:250 scale - useful for navigating between site-wide overview and detail inspection without leaving your position.
| Platform | Controls |
|---|---|
 VR VR | Hold both controller grips simultaneously. Spread hands apart to zoom in (toward 1:1). Bring hands together to zoom out (toward 1:250). A scale indicator appears between controllers showing current ratio. |
 Web Web | Scroll mouse wheel, or use 3D navigation Dynamic Scaling control. |
Find more details in Control tips menu in Desktop mode or in the dedicated section Dynamic Scaling.
Navigation Aids
Settings and modes that assist navigation, reduce motion discomfort, or control how the scene environment is displayed.
Tunnel Vision
Reduces motion sickness by narrowing peripheral field of view during locomotion (e.g. while teleporting).
| Platform | Controls |
|---|---|
 VR VR | Enable from Options menu (top panel in Desktop mode before entering VR) or from VR Tools Menu once in headset. |
Vision (Gaze) Control
Navigate using head gaze alone - no active controller input required. Useful when you want hands-free movement.
Note: display is limited to single scan when using gaze-based navigation.
| Platform | Controls |
|---|---|
 VR VR | Let your arms hang at your sides - controllers disappear from view. Orient your gaze toward a scan icon. Once icon highlights, press Navigation controller trigger to go there. |
Yellow / Magenta Gaze-Based Navigation
Special modes to control teleportation.
| Platform | Controls |
|---|---|
 VR VR | Teleport helpers |
Display Modes
Switch how point cloud data is rendered. Available modes vary by platform.
- RGB - colorful image taken from scanner data
- X-ray - transparent mode for comparison of multiple scans
- Surface - mesh generated from scan data
- Heightmap - scene colored according to object heights (VR and Igloo only)
| Platform | Available modes |
|---|---|
 VR VR | All modes except Intensity and 2D panoramic. Switch from VR Tools Menu or press Y on Tools controller to cycle. |
 Desktop Desktop | All modes except heightmap, intensity, and 2D panoramic. Available in Display Modes panel at top of screen. |
 Igloo Igloo | All modes except Intensity and 2D panoramic |
 Web Web | All display modes |

Heightmap (VR)
Displays scene colored according to object heights. Clicking Heightmap button changes display mode and shows a color legend. Move window by grabbing title of legend with Navigation controller trigger.
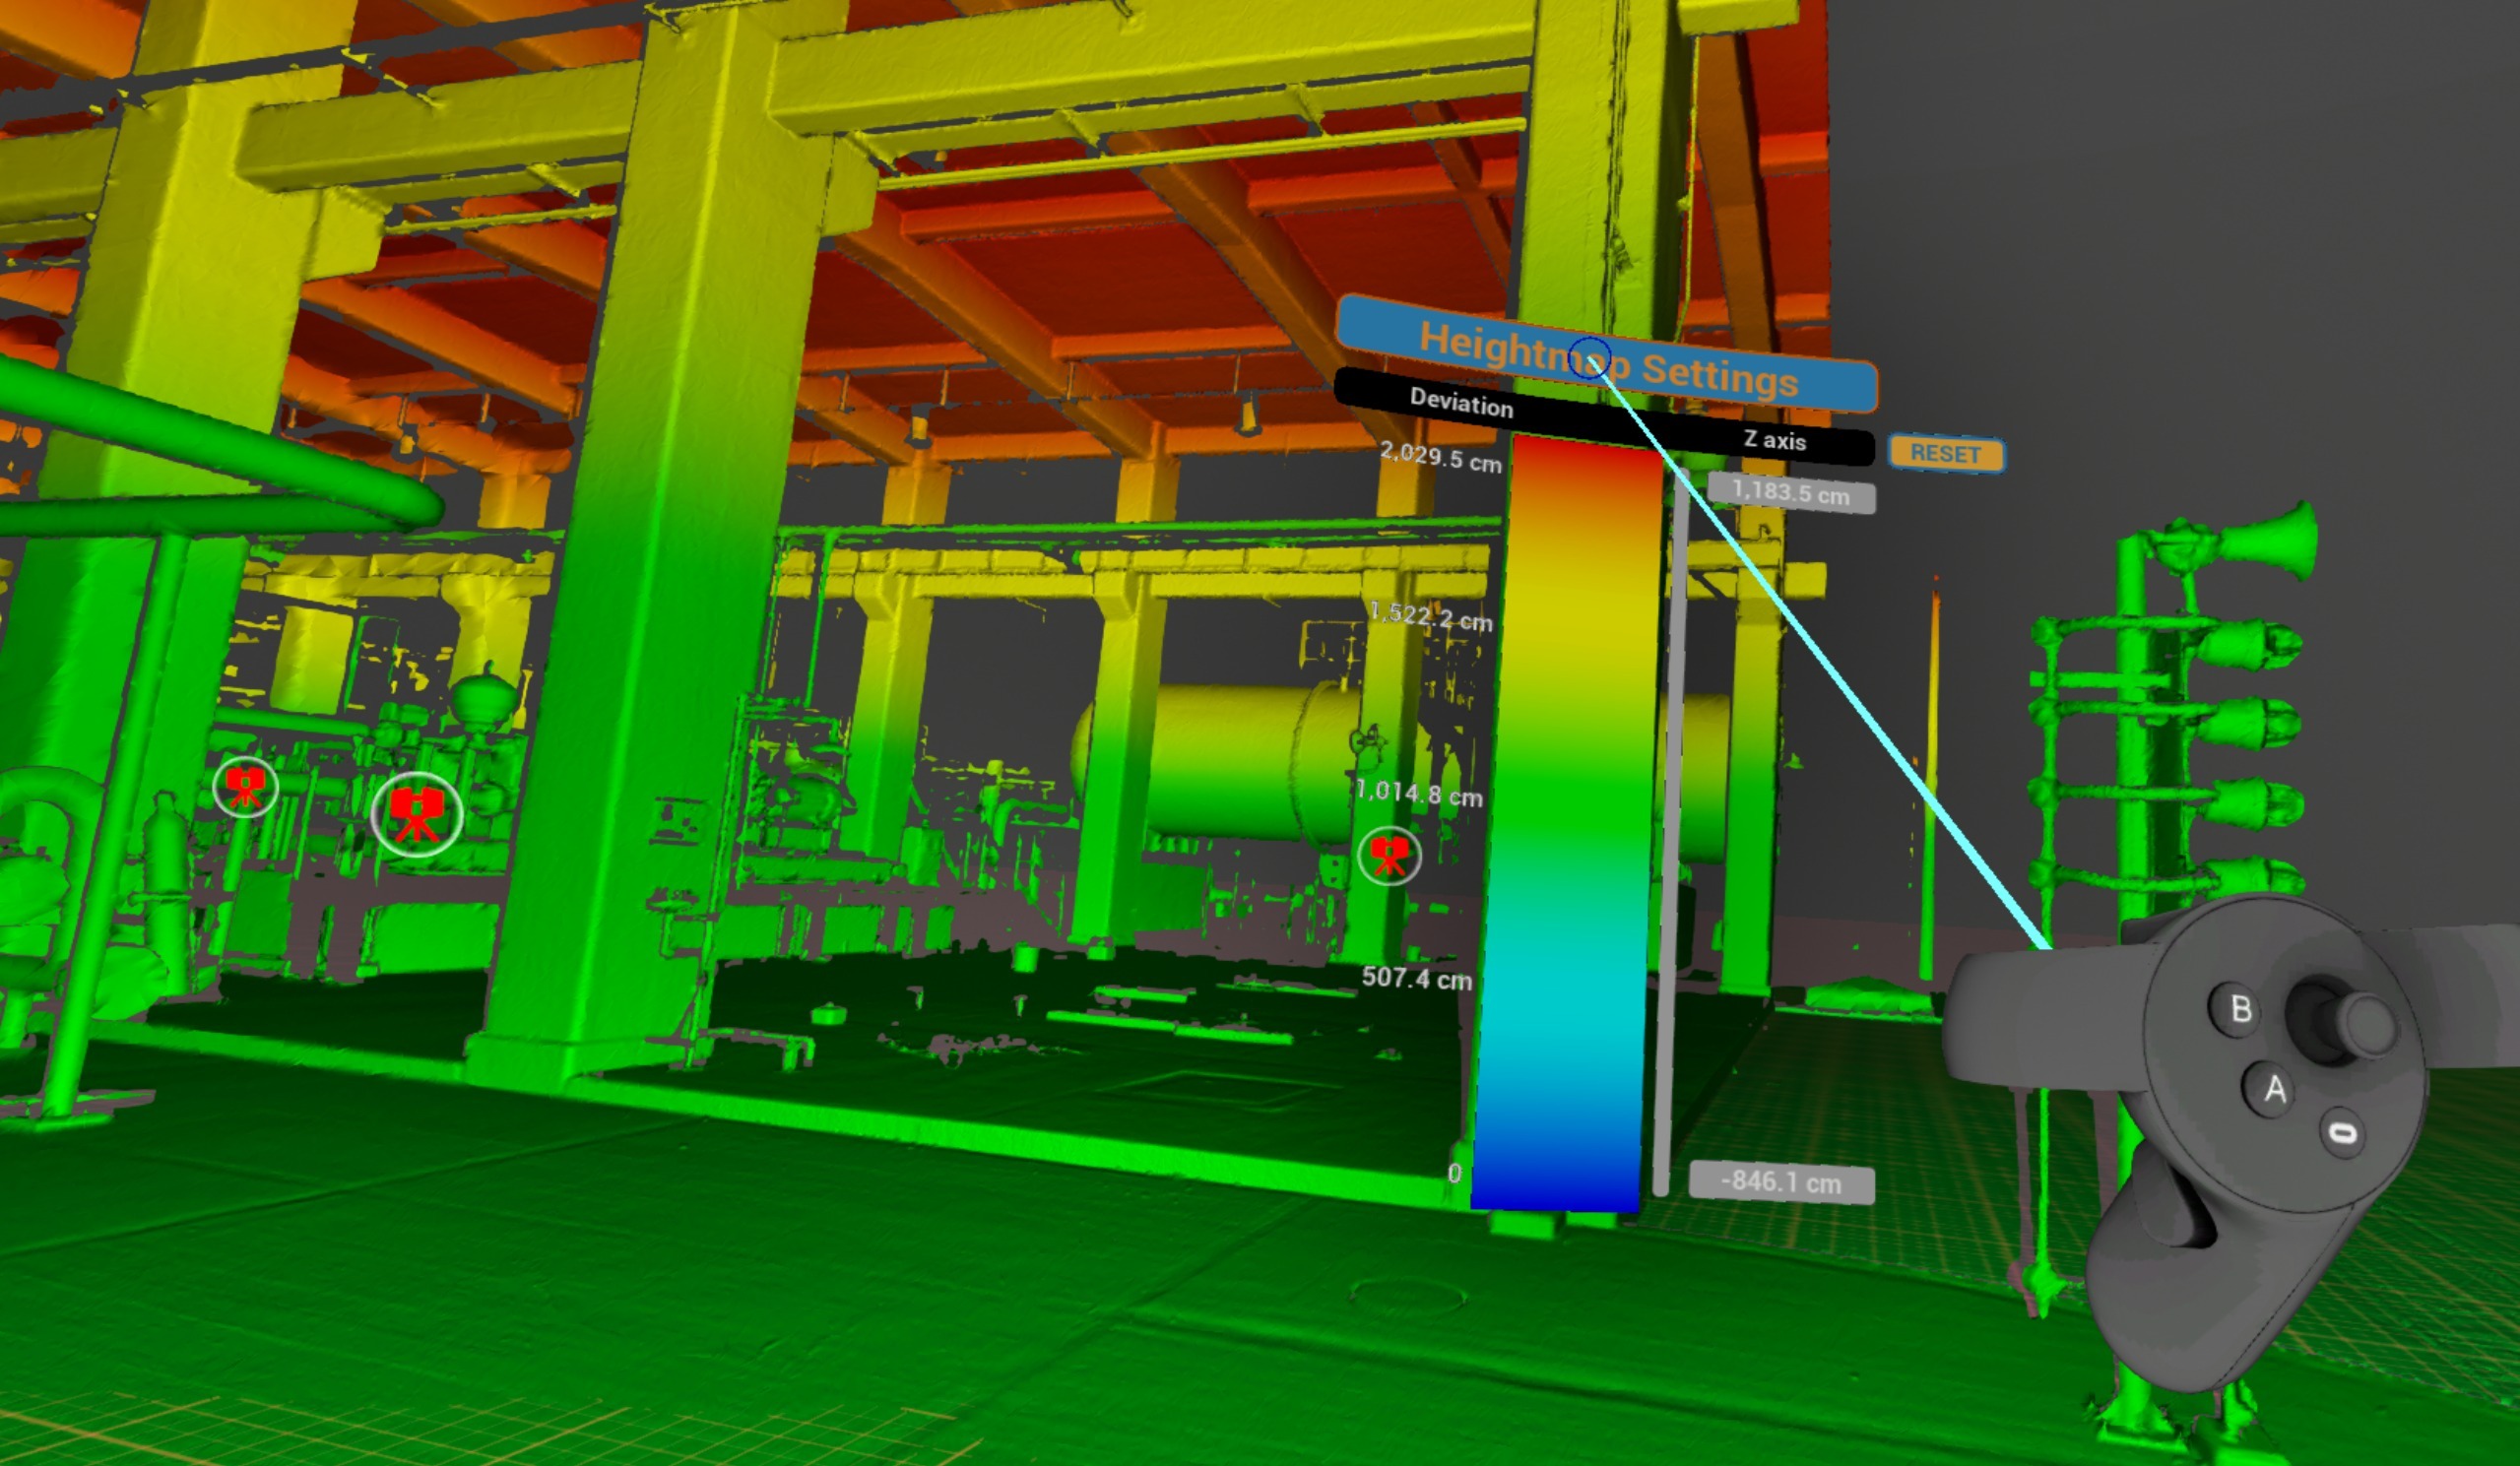
To adjust height limits point at a number and pull or push Navigation controller thumbstick.

Slide grey bar up and down to offset range set.
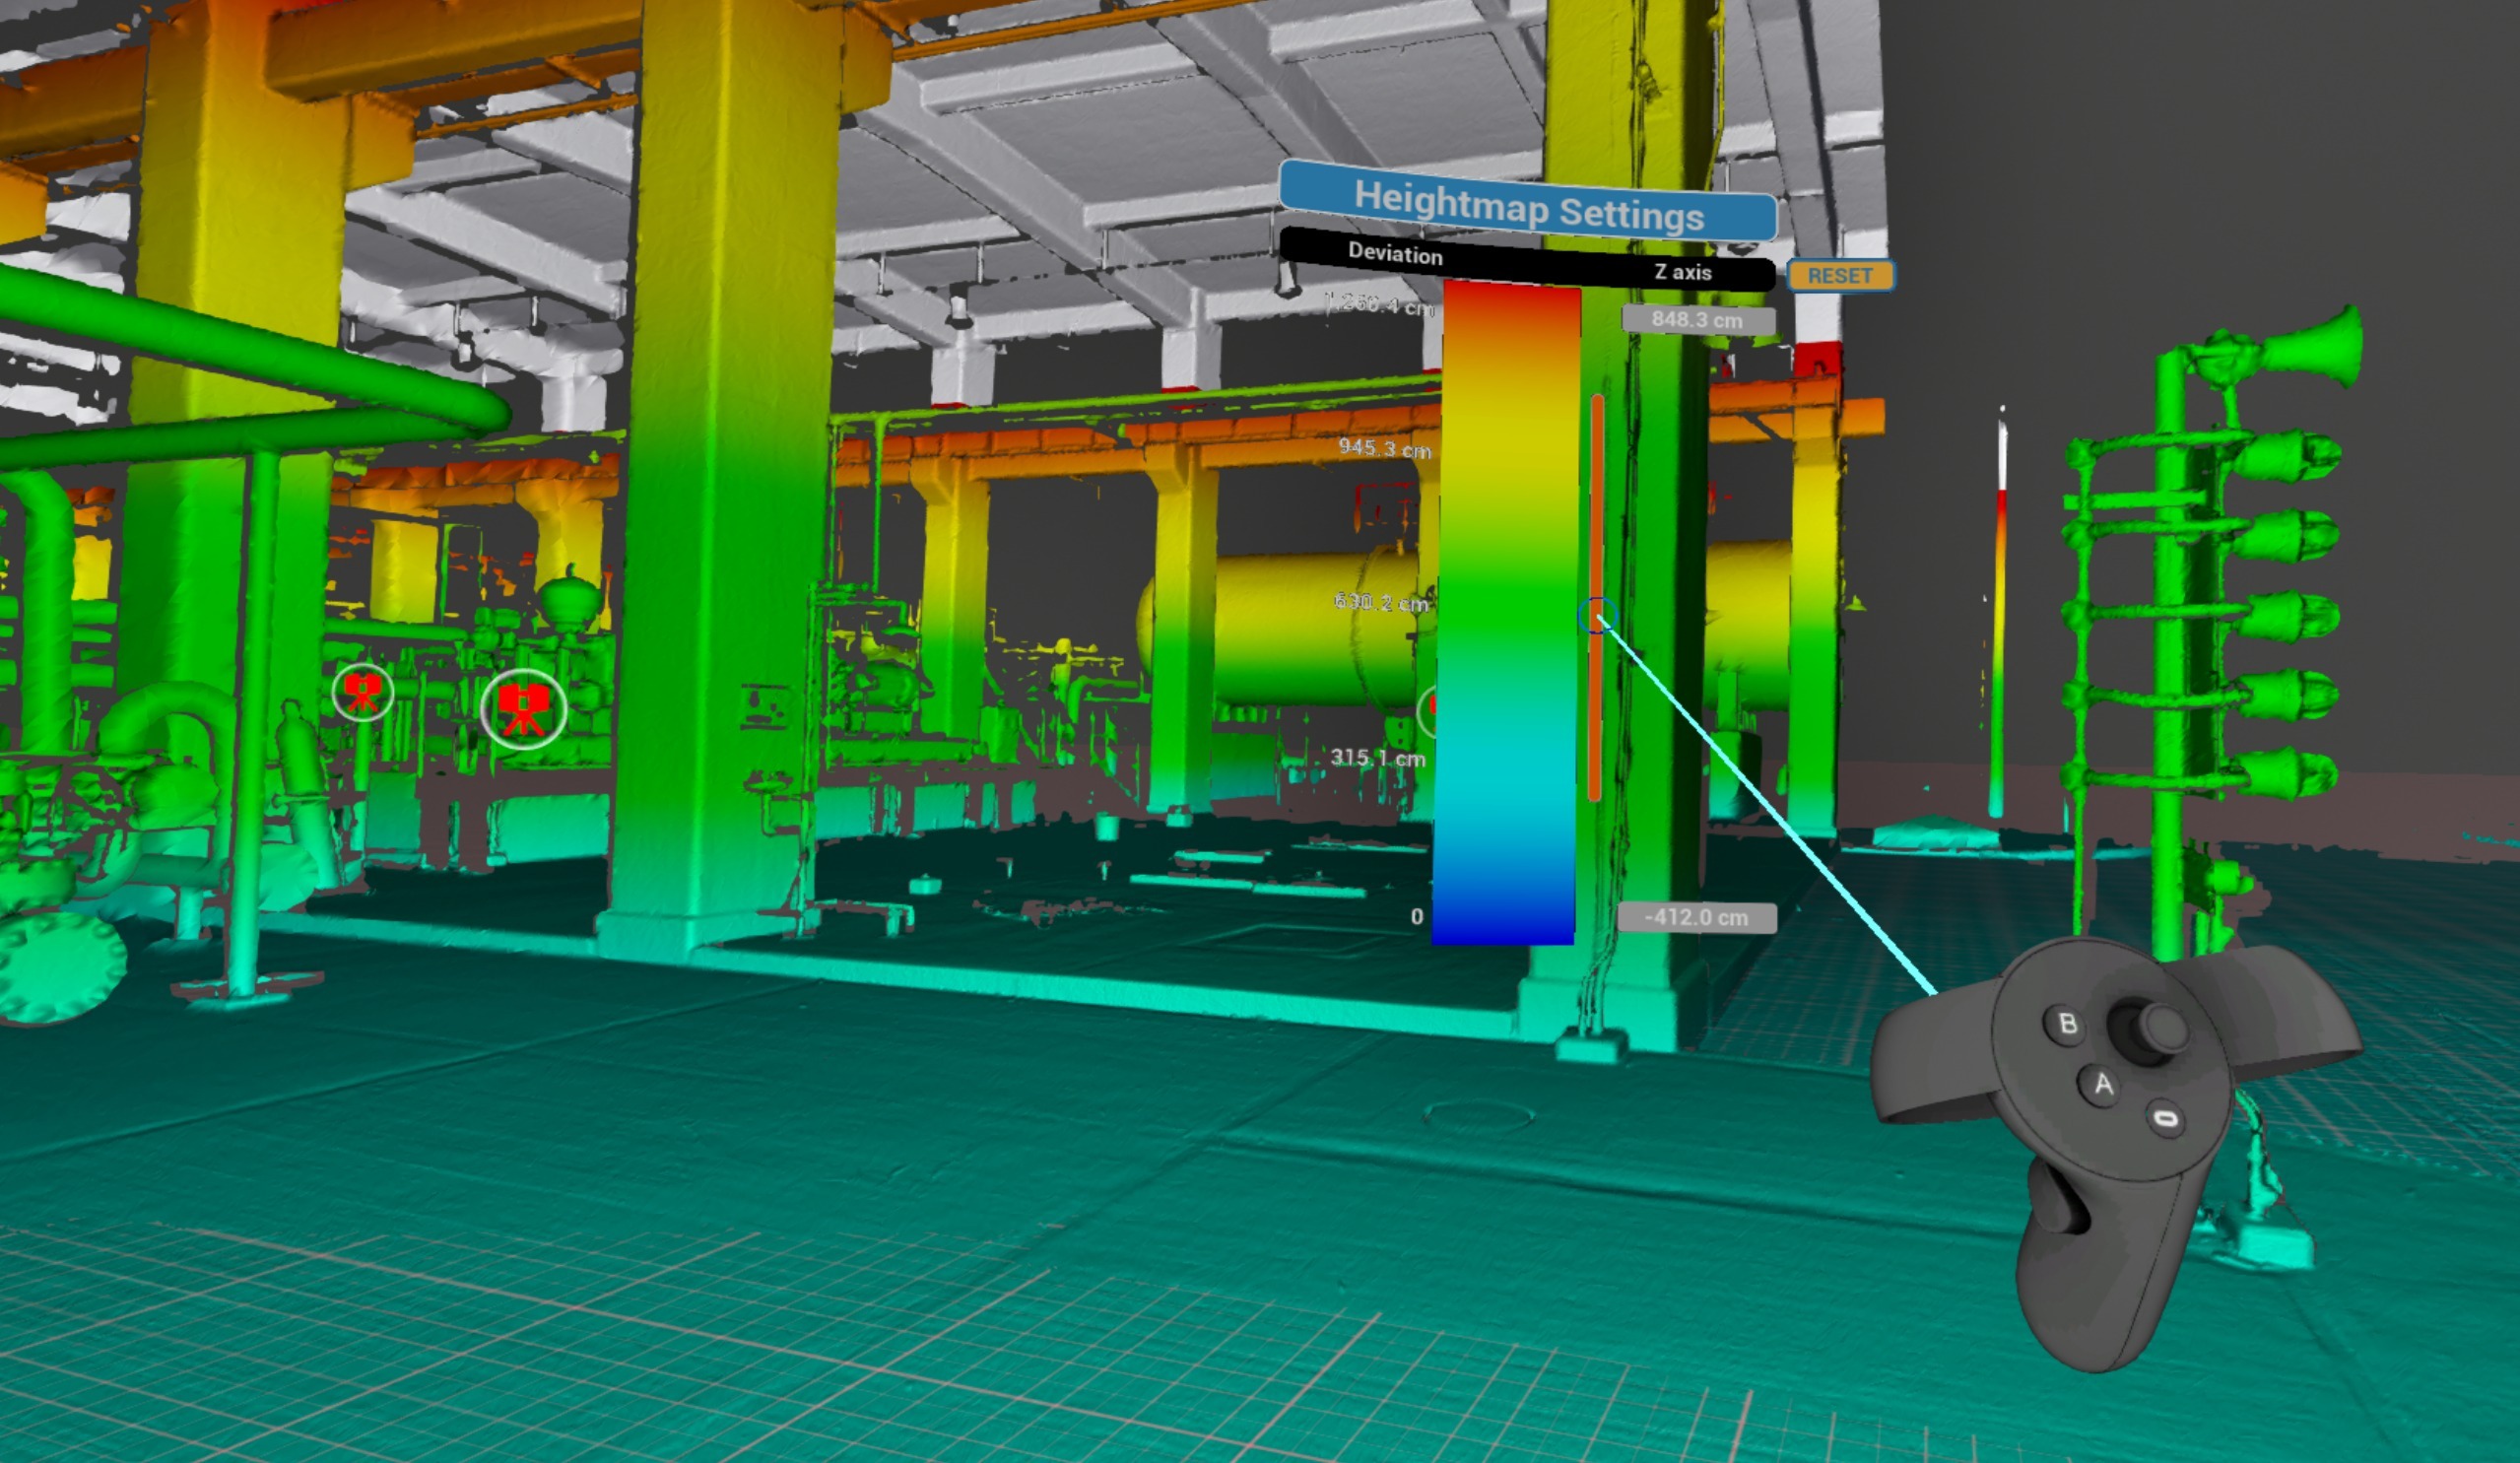
Click Reset to return to default settings.
Indoor / Outdoor
Replace sky background with a black one for indoor scenes. Can be used alongside other display modes (RGB, X-ray, Surface).
| Platform | Controls |
|---|---|
 VR VR | Switch from VR Tools Menu |
 Desktop Desktop | Available in Display Modes panel at top of screen |
 Web Web | Background color/image control |
Virtual Floor Grid
Display a reference grid on floor plane to aid spatial orientation.
| Platform | Controls |
|---|---|
 VR VR | Available |
 Igloo Igloo | Available |
Performance Options
Settings that affect rendering quality and visual output of point cloud data and 3D geometry.
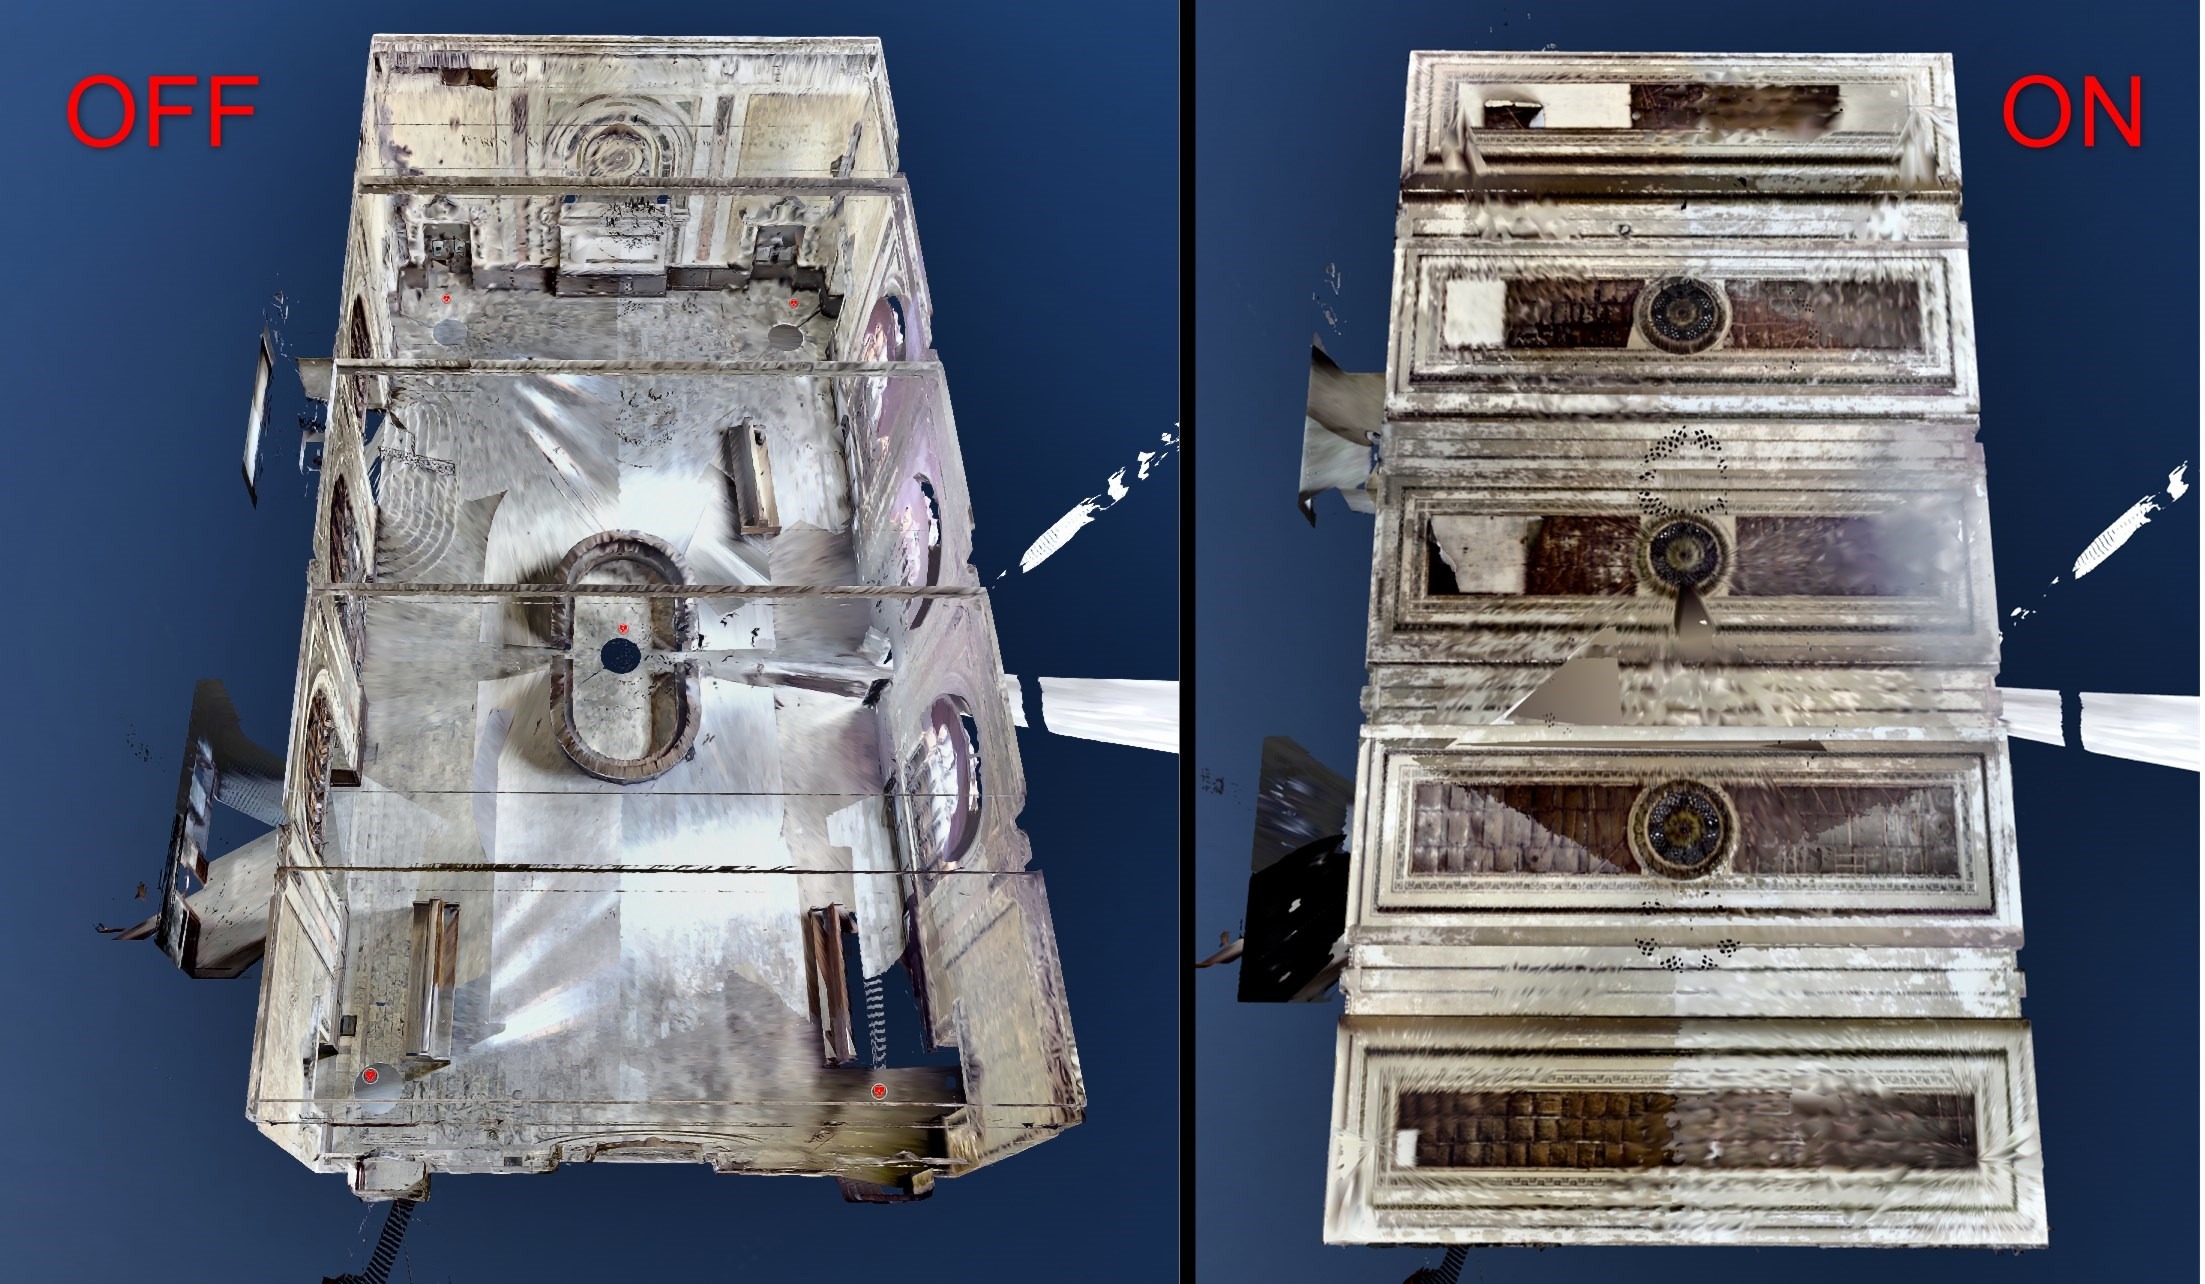
Backfaces
Show or hide back-facing surfaces of 3D mesh - useful for seeing inside buildings from outside and cleaning up the scene from unnecessary mesh pieces. Can be used alongside other display modes (RGB, X-ray, Surface).
| Platform | Controls |
|---|---|
 VR VR | Switch from VR Tools Menu. |
 Desktop Desktop | Available in Display Modes panel at top of screen. |
 Igloo Igloo | Available |
 Web Web | Available |
Visual / Scan Quality
Adjust rendering quality level for point cloud scans and 3D visuals.
| Platform | Controls |
|---|---|
 VR VR | Available |
 Desktop Desktop | Available |
 Igloo Igloo | Available |
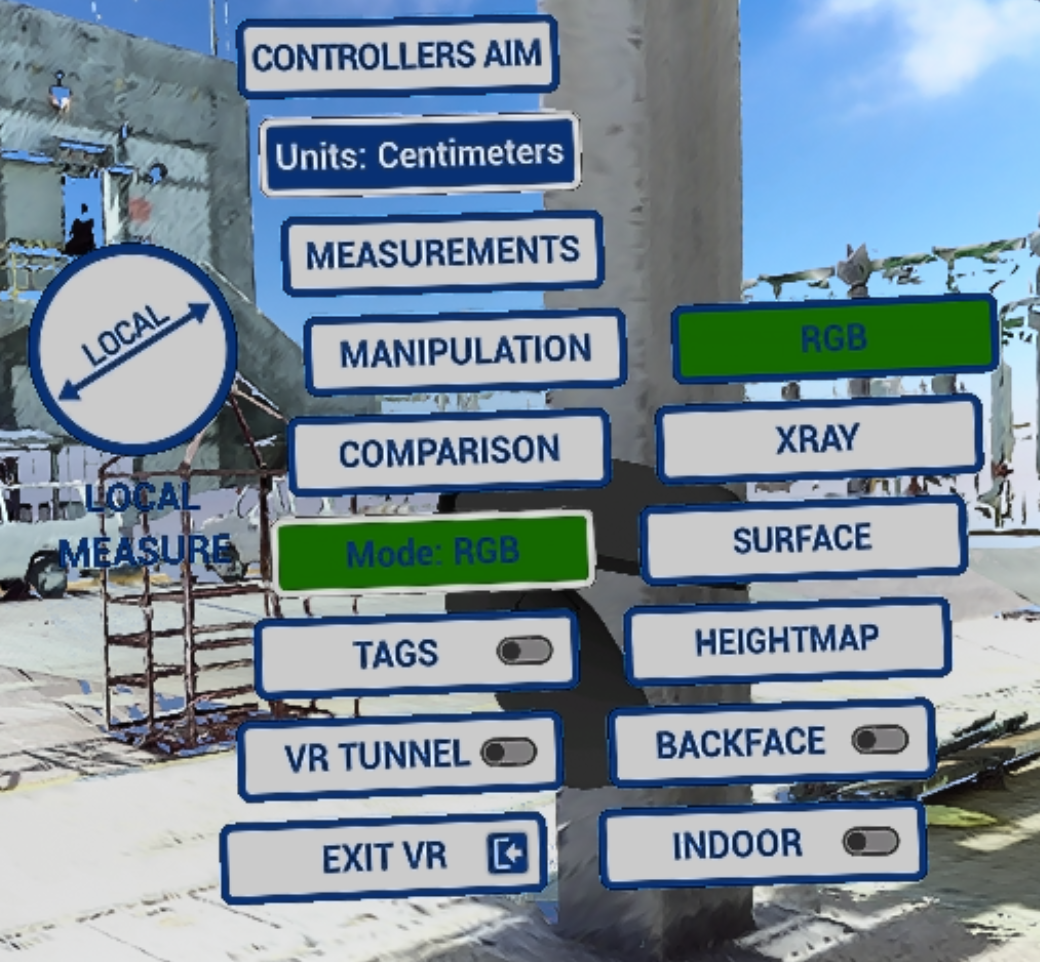
VRツールメニュー
このメニューは、モードの有効化/無効化と機能へのアクセスを行うためのメインコントロールです。
VR Tools メニューを開くには、Tools controllerのサムスティックをクリックします。 
- Controllers Aim を設定します(詳細: Controller Aim)
- 測定とハイトマップで使用される単位を変更します。
- 異なる測定を取得します(VRアクションの測定)
- CADモデル操作を行います(まだ有効化されていません!)。
- 比較ツールを使用します(VRアクション比較)。 ビジュアルチェックのみ利用可能です。
- 表示 モードを切り替え、ハイトマップ、バックフェース、および屋内を含みます。
Note: switch between display modes by clicking Y button on Tools controller. Cycle Display Modes
- タグをアクティブ化してレビューを行う(VRアクションタグ)
- VR トンネル - よりスムーズな スキャン間のナビゲーションとテレポーテーションを実現します。 詳細はオプションに記載されています。
- Exit VR mode – exit to Desktop mode
この記事は役に立ちましたか?
それは素晴らしい!
フィードバックありがとうございます
お役に立てず申し訳ございません!
フィードバックありがとうございます
フィードバックを送信しました
記事の改善におけるご協力ありがとうございます。