This article provides an overview of upload process for Terrestrial Laser Scans (TLS) to a Cintoo project, including file formats, best practices for data preparation.
Permissions: users with roles including Upload or Delete Reality Data permission can import terrestrial laser scans with Cintoo Connect.
TABLE OF CONTENTS
- Overview of Static Scans
- Supported Structured Scan File Formats
- Preparing Cintoo Project for Uploading Scans
- Uploading Structured Scans with Cintoo Connect
Overview of Static Scans
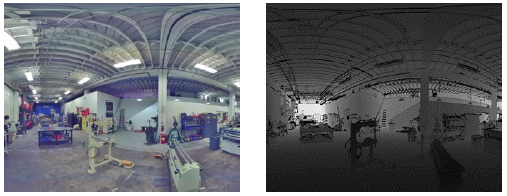
Terrestrial scans, also called static scans, are generated from a device mounted on a tripod.

Each individual scan comes with its depth map, associating X, Y, Z data to each pixel of the panoramic image grid.
Structured scans need to be registered (i.e., aligned in the same coordinate systems) using registration software such as: Faro SCENE, Trimble RealWorks, Leica Cyclone, Leica Register 360, Topcon ScanMaster, Autodesk ReCap Pro etc. Once registered, structured data contains each scan location, each panoramic image & depth map, and 3D point cloud.
With structured scans, each scan location is visible in 3D space. It is possible to be in each scan position, see the panoramic image and navigate from scan to scan.
Supported Structured Scan File Formats
- (Structured) RCP: native format for Autodesk ReCap projects
- (Structured) FLS or LSPROJ: native format for Faro SCENE projects
- (Structured) E57: standard exchange format for terrestrial laser scanning
- Most point cloud software provide an option to export a structured E57 file
- See Import Structured Scans section for more information on how to generate a structured E57 from various registration software
Preparing Cintoo Project for Uploading Scans
1. Before uploading scans, from the drop-down Add menu on the top create a Work Zone to host the scans.

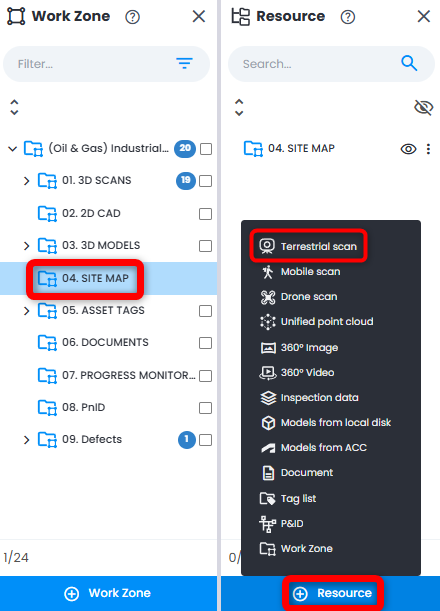
2. Select a work zone where scans need to be uploaded and click Terrestrial scan from Add drop-down menu or click on Terrestrial laser scans from Data tab main view.

Or use Add button at the very bottom of Resource Explorer which is equivalent to Add menu at the top right of the screen and choose Terrestrial scan into the work zone selected in Work Zone Explorer.
3. Cintoo Connect launches.

Uploading Structured Scans with Cintoo Connect
1. Select Terrestrial Laser Scans tab in Cintoo Connect.
2. Select RCP (Autodesk ReCap), FLS (Faro), LSPROJ (Faro Scene project) or E57 file. Please note that the data must be a structured project (i.e., it must include the location of each scan, the panoramic images, depth maps and the point cloud.)
- Please reference this video to understand the difference between a structured scan project and a unified or unstructured scan project.
3. Once the input file has been selected, all scans setups included in the file will display in the list.
Note: if there are any embedded 360 images (spherical as well) with scan data they will be imported along with scan data.

- If some scans have lost structure Resolution column shows lost structure instead of dimensions.

This occurs most often when an RCP Support folder does not include the associated RCC files for each scan. Cintoo Connect can still read and upload the scans.
- If selected scan file is a unified point cloud, this warning message appears.

In this case, please refer to the team in charge of the laser scanning to request the source structured file in RCP or E57 format. For more details, see Scan File Contains No Static Scan.
If the structure needs to be restored, try Import Unified Point Cloud option.
4. Right-click any scan in the list and click Scan details to view more information about the scan.

A pop-up window will then appear listing information for the selected scan.
- If some scans have a resolution lower than 1,000 pixels in one axis, they will be automatically unselected. This usually corresponds to survey points, which do not need to be uploaded. To include them, click the check box in the Cintoo Connect scan list.
- Structured scans that have lost their structure and that have less than 250,000 points are also automatically unselected.
- On average, allow around 1 to 2 min for the processing of one scan of 10 million pixels, 5 min for 40 million pixels, and about 25 min for 160 million pixels (times may vary depending on PC parameters).
5. Adjust Data to process in parallel setting to process more than 2 scans (default setting) in parallel if PC is multi-core.

On average, at least 400 MB of RAM per 10 million pixels are needed to process. For example:
- 8 GB of RAM will allow to process 5 scans of 40 million each in parallel
- 64 GB of RAM will be needed to process 5 scans of 160 million pixels each in parallel
6. Change Scale factor only there is a direct requirement from surveyor.
Scale factor expresses the difference between the local coordinate system that is needed for scans and models, and the geographical coordinate system (such as State Plane Coordinate System) used during capture process.
7. Enable or disable Use filename as prefix for scan names to create a clear naming convention.
8. Enable or disable Do not import deleted points from RCP.
Please see Import RCP with deleted points.
9. Enable or disable Blur - Faces:
- This option is enabled by default, choose option None to not apply any blurring.
- This option automatically blurs faces captured in any panoramic images included in the scans being uploaded to Cintoo.
- Blurring cannot be undone in Cintoo after scans have been uploaded.
- Any files uploaded without Blur Faces option enabled must be deleted from Cintoo project and re-uploaded with the option checked to apply automatic face blurring.
10. Enable or disable Blur - Human bodies and car plates:
- This option is disabled by default, option Faces is chosen.
- Enable this option to automatically blur human bodies including faces and car plates captured on any panoramic images included in the scans being uploaded to Cintoo.
- Blurring cannot be undone in Cintoo after scans have been uploaded.
- Any files uploaded without Blur Human bodies and car plates option enabled must be deleted from Cintoo project and re-uploaded with the option checked to apply automatic blurring.
Warning: use carefully only if it is imperative, as scan import time might be doubled with the option enabled.
11. Click Import to begin the upload process.
Once a first scan has been uploaded, the data is visible in Cintoo by going in Data tab, Overview Map, or 3D View. Refresh the browser to see scans that have finished uploading.
Was this article helpful?
That’s Great!
Thank you for your feedback
Sorry! We couldn't be helpful
Thank you for your feedback
Feedback sent
We appreciate your effort and will try to fix the article